DESCRIPTION:
Searching the industry looking for low cost and effective mining laboratory equipment, we are continually testing new items. Today, the necessary equipment can be purchased for a fraction of the cost of past mining laboratories. Where low cost equipment could not be found, we have manufactured the equipment ourselves.
If you are going into mining or if you are in mining, consider putting in your own lab. A small backyard facility can prevent the loss of a great deal of time and money. We always answer questions on the phone, and will help with setting up your lab. We believe that a miner without a lab is like a hospital without a MRI machine. Neither can really tell what is happening without the proper tools.
WARNING: Assay lead fumes are poisonous. Assay Furnaces must not be used indoors – unless under a ventilated metal hood.
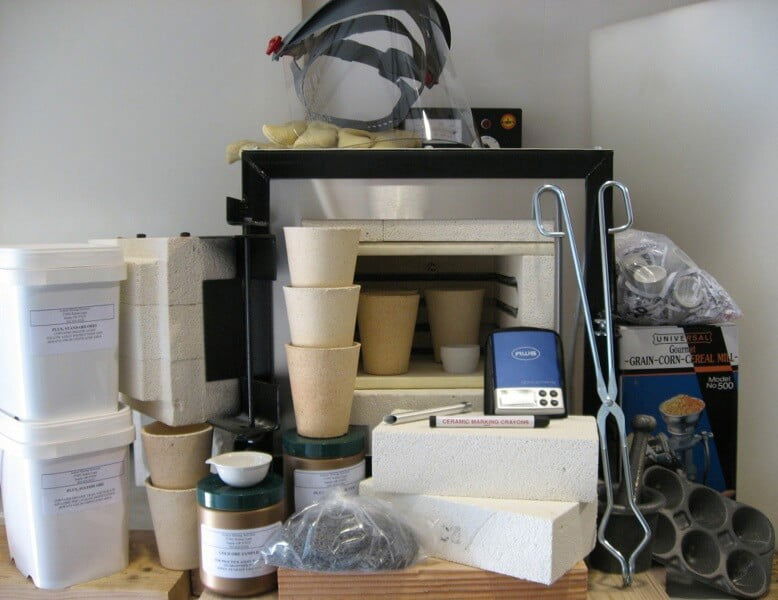
KIT SUPPLIES
- 1 lb. Cupelling Lead Wool
- 1 lb. Gold ore
- 2 Fire Bricks
- 10 lbs. Standard Ore Assay Flux
- 10 lbs. Sulfide Ore Assay Flux
- 6 lbs. Gold/Silver Bullion Flux
- 8 Crucibles 30 grams
- 20 Cupels 1.5” MgO
- 1 Ceramic Crayon
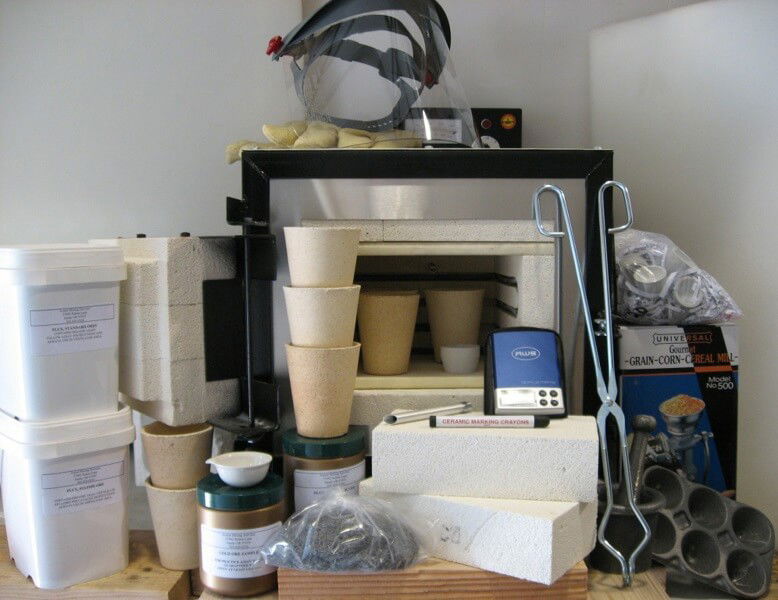
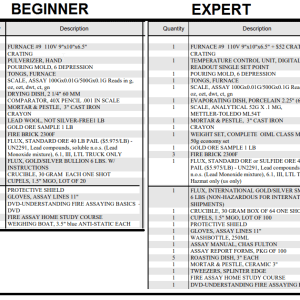
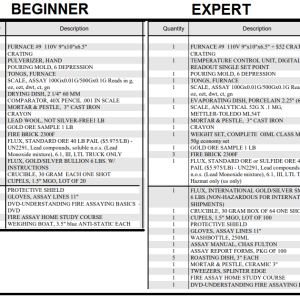
ADVANCED EXPERT FIRE ASSAY KIT
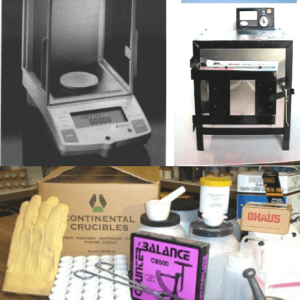
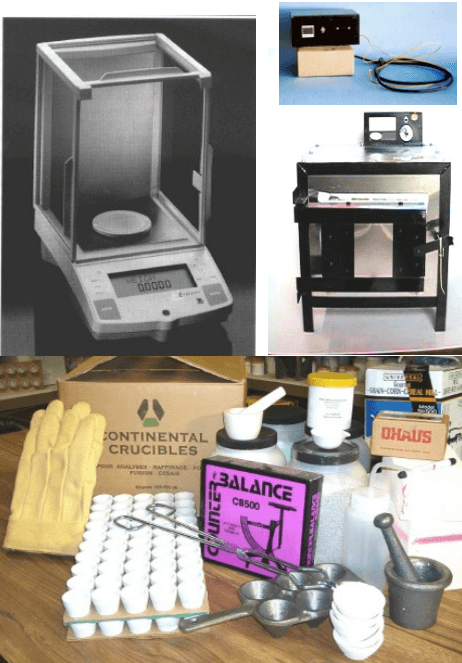
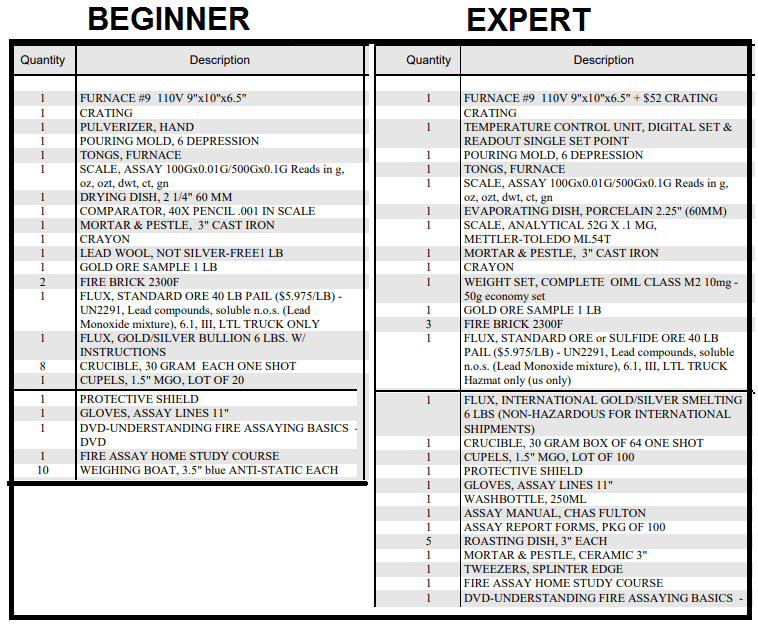
The Expert Fire Assay Kit offers additional equipment and supplies to the Beginners Fire Assay Kit (shown in photo), including the Automatic Temperature Control for the Furnace. The Analytical Balance is an easy-to-read digital unit. An excellent laboratory setup for any operation striving towards professional results.
Flux restrictions – Ask which ones we can ship to your location.
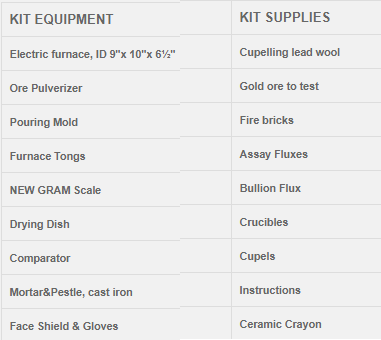
FIRE ASSAYING KIT EQUIPMENT - Assay furnace 9”x10”x6.5”
- Auto Temp. Control
- Analytical Balance
- Complete Set of Weights
- 250 ml Wash Bottle
- Evaporating Dish
- Assay Manual
- Pouring Mold Tweezers
- Furnace Tongs
- Assay Gram Scale – NEW (not shown)
- Mortar & Pestle, 3” cast iron;
- Mortar & Pestle, 3” ceramic
- Face Shield
- Assay Gloves, cuff length
| FIRE ASSAYING KIT SUPPLIES- 64 Crucibles, 30 gm
- 5 Roasting Dishes
- 100 Cupels, 1.5”
- 6 lbs. Gold/Silver Flux
- 1 lb. Gold Ore
- 3 Fire Bricks
- 100 Assay Report
- Ceramic Crayon
- 40 lbs. Standard Ore Flux
- 10 lbs. Sulfide Ore Flux
- Video & Fire Assay
- Home Study Course
|  |
Side by Side Comparison
INTERNATIONAL (UNLEADED) ASSAY FLUX
Due to restrictions in shipping flux containing litharge (lead compound), we have developed an International Assay Flux, which ships in a 25 lbs pail. The formula is:
33 parts dense soda ash
22 parts borax anhydrous
4 parts silica
- Assay Flour (included with the Assay Kit in a separate container) is to be added and pre-mixed into the flux when smelting with litharge (lead oxide) for oxide or chloride ores. DO NOT ADD THE ASSAY FLOUR FOR SULFIDE ORES.
- ADD COLLECTOR TO THE INTERNATIONAL (UNLEADED) ASSAY FLUX: You will need to obtain and add litharge, powdered lead, or some type of lead collector (or silver) to your flux before using it in your assays or smelting. Use equal amounts (by weight) of the flux to your litharge. In other words, 45 grams of flux to 45 grams of litharge, by weight. If you are using some other type of lead, use 60 grams of flux and 30 grams of lead. If using lead weights, be sure to get the purest lead weights that you can get. Silver can also be used as a collector in the assay/smelt formula above. It can then be dissolved with a 25% solution of nitric acid and distilled water. The silver should be checked for any gold content before using it as a collector, so that you can adjust your figures accordingly.
PREPARATION OF ASSAY FLUX FOR STANDARD ORES
STEP 1. If you have litharge, add 25 lbs to the pail of flux. This would be the simplest way to mix and use your flux.
STEP 2. If you are making your flux for standard oxide ores, add the full container of Assay Flour to the 25 lbs pail of flux. If you are not making the full pail into a standard oxide assay flux, then use a ratio of Assay Flour to the amount of flux.
STEP 3. You can now follow the standard steps for assaying or smelting.
PREPARATION OF ASSAY FLUX FOR SULFIDE ORES
STEP 1. If you have litharge, add 25 lbs to the pail of flux. This would be the simplest way to use your flux.
STEP 2. You can now follow the standard steps for assaying sulfide ores.
PREPARATION OF ASSAY FLUX IF YOU ARE USING LEAD WEIGHTS, POWDERED LEAD, SHOT, OR SHAVINGS
STEP 1. Weigh out the Unleaded flux you are going to use for assaying or smelting. (For an assay, you are going to use a total of 90 grams of LEADED assay flux – so weigh out 60 grams of flux and weigh out 30 grams of lead. Add this 90 grams of LEADED assay flux to your crucible.
STEP 2. You can now follow the standard steps for assaying or smelting ores.
STANDARD ORE FLUX (OXIDE ORES)
- If assaying an ore sample, be sure that your ore is a representative sample of your ore vein. Take chips and rocks from the entire surface of the vein and drill the vein if possible.
- Pulverize the ore into a powder (80 mesh or finer) and stir the powdered ore thoroughly.
- Measure out 29.16 grams of ore (this is an Assay Ton) or material to be smelted.
- Mix 90 grams (or 3 ounces) of the Standard Ore Flux formula with the material and place into a crucible. (If smelting larger amounts of material, be sure to use a 3 to 1 ratio.)
- Fire crucible at 2000°F for 45 minutes to 154 hours (The crucible must remain in the furnace for at least 45 minutes after the furnace reaches 2000°F and the sample is molten and quits smoking). There is no exact time – each ore is different.
- Using tongs remove the crucible from the furnace and pour its entire contents into a pouring mold.
- When the slag in the pouring mold has cooled, there will be a lead button at the bottom of the slag. Break this loose from the slag.
- Pound the lead button with a hammer until the slag is broken off. Most assayers pound the lead button into a cube. A small amount of slag will adhere to the lead as powder. This will give no trouble.
- Place the lead on a cupel and place the cupel into the furnace at 1700°F until the lead has all been absorbed into the cupel or volatilized into the air, leaving the precious metals as a small bead in the cupel.
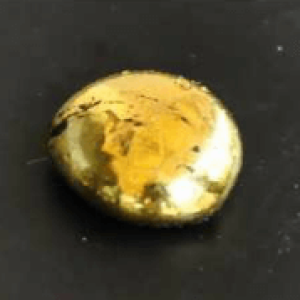
- Weigh the bead, or measure its size.
Note: If you used 29.16 grams of ore material, then for each milligram your bead weighs, there is 1 ounce of precious metals in your ore. But remember at this point the bead is gold, silver and maybe platinum so you must go on to standard separation methods before you will know the exact gold, silver and platinum content.
Safety Warning: Assay fumes are poisonous. An assay furnace must not be used indoors unless under a ventilated hood.
Note: Wear gloves and goggles when doing assays and smelting.
Goggles or face shield must be worn at all times. Hot slag can splatter !
Basic Fire Assay Instructions
- Be sure that your ore is a representative sample of your ore vein. Take chips and rocks from the entire surface of the vein and drill the vein if possible.
- Pulverize the ore into a powder (80 mesh or finer) and stir the powdered ore thoroughly.
- Measure out 29.16 grams of ore (this is an Assay Ton).
- Mix 90 grams (3 ounces) of the proper assay formula with the ore and place into a 30 gram crucible. (See page 13 for instructions concerning the proper assay formula and page 14 for a picture of a crucible).
- Furnace crucible at 1850°-2000°F for 45 minutes to 1½ hours (The crucible must remain in the furnace for at least 45 minutes after the furnace reaches temperature – until it is done & quits smoking).
- Using tongs remove the crucible from the furnace and pour its entire contents into a pouring mold. (See page 12 for a picture of tongs and page 20 for a picture of a pouring mold).
- When the slag in the pouring mold has cooled, there will be a lead button at the bottom of the slag. Break this loose from the slag.
- Pound the lead button with a hammer until the slag is broken off. Most assayers pound the lead button into a cube. A small amount of slag will adhere to the lead as powder. This will give no trouble.
- Place the lead on a cupel (See page 14 for picture) and place the cupel into the furnace at 1750°F. until the lead has all been absorbed into the cupel or volatilized into the air, leaving the gold and silver as a small bead in the cupel.
- Weigh the bead, or measure its size. (See page 17 for picture of a balance; or if you measure the bead, (See page 16 for a picture of a comparator and a chart to determine the weight from the size of the bead.) NOTE: For each milligram your bead weighs, there is 1 ounce of gold and silver in your ore. But remember at this point the bead is gold and silver so you must go on to step 11 before you will know the exact gold (and silver) content.
- You must now determine how much gold and silver is in the bead. If there is any slight yellow coloring in the bead, it is at least 77% gold. Dark yellow indicates up to 99% gold. If the bead is silver color then it should be dropped into (25% nitric + 75% distilled water) warm nitric solution.
The Parting and Drying Dish is a necessary part of the assay. The gold bead from the cupel is placed in the dish along with nitric acid and water. Use distilled water only, 2 parts water to 1 part acid. Heat on a hot plate or over an alcohol flame. Heat long enough to permit fumes to rise from the acid. If the bead begins to bubble and react, allow the action to continue until there is more action. If the bead simply discolors after the first fumes, add enough water to cool the acid and stop any further action. Compare the color of the bead to the color chart below to determine gold content.
If the bead bubbled, when the bubbling stops, pour off the diluted acid carefully and add distilled water and pour off several times. Finally drain the water off and dry over heat. The black residue left is the gold (99% pure). It will turn gold color when annealed at 1000°F for 3 minutes. This gold is carefully removed from the parting dish and weighed. If the bead did not bubble and you wish amore accurate indication than the color chart, then the answer is to inquart with silver, Just add 4 times as much silver by weight as there is gold in the bead to the bead with about 10 times as much lead and re-cupel. The silver will alloy with gold and allow the nitric to dissolve the silver leaving the gold. Be sure to weigh the bead before adding the silver, then when you have weighed the gold you will know how much silver actually came out of the assay.
PGM ASSAYS
The Fire Assay Home Study Course only talks about gold and silver which comes with the kit. We are able to get a bead of gold and silver and part it, which is dissolving the silver into solution and weight the gold. we do get ores that have PGM present, and they will be mixed with your gold and silver. It normally changes the physical characteristics of the bead and will appear bumpy like a golf ball. It is very difficult to identify quantities when PGM are present. Most of the time that bead would need to be digested and each metal dropped separately. This is beyond the assay kit, chemical assay are now needed. We recommend send them out if you need to know the PGM quantities. 911Metallurgy recommends NolanGoddard@actlabs.com

