Table of Contents
The dry-sand, rubber-wheel (DSRW) abrasion test apparatus simulates low-stress, three-body abrasive wear. This type of wear occurs in the mining industry in linkages, pivot pins, and wire ropes, which suffer slow wear from the sliding and rolling action of abrasive fragments of rock and ore trapped between metal surfaces. Because this type of wear is slow, field trials alone would be too slow for evaluating new materials. The DSRW abrasion test is quick and gives a reasonable correlation with field tests. Even before the test became an ASTM standard (G65-81) in 1980, it had been used by a number of laboratories for many years. Since becoming an ASTM standard, it has become probably the most popular abrasive wear test in the United States.
The Society of Automotive Engineers (SAE) has developed but has not published a wet-sand abrasion test that is similar to the ASTM dry-sand test. Some machines have been built to run both tests. SAE’s wet-sand test has the advantage that the specimen does not heat as much as do the samples in a dry-sand test.
DSRW Equipment and Specimen
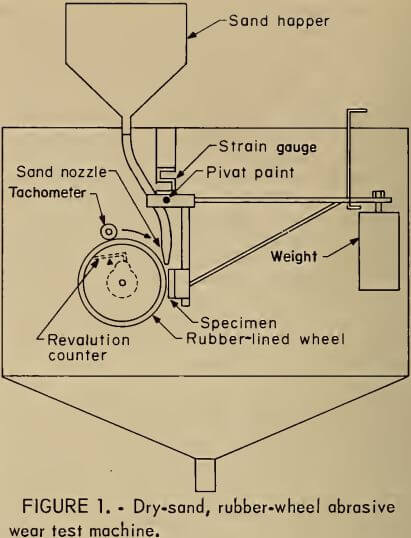
The basic ASTM machine consists of a rubber-rimmed steel wheel, 228.6 mm in diam by 12.7 mm wide, that turns at 200 rpm during a test; a sand hopper connected by a tube to a nozzle that allows a 250- to 350-g/min sand flow; a revolution counter that stops the drive motor after a set number of revolutions; and a weighted lever arm that holds the specimen and produces a horizontal force against the wheel where the sand is flowing. The sand is a 50- to 70-mesh silica test sand. The hardness of the rubber on the wheel must be durometer A-60±2.
The Bureau’s machine includes a strain gauge and a tachometer, as shown in figure 1, although they are not part of the ASTM standard. The strain gauge supports the lever arm assembly at its pivot point, which is on a vertical line through the specimen-wheel interface. This allows measurement of the frictional force on the specimen during the wear test. The tachometer and a variable-speed drive make it possible to maintain a constant surface velocity on the rubber wheel as the diameter of the wheel decreases through either wear or surface dressing.
A typical test specimen is a rectangle, 25 by 76 mm, that is 3 to 13 mm thick. The wear surface is ground flat with a surface finish of at least 0.8 µm. The density of the test material must be known, to calculate the volume lost. The relatively simple shape

of the test specimen is conducive to specimen preparation. Specimens of pure metals, steels, white cast irons, weld overlays, plastics, and ceramics have been made and tested.
DSRW Procedure
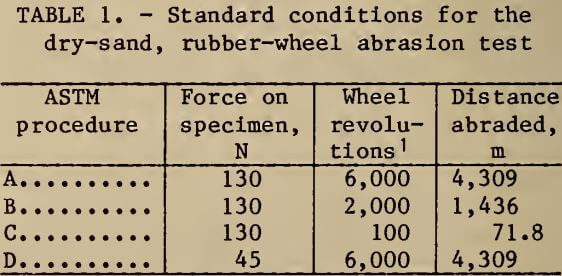
The equipment has two test parameters: the sliding distance (number of wheel revolutions) and the specimen load. The ASTM recognizes four procedures using these parameters, as shown in table 1.

A test consists of eight steps: (1) clean and weigh the specimen, (2) mount the specimen in the lever arm fixture and load the arm, (3) start the sand flow through the nozzle, (4) start the rubber-wheel drive motor, (5) release the lever arm so the specimen contacts the wheel and start the revolution counter, (6) stop the motor (automatic) and sand flow, (7) remove the specimen, and (8) clean and reweigh the specimen. From the weight loss and density of the material, the volume loss is calculated. The test is repeated one or more times. The coefficient of variation on a material must not exceed 7 pct to meet ASTM specifications.
DSRW Results and Discussion
Most of the Bureau’s testing has been with a 130-N load on the specimen and 2,000 revolutions of the rubber wheel (ASTM procedure B). Typical volume losses have ranged from 5 mm³ for sintered Al2O3 to 188 mm³ for pure iron, with losses for most steels ranging from 30 to 120 mm³. The reproducibility of the test is best for volume losses in the range of 20 to 100 mm³.
In tests in which less than 20 mm³ is lost, any small material inhomogeneities are exaggerated; therefore, a more severe test should be run by using either a greater sliding distance or more load. Above a 100-mm³ loss, the groove becomes so deep that it may contact the edge of the rubber wheel and cause erratic results. Therefore, a less severe procedure may be desired. Using another procedure has a disadvantage in that test results cannot be directly compared among different procedures.
The DSRW test should be used only for ranking of various materials, not for absolute values of wear. For example, a material that wears half as much as another in the test probably will not last twice as long in the field because the test tends to exaggerate differences. Field factors such as the hardness and particle size of the abrading material will affect the absolute values of wear more than they affect the ranking. Typical wear data are presented in table 2.
