Table of Contents
- Diamond Drills
- Diamonds
- Uses of the Diamond Drill
- Supervision
- Preparing a Prospect for Diamond Drilling
- Control of the Location of Drill Holes
- Contracting the Drilling
- Form of Contract
- Testing Drill Holes for Vertical Angle and Azimuth
- Wedging Drill Holes to keep them Nearly Vertical
- Cementation of Drill Holes
- New Standard Sizes of Fittings
- Sludge Collection
- Core and how to Handle it
- Sampling and Classification of Core
- Core Samples to be kept as Record
- Analysis of Core
- Final Drill-Hole Log
- Plans and Sections
- Drill-Hole Models
- Computation of Ore Reserves
- Cost Per Ton to Prove Tonnage
- Final Report
In approaching the subject of diamond-drilling practice, a brief history of the origin and development of the diamond drill may be of interest. The use of black diamonds for boring holes in rock was discovered in 1863 by Rudolph Leschot, a French engineer. In 1864, he employed a diamond bit to bore holes for blasting purposes in the construction of the Mont Cenis tunnel between France and Italy. The method was introduced and developed in the United States in the late sixties. The first deep hole was drilled for coal in 1870, near Pottsville, Penn., by M. C. Bullock. This hole was seven hundred and fifty feet deep. It can be inferred that the diamond drill was introduced into Canada in 1871, when a bore-hole, known as Harper’s bore-hole, was drilled for coal at Springhill, Cumberland county, Nova Scotia; and at the old Silver Islet mine, near Port Arthur, the diamond drill was in use as early as 1872.
Diamond Drills
While M. C. Bullock was developing the diamond drill for exploratory work, the Sullivan Machine Company, of Claremont, N.H., was developing the diamond channelers and gadders for quarry work. These quarry machines were very successful until the high price of black diamonds became prohibitive. In 1878, Albert Ball, chief engineer of the Sullivan Machine Company, designed the Sullivan diamond drill so well known today. The first of these drills went to the Lake Superior iron ranges. After 1880, use of the diamond drill expanded rapidly and spread to all parts of the world where exploratory work was being done.
In recent years, the type of diamond drill has not changed much, but better material is going into its construction. Steel castings have replaced cast-iron. Ball and roller bearings are now used instead of brasses and babbits. Gun lubrication has eliminated the oil-can. These improvements make a drill that can be operated for long periods without expense for repairs.
The gasolene-driven diamond drill has proved its real worth for surface drilling, due to possible high rotation and portability in the field. The air-motor-driven drill is very adaptable for underground work because it also has high rotation, is completely enclosed, and operates in a bath of oil.
The chances are that it is better business today to buy a new drill than to accept an old one as a gift.
Diamonds
Today, both white diamonds and black diamonds are used for drilling purposes. White diamonds, in the simple crystals, are brittle and cleave perfectly in four directions. These stones are too weak to be useful for drilling purposes in the larger sizes. The variety known as ‘bort’ is a confused rounded aggregate of crystals, showing little cleavage, but greater hardness. These stones, in the larger sizes, have been used for many years for drilling purposes, with some success in soft rocks. In 1926, however, it was found that it was more economical to use small white diamonds, averaging from ten to fifteen to a carat, set in the bit in large numbers, than to use the larger bort or ‘carbon’.
Black diamonds, known as carbon, are found only in Brazil. The black diamond is an irregular shaped stone, of granular to compact crystalline structure, with no cleavage. It is tougher, less brittle, and will stand far greater pressure, than white diamonds. It is the hardest substance known and our greatest abrasive.
For drilling, carbon is safe and sure. It always works, whereas small white diamonds, though generally efficient, are useless in certain shattered, broken-up ground. In ground where both work successfully, the choice depends on the price per carat, diamond loss per foot, and the footage rate obtained by each.
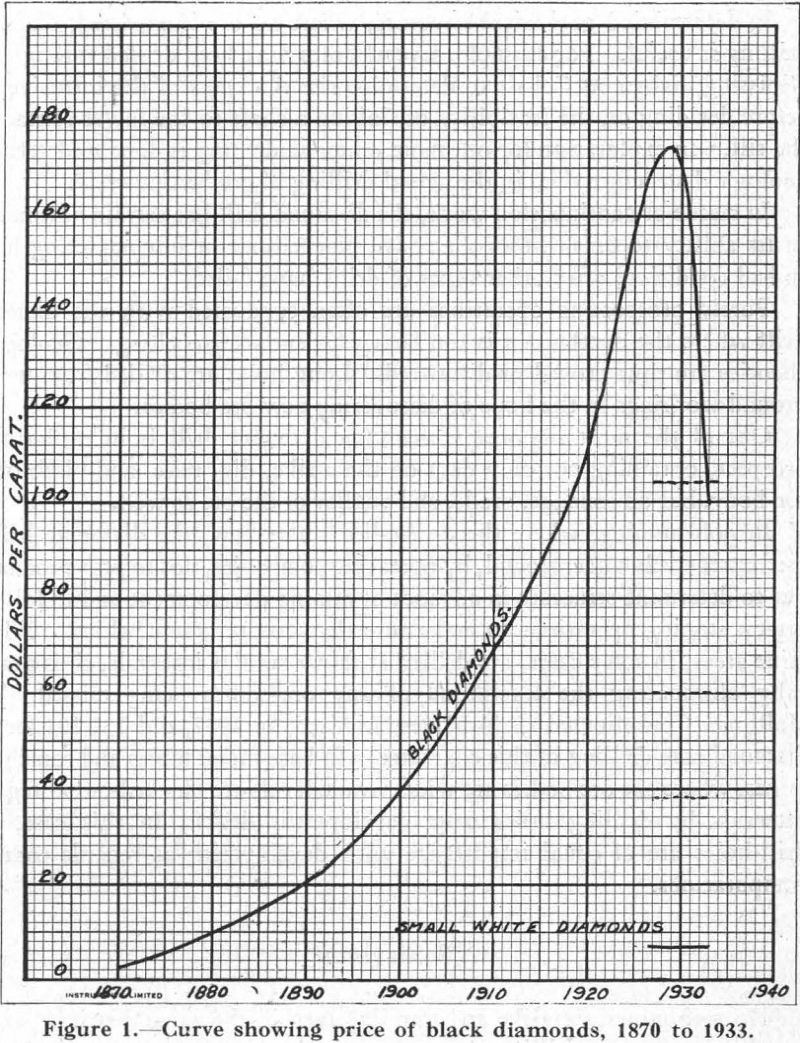
The accompanying curve (Figure 1) shows the price of black diamonds (2 to 3 carats) for drilling purposes since 1870.
Uses of the Diamond Drill
The modern diamond drill has many uses both in and out of mining. It has few limitations and has been universally successful in drilling holes at any angle in both hard and soft material. It is equally useful in sinking casing through overburden to bedrock.
In mining operations, holes are drilled to locate old stopes where the records have been lost, as well as to drain any water contained in them. Sometimes electric power cables are laid underground through drill holes. Quite often hoisting operations are conducted by running steel cables through drill holes.
In construction, the diamond drill is used to determine the elevation of solid material upon which bridges, buildings, and dams are constructed. Sub-aqueous areas are cross-sectioned in great detail before final plans for traffic tunnels can be made. Liquid cement is pumped through bore-holes to strengthen and waterproof foundations. Lives of aged structures have been lengthened in this way. A good example is St. Paul’s Cathedral in London.
Geophysical surveys are generally followed by diamond core-drilling to prove any ore-bodies indicated. It is generally conceded that the great Buchans mine, in Newfoundland, was discovered in this way.
In determining geological structure, where no ore is expected, diamond drilling is useful. For example, several holes have been drilled through the Nipissing diabase at Cobalt to determine the thickness of the intrusive sill before deciding on the feasibility of sinking a shaft to the lower contact of the sill. In exploration for oil, more diamond drilling is done to determine geological structure than in the actual drilling of production wells.
In rescue or continuation work, the diamond-drill has certain advantages in its ability to finish holes that have pinched-out or in completing holes in bad condition, after other types of drills have failed.
Purely prospecting operations are often conducted with the diamond drill where the overburden is too heavy for surface trenching. Geological theories are thus proved or disproved. Long holes are drilled from underground workings in the hope of discovering new ore-bodies.
One of the most important uses of a diamond drill is in exploring a prospect, obtaining not only data on the strike, dip, rake, and pitch of an ore-body, but on tonnage, grade, and quality of the ore as well.
In gold mining, where the ore-bodies are narrow, the diamond drill is used extensively underground, by operating companies, not to prove tonnage, but to determine structure in advance of mining development and in following-up stoping operations to make sure that no ore is left behind. Whole mine areas, in some cases, are drilled at fairly regular intervals, thus practically eliminating the likelihood of any ore-bodies being missed. The Hollinger Consolidated Gold Mines, Limited, in 1932, did 151,105 feet of diamond core drilling of this character. In base-metal mines and some gold mines, where the ore-bodies are wide, whole levels are blocked-out at regular intervals by drilling holes from development drifts. In this case, the drill-holes are of equal importance with development as regards tonnage computations.
Supervision
No two mines are alike structurally, even in the same district. Every exploration by core-drilling is a problem by itself and should be faced with an open mind. Since most of the romance as well as the practical object of diamond drilling has to do with the finding of ore, suppose, for the purpose of this paper, that a prospect is assumed, on which the owner has done a considerable amount of prospecting and on which preliminary sampling indicates values warranting serious exploration to prove tonnage.
It is quite often said of our best executives that they possess the ability to choose the right man for the job. However, it is sometimes rather difficult to find a qualified man to supervise core-drilling operations. Core- drilling is a sort of stepping-stone profession. People from all walks of life do core-drilling. It seems to be a twist of human nature that every man, no matter what his profession, has very definite ideas as to where bore-holes should be drilled. Therefore, in any exploration by core-drilling, there is a fifty-fifty chance that the man in charge lacks the necessary training and experience.
Some people even try to do drilling with no representative driller at all on the property, which is sure to lead to grief. A few years ago, a large mining organization allowed their accountant to lay out the holes; the data obtained were practically worthless. In another case, the company metallurgist looked after the drilling operations, resulting in financial loss when the properties were sold.
It seems reasonable to choose a relatively young man, who likes prospecting because the work is fairly strenuous. Engineering experience is necessary because of the surveying and mapping to be done. Geological training is imperative because of the importance of mapping and working out the ages of the rocks surrounding the ore-zone. Geophysical knowledge is useful. Such training, along with some field experience, should qualify a man to supervise core-drilling operations properly.
Preparing a Prospect for Diamond Drilling
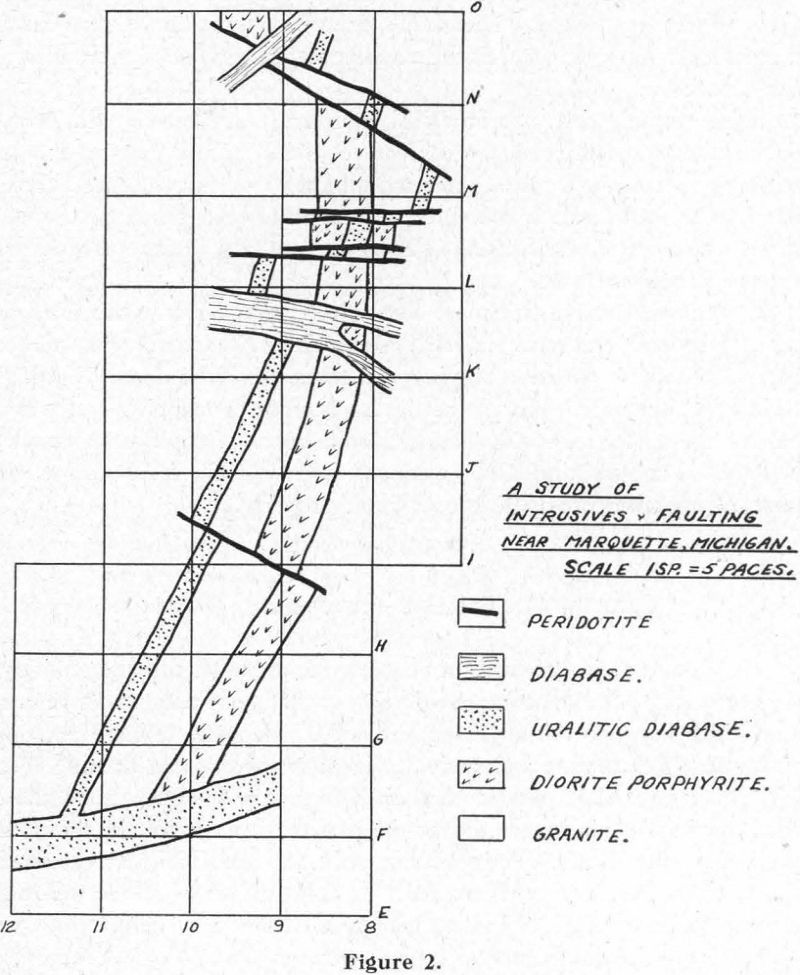
The first step, in preparing a prospect for diamond drilling, consists in surface work. The ore-zone should be trenched, not only to prove length and width but also the strike and dip of the deposit. Some trenching is warranted to determine rock contacts, intrusive dykes, and faulting (Figure 2). Rock formations should be studied over a wide area around the ore-zone, having in mind more the origin and relative ages of the rocks, than their mere rock names. Petrographic work on rock slides may throw some light on the origin as well as assist in nomenclature. If the ore-zone is heavily soil covered, study along geophysical lines may help.
If the district has been mapped by a government geological survey, this will afford a guide in making a geological and topographical map of the smaller area around the ore-zone. When all the surface information obtainable by reasonable expenditure is mapped, it is then time to look below the surface for additional information. Surface exploration work should be well done. It costs less money than work below the surface. Without it, deeper work cannot be safely laid out.
There is a disagreement among mining men regarding the next step. One school seems to prefer diamond core-drilling and the other actual development by shafts, drifts, and cross-cuts. However, in exploring a prospect, the rule is that the expenditure of money shall be as low as possible, so long as it remains a prospect. Since the promising prospect is a one in a hundred chance, core-drilling should be used wherever possible, because
tonnage or promising indications can be proved by diamond core-drilling for one-fifth to one-tenth of the cost of development by shafts, drifts, and cross-cuts.
Control of the Location of Drill Holes
In designing a scheme of exploration to control the position of bore-holes, two methods are available: squares with vertical holes, and holes in parallel sections. In general, the squares and vertical holes can be used on irregular deposits or on vein-like deposits dipping less than 45 degrees. Holes in parallel sections can be used on vein-like deposits dipping more than 45 degrees.
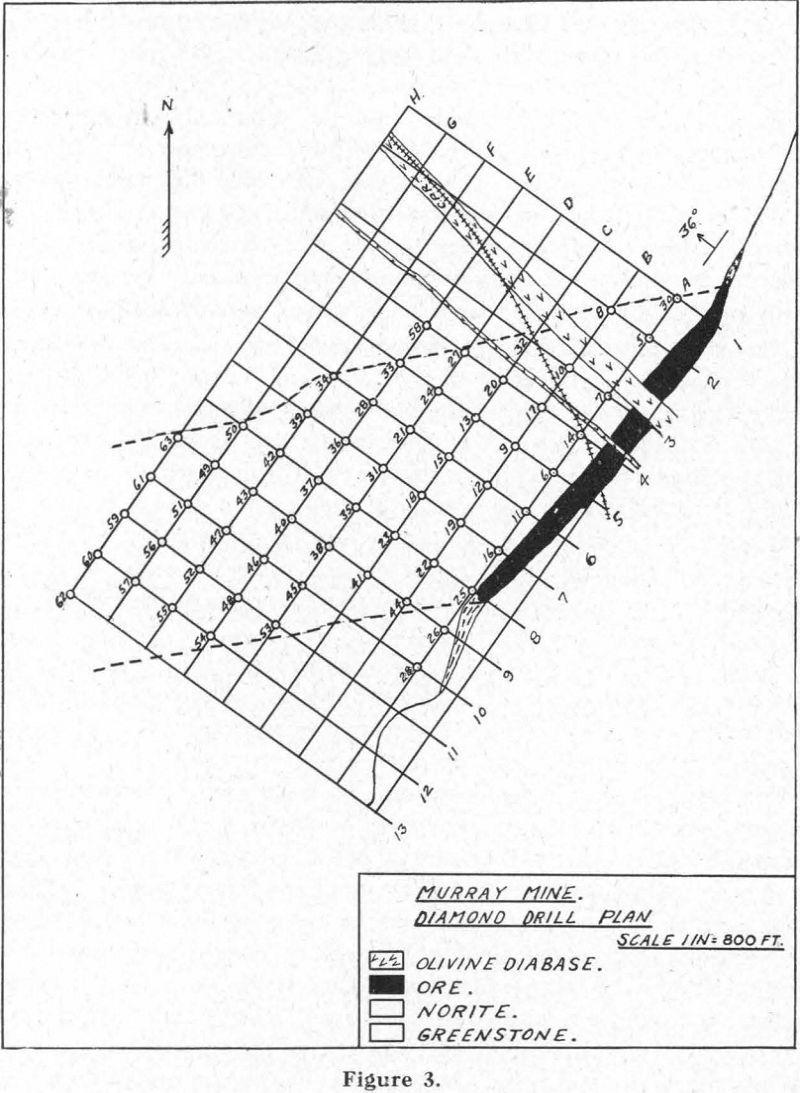
The size of the squares or the distance between sections depends on the size of the ore-body, the character of the mineralization, and the structure of the rocks. In drilling metalliferous deposits, the interval is not apt to be greater than two hundred feet or less than fifty feet. For example, an ore-body proved for one thousand feet in length on surface, with fairly even mineralization and simple structure, can stand two-hundred-foot intervals. On the other hand, a deposit proved for three hundred feet in length with erratic mineralization and complex structure can stand only fifty-foot intervals. The interval chosen is a matter of judgment created by a clear understanding of the surface. It is well to remember that the selection of the interval may determine the success or failure of an exploration.
To get the position of the holes in the field, first lay out the interval chosen in squares on tracing paper. Move the tracing paper over the surface geological and topographical plan, making one side of the squares as nearly parallel to the strike of the ore-zone as possible, and one-half the interval from the centre of the ore-body. Adjust the tracing paper so that the corners of the squares will miss all younger intrusives, faults, improvements, or any topography where it would be impossible to set-up a diamond drill.
Next stake out these holes by transit around the ore-zone. Use vertical holes if possible, remembering that squares and vertical holes make the perfect scheme. If the deposit dips more than 45 degrees, angle holes from the corners of the squares and pointed across the ore-zone give the section system. In general, angle holes should be drilled as steeply as possible, because steep holes are more efficient than flat ones, deflect less than flat ones, and hence give greater engineering accuracy. It is not necessary or desirable that the holes intersect the ore-body at right angles to the dip. The square system becomes the parallel section system as soon as an angle hole is drilled across the ore-zone.
Holes drilled by a mining organization should be numbered consecutively from one up, no matter where they are drilled. The squares should be numbered one way by figures and the other way by letters. This allows any proposed hole to be referred to as 3B, 6C, etc.
The first hole should be chosen near to and opposite the centre of the known ore-zone or indication. Starting with the known ore-outcrop, no chances should be taken. Play sure by building around No. 1 hole, corner by corner. Allow no possibility of the ore-body being missed.
In general, it is better to drill out the ore-zone along the strike with shallow holes first, because shallow holes prove tonnage more cheaply than deep holes. As the exploration proceeds and holes are drilled farther and farther out from the outcrop along the dip, it then becomes necessary to drill every other section, or double the size of the squares, otherwise the cost per ton of ore proved will be too great due to the cost of deep holes. It should never be forgotten that ore-bodies have four relationships sp a horizontal plane, namely, strike, dip, rake, and pitch. Strike and dip can generally be determined by a surface inspection, but rake and pitch only by proving the ore-body to depth. The pitch of an ore-body does not seem to be very well understood. Pitching ore-bodies are deceptive and have fooled more than one human.
Every drill set-up should be checked over by the engineer in charge before the drilling is allowed to start. The casing pipe, from surface to bedrock, should not be pulled out when the hole is completed, until the elevation of the casing has been determined and it is quite certain that a second set-up of the drill over the casing pipe will not be necessary in order to deepen the hole.
Since the holes should be laid out accurately by transit, it is important, in the case of a vertical hole, that the drill-chuck be centred over the hole stake when the drill base is level and the feedscrew vertical. In the case of art angle hole, when the drill-base is level and the head of the drill is set at the proper angle, the hole stake must be in line through the feedscrew. The line stake must also be in line through the feedscrew when the head is loosened and the chuck raised. An angle hole cannot be properly surveyed after the drill has been moved off the hole.
Contracting the Drilling
The question arises whether a mining company should buy diamond drills to do their own drilling or to contract the work. Where operating companies carry on diamond drilling continuously, the practice seems to be for the companies to purchase diamond drills and operate them either on company account, or company account plus a bonus, or by straight contract. Those companies and syndicates doing drilling only at intervals generally contract the work. This frees them of the expense of carrying drill men, equipment, and diamonds over periods when no drilling is being done. It also has the further advantage that it allows the engineer to devote all his time to the problem of finding ore.
In obtaining tenders, complete information should be supplied to the contractor so that a proper estimate of the cost per foot can be made. This information should cover the following:
- Definite location of the drilling.
- Minimum amount of drilling.
- Probable total amount of drilling.
- Minimum depth of holes.
- Maximum depth of holes.
- Is drilling to be done from surface or underground?
- Length of pulls underground.
- Give approximate depth of surface material.
- Give kinds of rocks to be drilled.
- What kind of ore is expected?
- How far will the drill-holes be from a supply of water?
- How high will the drill-holes be above the water supply?
- Give kind of fuel available and cost.
- Is compressed air or steam available?
- Give distance of drill location from the nearest railway station.
- Are there roads from the nearest railway station to the drill location?
- Are teams available?
- Can drillmen obtain accommodation near the drill location and at what rate?
- Give name of individual or company financially responsible for payment for the drilling.
Form of Contract
An agreement between the company and the drilling contractor is also necessary. This agreement should be complete. It is important that the obligations of each party under the contract should be carefully stated, otherwise adjustments will have to be made during the period while the drilling is being carried out. Some of the points to be covered in such an agreement follow:
- Price per foot on minimum footage.
- Minimum and maximum depth of holes.
- Transportation paid by the company.
- Cost plus basis.
- Percentage basis.
- Rental basis.
- Adjustment if contract is not completed by the company
- Labour compensation.
- Equipment provided by the company.
- Equipment provided by the contractor.
- Amount of stand-piping guaranteed by the contractor.
- Cost of casing a hole.
- Wedging of holes.
- Sludge collection.
- Size of core.
- Core-boxes.
- Accommodation and board.
- Roads built by the contractor.
- Camps built by the contractor.
- Surveying holes for angle and azimuth.
- Fuel furnished by the company.
- Privilege of cutting wood by the contractor.
- Casing pipe left in holes by the contractor.
- Water provided by the company.
- Water and power provided underground by the company.
- Length of pulls underground.
- Teams provided by the company.
- Responsibility clause.
- Payment for the work.
Testing Drill Holes for Vertical Angle and Azimuth
It is well known that holes, no matter how drilled, deflect more or less, depending on the depth, angle, and character of the material drilled. Failure to test holes for angle has had serious consequences. The deflection of deep holes often becomes so great as to seriously impair their usefulness. In general, vertical or steep-angle holes deflect less than flat holes. Holes drilled in homogeneous rocks deflect very little, while holes drilled in schisted or stratified rocks deflect badly. For example, a vertical hole drilled in norite at Creighton mine to a depth of 1,000 feet is not apt to deflect more than three degrees, while a hole of the same depth at the Frood mine is apt to deflect anywhere from fifteen to sixteen degrees. It is better to do everything to avoid serious deflection than to depend on the various methods for measuring the vertical angle and azimuth of a crooked hole.
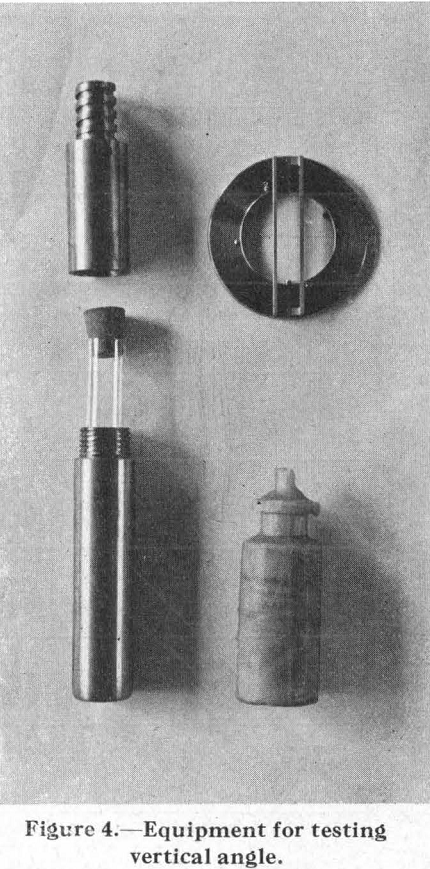
However, in order to play sure, bore-holes must be tested. The hydro-fluoric acid test is universally satisfactory in testing holes for vertical angles. The acid is mixed with water in varying proportions depending on the depth of the hole. The stronger solution is used for shallow holes and the weaker solution for deep holes on account of the greater time it takes to lower and hoist drill rods. A capillarity curve is necessary to correct the angle read off the test tubes. The capillarity curve varies with the diameter of the glass tube used (See Figures 4 and 5).
To determine the azimuth of a hole, the Maas compass has been used universally in this country. However, this instrument for determining azimuth, like so many others, makes use of the magnetic needle. Certain ore-bodies as well as certain rock formations, are magnetic, so care is necessary if azimuth determinations are to mean anything.
Wedging Drill Holes to keep them Nearly Vertical
Steel wedges are placed in bore-holes for various purposes. In the past, steel wedges have been lowered into bore-holes to drill around lost tools or to obtain a second core from the same hole, the direction of deflection being unknown. More recently, Messrs. Hall & Rowe have introduced a method to deflect a hole in a definite direction. This method was used extensively at the Frood Mine in 1927-28 to drill nearly vertical holes. The holes were started vertically and were tested every twenty-five feet for vertical
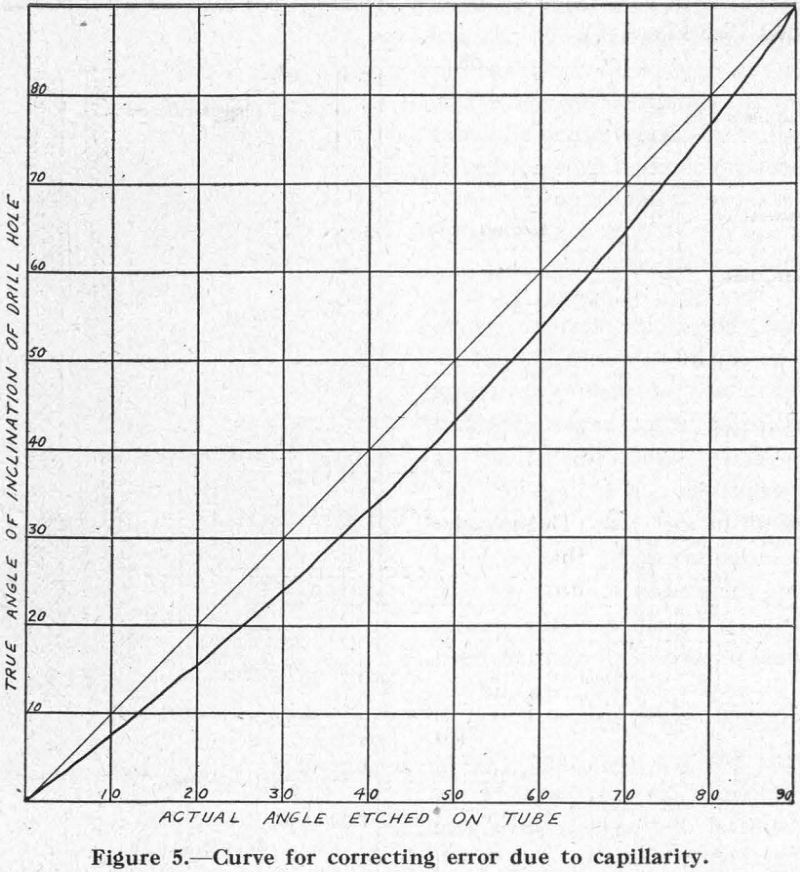
Owing to the fact that the acid meniscus creeps up the hanging-wall side of the tube and is flattened on the footwall side, the apparent angle of dip, as etched on the tube, is always greater than the true dip of the hole.
angle, using the acid test. When a test showed a deflection of degrees, a wedge was placed against the dip of the hole and the hole brought back to the vertical. In this way nearly vertical holes were drilled to intersect the ore-body at depths down to 2,500 feet. The chances are that these same holes would have been going horizontally at a depth of 1,500 feet if no wedges had been used. As most of the rich ore in the Frood mine is below the 1,500-foot level, the importance of wedging in this case to drill nearly vertical holes is apparent. It is perhaps better practice to keep a bore-hole nearly vertical than to allow it to wander and depend on a compass needle to survey it, because the wandering hole may never intersect the ore-body towards which it is pointed.
The Hall-Rowe method of drilling vertical holes may be described as follows (See Figure 6):
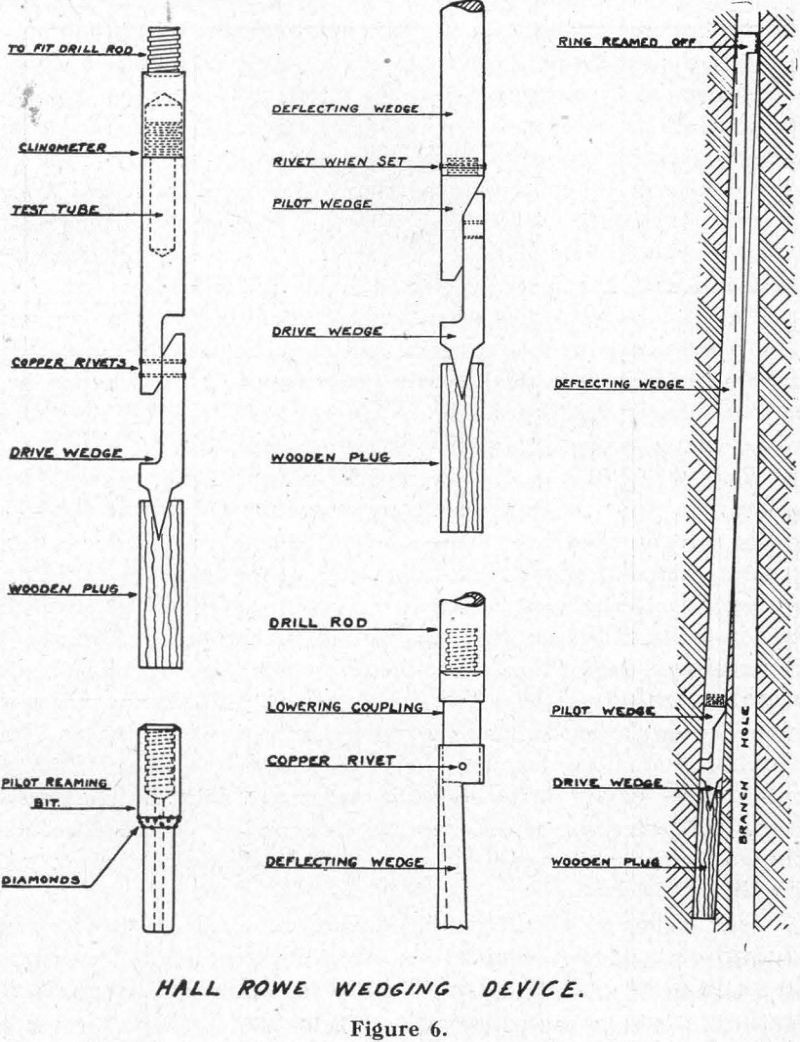
To wedge a diamond-drill hole at any point, the hole is filled up to the desired point. A dry, turned wooden plug, grooved to allow water to pass, is pushed down the hole with the rods, to the point where it is desired to branch the hole, and is allowed to swell.
The clinometer is then prepared for lowering down the hole. A centre line is scribed parallel to the axis and at right angles to the plane of the flat side. The drive-wedge is then rivetted to the clinometer, using copper rivets, as shown in Figure 6. The acid test is used to determine the vertical angles. Lines are scratched on the test tube with a small ‘carbon’ to coincide with the centre line on the clinometer. The clinometer and drive-wedge are then lowered down the hole and allowed to drop when within about six inches of the wooden plug, thereby shearing the copper rivets connecting the clinometer and drive-wedge and driving the chisel point of the drive-wedge securely into the wooden plug. The clinometer is allowed to set for thirty minutes to enable the acid to make an etching on the test tube. The clinometer is then pulled up, leaving the drive-wedge in the hole. The test tube is removed, cleaned, and dried, and the low point of the etching marked when the tube is held vertical. The relative direction of the face of the drive-wedge and the dip of the hole are indicated.
The pilot wedge is now screwed into the end of the deflecting wedge. The pilot wedge is set so that, when its flat side fits with the flat side of the drive-wedge already in the hole, the grooved side of the deflecting wedge will be directly opposite the dip of the hole. In this position the pilot wedge and deflecting wedge are rivetted together.
The lowering coupling for lowering the deflecting wedge is then rivetted to the ring left on top of the deflecting wedge and the assembled deflecting wedge and pilot wedge are lowered down the hole with the rods. In one position the point of the pilot wedge will rest on the point of the drive-wedge, and on being rotated 180 degrees the pilot wedge will drop two inches into its place, indicating that the two are in their proper relation. The copper rivet in the top ring of the deflecting wedge is also sheared off, giving a further drop of one and a half inches. When the deflecting wedge is in place, the top ring left for lowering purposes is cut off with a rose bit. Next, a special bit and core barrel are lowered, which drills a hole of the same radius as the groove in the deflecting wedge to a point three or four feet below the deflecting wedge. Since the groove of the deflecting wedge has the same radius as the special bit, the bit follows the wedge without cutting into it.
After drilling with the special bit, the wedge and deflected hole are reamed out with a special pilot reaming-bit. The pilot part of this bit fits the groove in the deflecting wedge. Diamonds are set in the bevelled part of the pilot reaming-bit and the hole reamed out to its original size. After doing this, the regular bit and core barrel are used, but reaming is started at the top of the deflecting wedge to make sure there is ample clearance for passing up and down and that the hole is kept up to gauge.
Cementation of Drill Holes
When a bore-hole is completed, it is advisable to plug it or cement it. All surface holes should be plugged at the casing with a wooden plug or cement, otherwise the children of the neighborhood will drop articles down it which may prevent moving back on the hole again. Underground holes often make water in such amounts that it is necessary to cement them. Sometimes wooden plugs, three feet long, driven in the holes, serve the purpose. Bore-holes in an ore-body should be cemented, because blasting operations in one part of a mine might blow pieces of rock through the hole, as through a rifle barrel, and injure men in some other section of the mine.
New Standard Sizes of Fittings
The new Commercial standard sizes of diamond core-drill fittings, adopted in 1930 by the Diamond Core Drill Manufacturers Association, are coming into use as the old supply of fittings is consumed. The new sizes are known as EX, AX, BX, and NX, and give the following standard sizes of core (See Figure 7):
EX 7/8-inch, replacing old E size of 15/16-inch
AX 1 1/8-inch, replacing old A size of 1 1/8-inch
BX 1 5/8-inch, replacing old B size of 1 3/8-inch
NX 2 1/8-inch, replacing old N size of 2-inch
The sizes are based on a set of four nesting flush joint casings, as shown by the following section through the casing couplings.
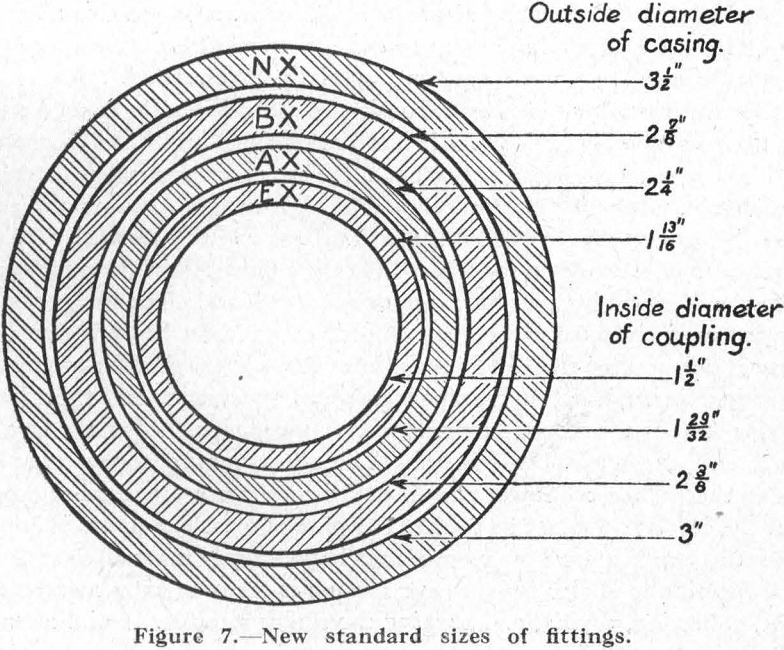
The advantage of this system is that an NX bit will pass through an NX casing and drill a hole of a size to admit the BX casing, the BX bit will pass the BX casing and drill a hole to admit the AX casing, and so on down to the EX size.
The benefits arising from the use of these new standard sizes are available to all and should be adopted as soon as old stocks of fittings on hand are exhausted.
Sludge Collection
The diamond drill produces two products, known as sludge and core samples. Unless these core samples are carefully collected and handled, the money spent for their collection may be in vain.
Core recovery is never perfect. Ninety to ninety-five per cent is considered good. Sometimes it is necessary to collect sludge as well. In general, the practice seems to be to collect sludge where the core-recovery is poor, otherwise not to bother with it. One of our large gold mining companies collects sludge at all times, no matter what the core-recovery may be. The analysis of this sludge is available before the core is sampled and classified. Since gold distribution is erratic and elusive, this is playing safe, taking no chances of missing an indication.
Some minerals are too soft to core. For example, certain forms of hematite iron-ore give very little core-recovery, and hence assay results depend almost entirely on the sludge samples.
Although all sorts of containers such as barrels, tubs, cans, etc., are used for collecting sludge, the lowly powder box seems to be the most popular receptacle in our own north country, especially underground.
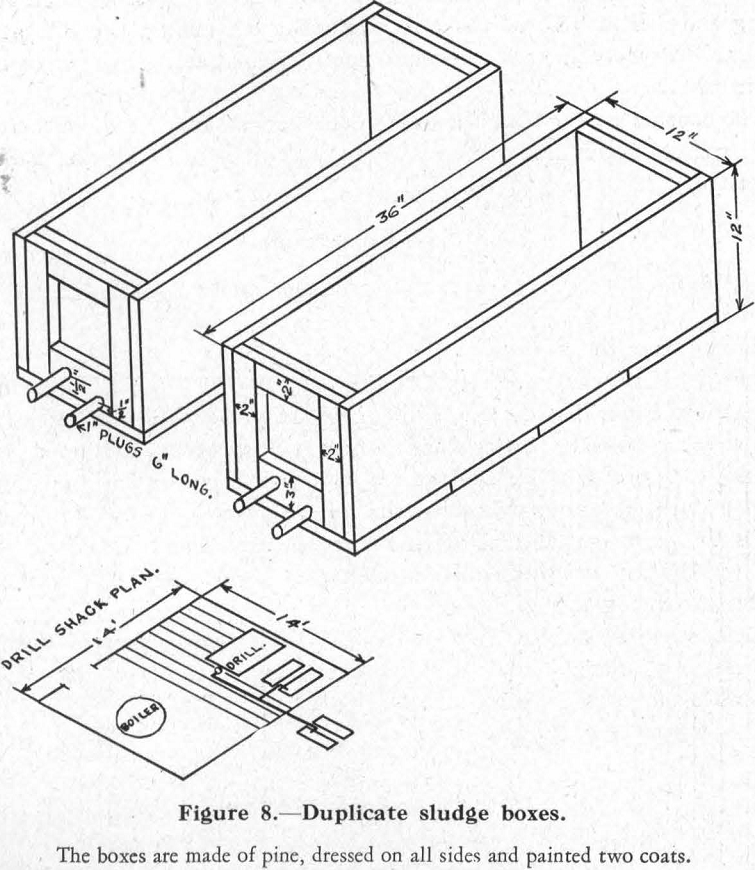
One method which has merit, consists of using duplicate boxes designed for the purpose (Figure 8). Each box has two one-inch holes in one end, with plugs, one flush with the bottom of the box, the other two inches above the bottom. The drill platform should be high enough to allow of the two boxes being set below it behind the drill. This allows a tee with pipe connections to be screwed on the top of the casing pipe so that the return water from the diamond bit will flow into one of the boxes. The sludge samples are generally collected every five feet because the rods, being 10 feet long, make it easy to keep track of five-foot intervals. When the hole has reached a five-foot interval, the sludge pipe is extended by screwing on a short length of pipe so that the second box will receive the sludge. After the first box has settled, the upper plug is pulled. This allows most of the water to flow out so that, when the lower plug is pulled, the pressure will be so reduced that the cuttings will not be washed out of the box. The sludge is brushed out into a pan and dried on a stove, then bagged ready for analysis.
Collection of sludge is expensive because it takes an extra man on each shift, collecting, drying, and bagging the sludge samples. Quite often the
sludge water does not return to surface, and hence cannot be collected unless the hole is cemented or cased to a point below where the sludge is being lost. Casing a hole is expensive and is not done unless the importance of sludge collection warrants it.
Core and how to Handle it
As diamond drilling is done with the object, if possible, of obtaining core rather than sludge, the proper handling of core is always to be carefully considered. A suitable core-house is necessary, with stalls along one side to hold the core-boxes, and a work table with good light for studying core.
Core-boxes (Figures 9 and 11) are necessary to receive the core as it is taken from the core-barrel at the drill. A satisfactory core-box made of wood, with five round grooves, five feet long, holding 25 feet of core, has come into use. Sizes are made to fit the new standard core sizes. This box is
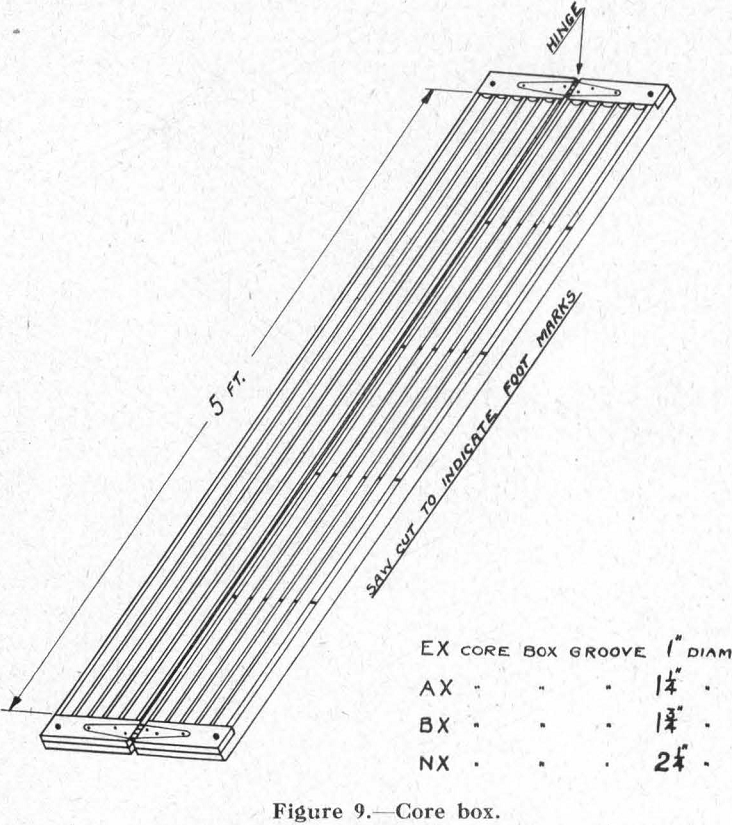
made in two parts, hinged together with strap hinges. The footage marks are laid off on the bottom side only. When closed, a screw in each end makes it possible to transport the filled box anywhere with safety.
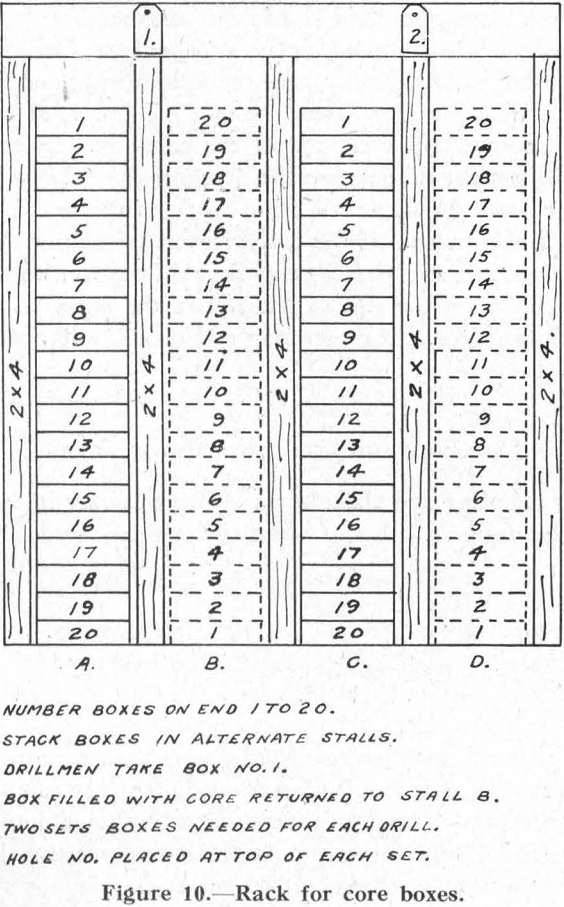
The following scheme of handling core-boxes gives a minimum of work. Number the core-boxes on the left-hand end in sets from one up. No other numbers on the boxes are necessary. Make stalls to a height of seven feet to receive the core-boxes. Stack the core-boxes in numerical order in alternate stalls (Figure 10). Place the number of the hole to be drilled at the top of each double stall. The drillman will take box No. 1 to the drill and return the filled box to the second stall. No box can be misplaced without its being known, provided each set has a distinguishing mark.
It is quite an art to lay core accurately. Unfortunately, there are at least three systems of laying core in a box in this country. Some lay core continuously, some lay it from left to right like we read a book, and some lay it just the reverse, from right to left. Engineers should adopt one method as standard practice. Many mistakes are made by drillmen, especially those
working for contractors, because they never can get thoroughly familiar with one method. Core should be laid continuously. This contention is supported by the fact that, out of six of our largest mining companies, recently visited, four lay core continuously beginning at the upper left-hand

corner of the box. Core should be laid in the boxes so that the boxes represent the depth of the hole. Round sticks six inches long, core size, should be supplied the drillman. As the depth of the hole is measured from the top of the casing pipe, the casing should be laid off first with round sticks, beginning at the upper left-hand end of the core-box. Every time a bit blocks, the drillman should measure the depth of the hole by counting up the rods. The depth should be laid off in the box to scale and the core laid backwards from this point. If the core recovered does not fill the space, then core has been lost and round sticks should be placed to represent the lost core. In this way, the core is laid out in the boxes to actual scale, just as it occurs in place. The sampling and classification of core so laid is a real pleasure.
Sampling and Classification of Core
The proper sampling and classification of core is very important. It is the heart of the business. In this work the engineer needs the following supplies:
Plain paper tags.
Ball of twine.
Sample sacks, size 10 in. by 14 in.
Ore sacks.
Hammer
Core splitter
Diamond drilling is expensive; it hardly pays to economize on analysis. It is good practice to sample all mineralization, to play sure, and take no chances of missing any values. In general, samples should not be more than five feet in length. Each sample should be broken at every change in the core, making each sample bagged of like material. Depths should be recorded in feet and tenths, not feet and inches. The bagged samples should be numbered consecutively from one up, no matter where taken. The sample number should be marked on the top and bottom of the plain paper tag and the tag torn in two. The lower half is folded and placed inside the sample bag and the top part is tied to the outside. This not only makes it easy to correct any mistakes made while bagging core, but facilitates the handling of the core samples on their arrival at the laboratory for analysis.
In classifying the core, the same geological classification should be used that was used in the surface mapping. Here, again, it should not be forgotten that the age of the rocks is more important than their mere rock names. This makes possible structural sections showing the relative age of the rocks surrounding the ore-body as well as the ore-body itself. Generally, there are not more than from three to six formations around a mine to be mapped. Perhaps it is better to stick to plain facts, because a lot of theories disgust the mining man and may impair the usefulness of the mapping.
The depth at which the water is lost in a hole should be recorded, for it may mean a fault.
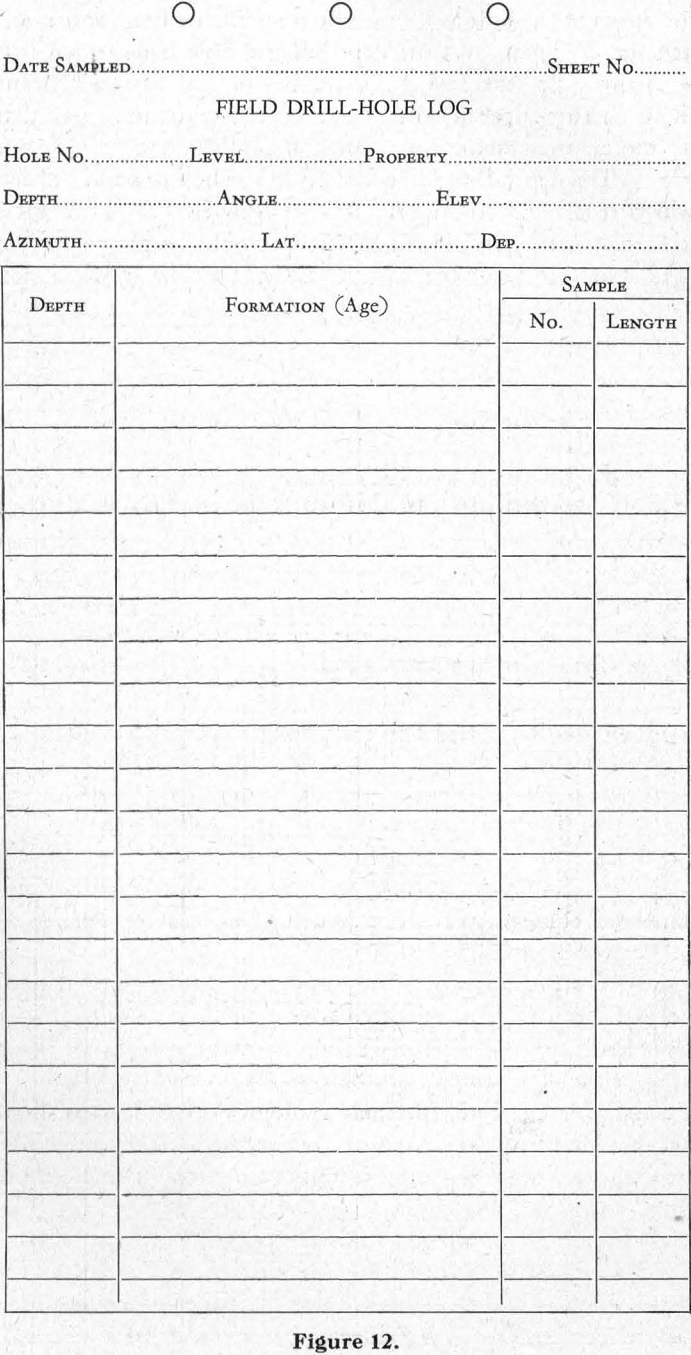
Loose-leaf sheets, punched at the top to fit Dominion Memo Book No. 6125, make a very convenient field drill-hole log (Figure 12).
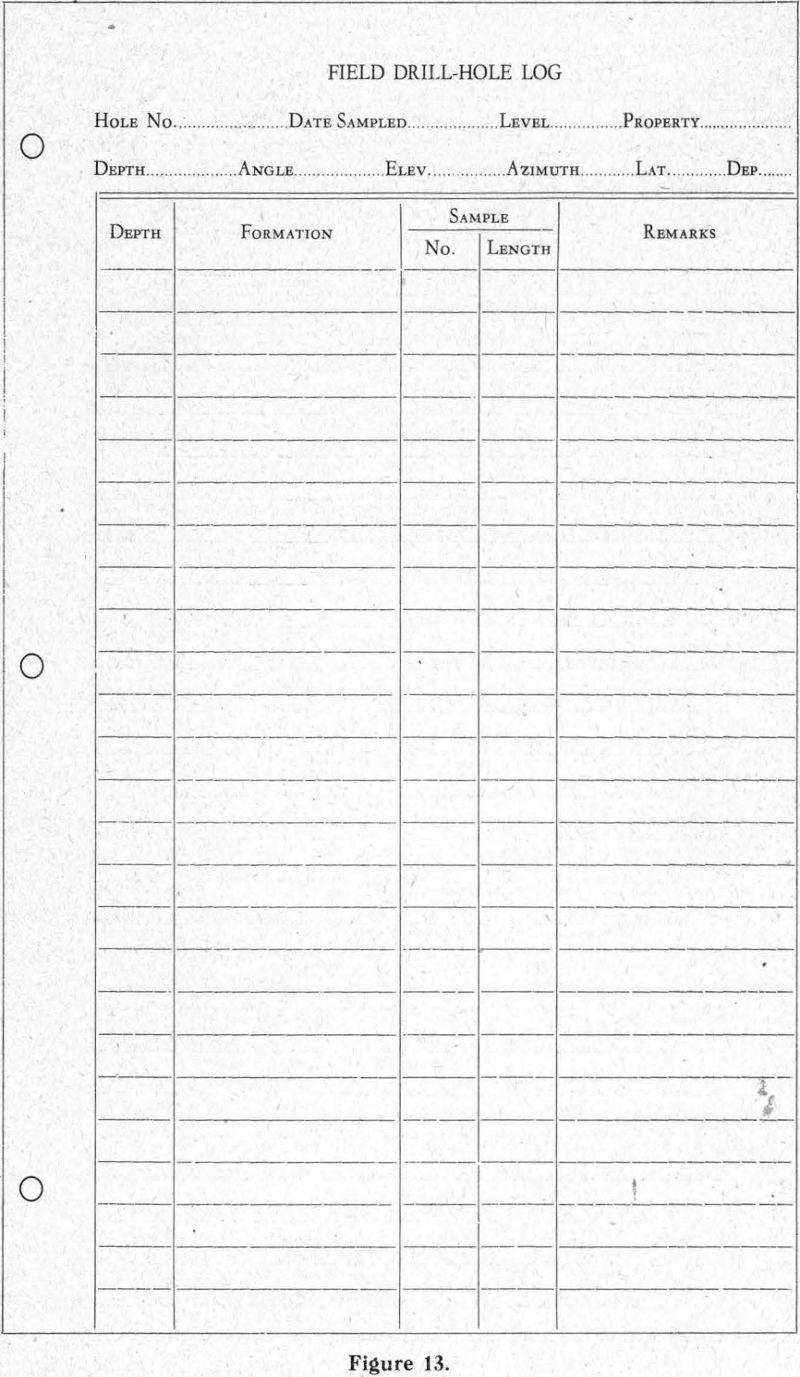
Some engineers prefer a larger, letter-size sheet with a column for remarks as well as a column for formations (Figure 13).
Core Samples to be kept as Record
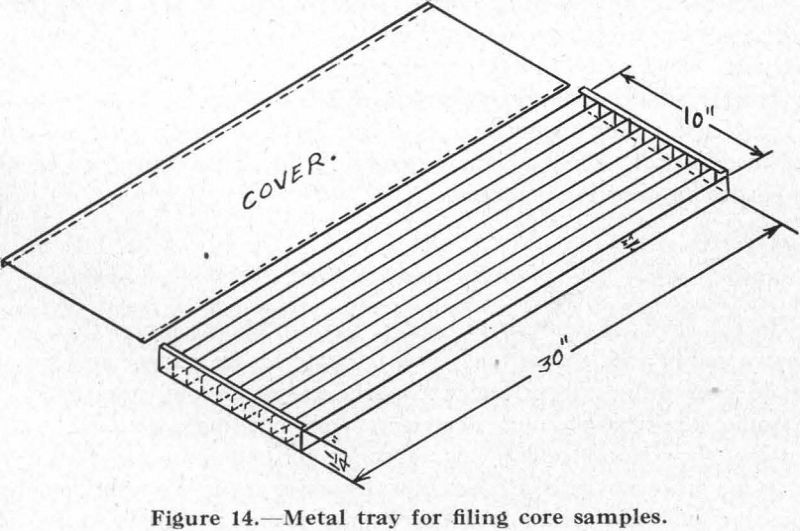
The practice varies, but a certain amount of core is filed away for possible future study; if not permanently, at least for a while. As the core is being sampled and classified, pieces of core, one inch long, are selected to show every change of formation in the hole. This core, properly labelled as to hole number and depth, is filed permanently in a metal tray, manufactured for the purpose. Some form of cabinet is necessary to hold the trays. One of our mining companies uses a special steel filing-cabinet, complete with trays, for this purpose (Figure 14).
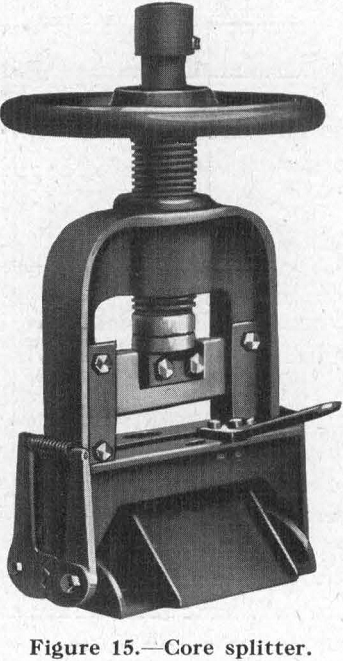
Some mining organizations prefer to split the core lengthwise, using a core-splitter for the purpose (Figure 15). In this case, one half of the core is bagged for analysis and the other half stored for a while for further study.
Certain exploration companies explore lands by core-drilling to obtain data that will aid in the sale of properties or in re-financing. Such companies consider it good business to store one half of the core permanently as an aid in verifying the drilling results. However, unless proper fireproof
storage facilities are provided for the exclusive storing of such split core, it is hardly worth while, because otherwise the core will not remain in proper order very long.
In the sampling, classification, and storage of core, the time to do it right is when the drilling is being done and the proposition is hot. In general, the more the core is handled, split up, and messed over, the less reliable it becomes. Personally, I prefer to watch and study the core from a hole while it is being drilled. I prefer to sample and classify the core as soon as the hole is completed, saving one-inch pieces of core for filing permanently and dumping the balance. The sample rejects or ground pulp may then be filed away in bottles for checking purposes.
Analysis of Core
In the chemical analysis of core, it pays to choose a firm that is well known and of good reputation. Few laboratories are manned and equipped to do everything. It is often necessary to search out specialists. For example, a reliable platinum assay costs from one hundred to five hundred dollars. Few laboratories are equipped for platinum-group analysis.
It is a great convenience if core-samples arrive at the laboratory numbered consecutively, with a sample number on the outside as well as on the inside of the bag. This facilitates sorting out the samples in numerical order for grinding, also selecting without delay those samples requiring rush assays.
Sample rejects of the core are sometimes retained and used for metallurgical tests.
Because of the expense of certain metal assays, or owing to lack of importance, one composite assay of the core may be made for each hole, or one for the whole property.
However, it is safer for the company doing drilling to require the chemical laboratory to save the sample rejects and ground pulp, at least for a while. Where permanent filing is required, the core rejects and ground pulp are returned to the company, to be filed away in bottles.
It must be remembered that, in the case of gold samples, the metallics are in the sample rejects and not in the ground pulp.
Final Drill-Hole Log
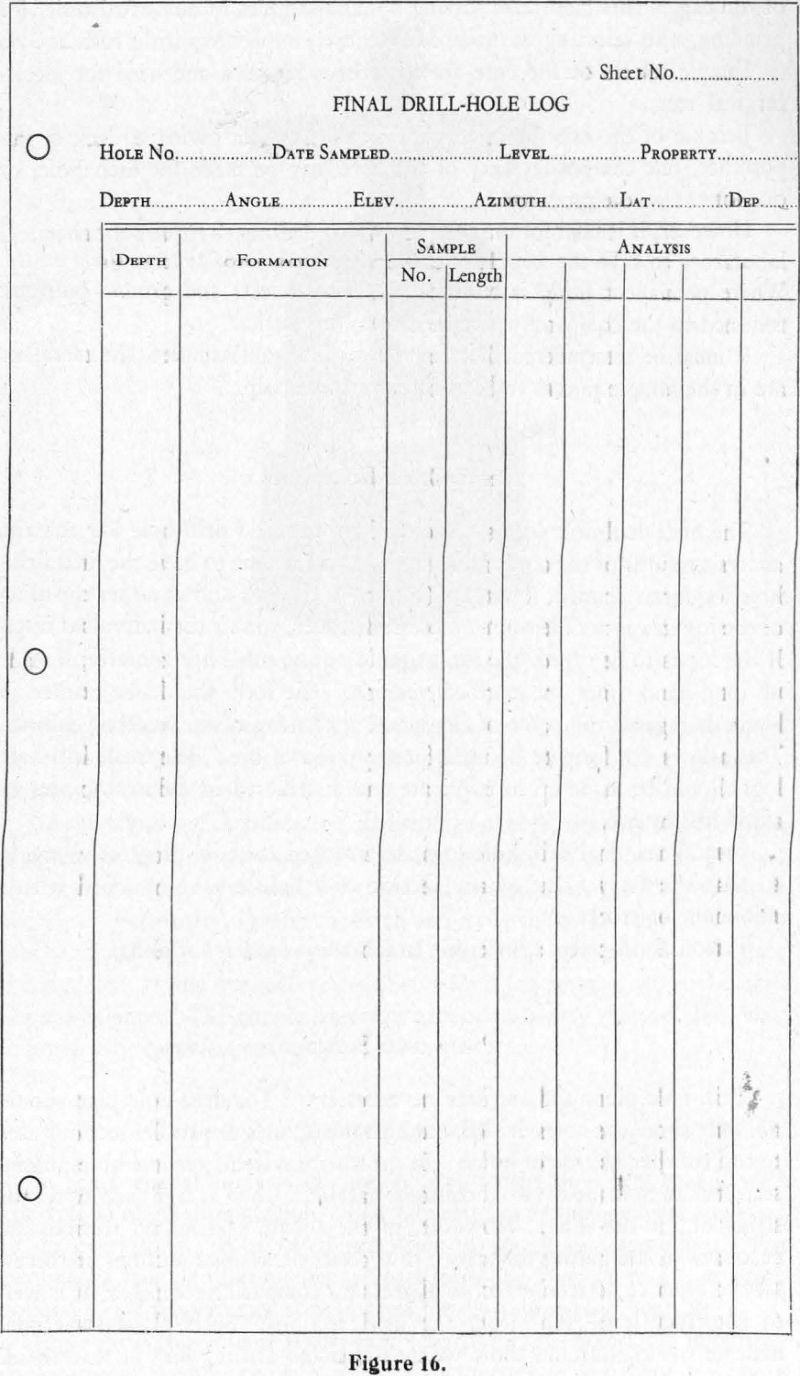
The final drill-hole log is made up from the field drill-hole log and the analysis returns of the core and sludge. It saves time to have the final drill-hole log forms printed, letter size (Figure 16). This allows either the filing of the log in a letter file or in a loose-leaf binder, to suit the individual taste. If the log is to be typed, the form should not be ruled horizontally; if made up long hand, lines are more convenient. The form should be printed in blank as regards the name of the metal at the top of the analysis column. This allows the form to be used for any kind of ore. The final drill-hole logs should be made up in triplicate and distributed in different places to avoid loss by fire.
Sometimes, final drill-hole logs are arranged to show progressive totals, so that the assay value of any section of a hole can be obtained with a minimum of work.
Personally, I prefer a letter-file to loose-leaf binders for filing.
Plans and Sections
Drill-hole plans and sections are necessary. The drill-hole plan should not only show the holes drilled, but also the squares or parallel sections used to control the position of holes. In the square system, vertical holes, useful sections can be made in two directions, parallel to, and at right angles to, the strike of the ore-body. However, in the square system, no sections are necessary in computing tonnage. In the section system, sections are necessary in order to determine sectional areas for computing tonnage. It is well to construct level-plans from the drill sections. Such plans sometimes indicate weaknesses and show where additional drilling may be warranted.
Drill-Hole Models
Where important drilling results are being obtained, drill-hole models are often made. Such models are useful in giving directors, officers, and visiting engineers a quick grasp of the ore-body and the structure of the rock formations surrounding it. Drill-hole models are of different types such as:
- Glass and celluloid plate models
- Rod models
- Solid models
The glass or celluloid plate models consist of a rectangular base with a frame built up from its four corners to hold the plates in their proper positions. The model should be open on all sides rather than at the top. It should set on a table about 42 inches high so that a convenient view is obtained from all sides. The drill-hole sections are painted on the plates and slid horizontally into their proper relative positions. These models require considerable work and are fairly expensive to make.
Where the square system, vertical holes, scheme has been used, a simple and inexpensive model is made by laying the drill-holes out to scale on a rectangular base. The final drill-hole log of the holes is painted on round steel or wooden rods and these are stuck upright in the base to represent the holes. Strings are tied along the footwall and hanging-wall contacts of the ore-body to outline it. In this type, the view is unobstructed in any way.
Where the ore-body consists of a single lens or mass with rather simple structure, solid models are made from the drill-hole sections and plans. Different colours are used to show the ore, intrusive, dykes, etc. These models are patterns of the ore-body and are held upright by being fastened to a base at the proper angle and orientation.
Computation of Ore Reserves
Where a prospect has been drilled at proper intervals either in a system of squares, vertical holes, or in parallel sections, reliable tonnage computations can generally be made of any ore proved. The following data are necessary:
- Plan of the holes
- Sections on the holes
- Final drill-hole logs
- Weight of a cu. ft. of the ore in place.
The weight of a cu. ft. of ore in place is obtained by determining the specific gravity of an average sample of the ore.
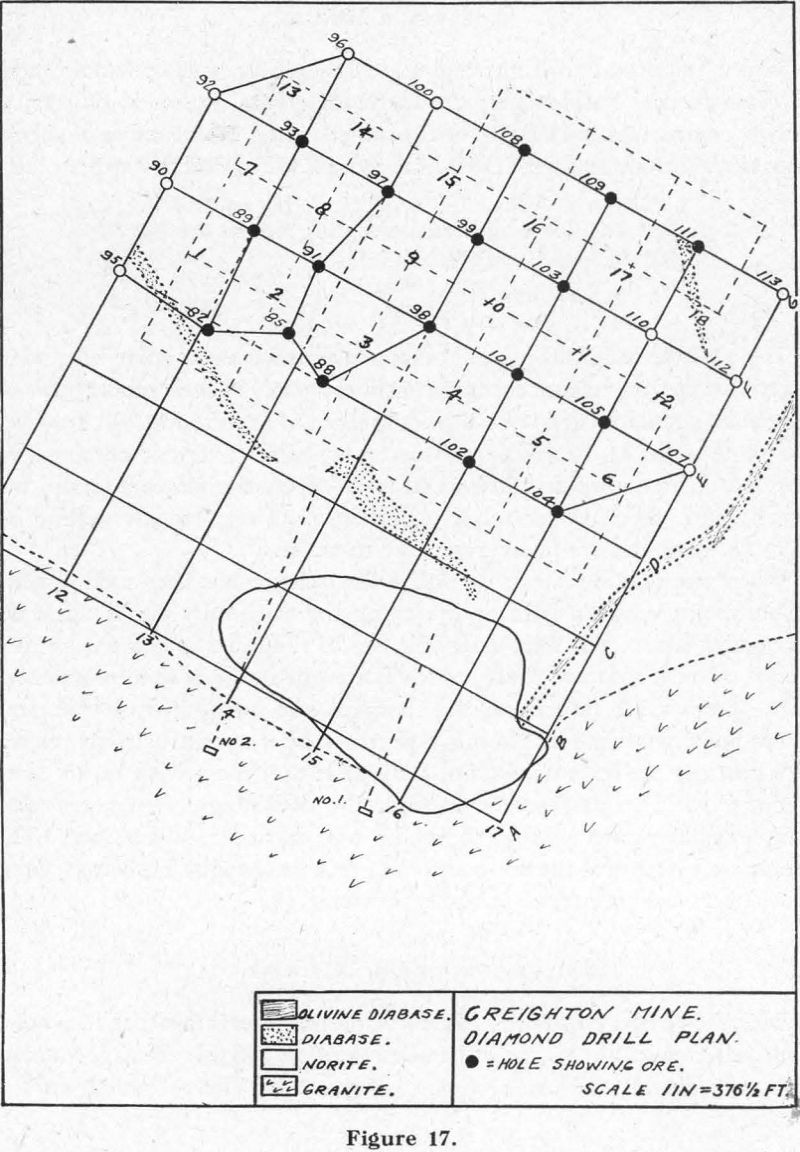
The following computations cover a block of ground at the Creighton mine, drilled in 1913-14. Much of the nickel used by the allies in the world war came from this block of ground, which is now entirely mined out. This area, six hundred feet wide and twelve hundred feet long, was drilled in two-hundred-foot squares, vertical holes. Twenty-six holes were drilled, amounting to 28,803 feet of drilling. These holes were drilled largely in norite and showed very little deflection. Each hole is considered the centre of a two-hundred-foot square. This is not quite true, because holes 91, 85, 82, and 88 were under way before the squares were laid out. The method of computing tonnage is a simple arithmetical one, making use of three letter-sized printed forms as follows:
- Hole computation sheet
- Block computation sheet
- Mine computation sheet.
Every step in the computations shows on the three forms. Figure 17 is a plan of the area, showing the vertical holes drilled.
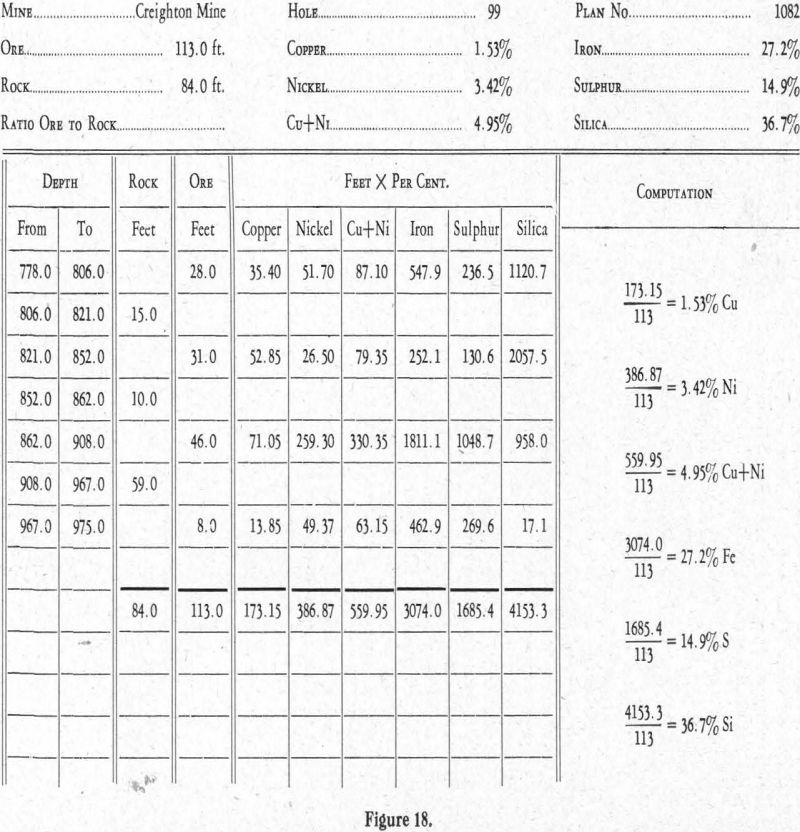
The tonnage computations for block 10 only are shown, to illustrate the method. From the final drill-hole logs of the twenty-six holes, the mineable ore section is selected and transferred to the hole computation sheets. The hole computation sheets are here illustrated by hole computation sheet 99 (Figure 18).
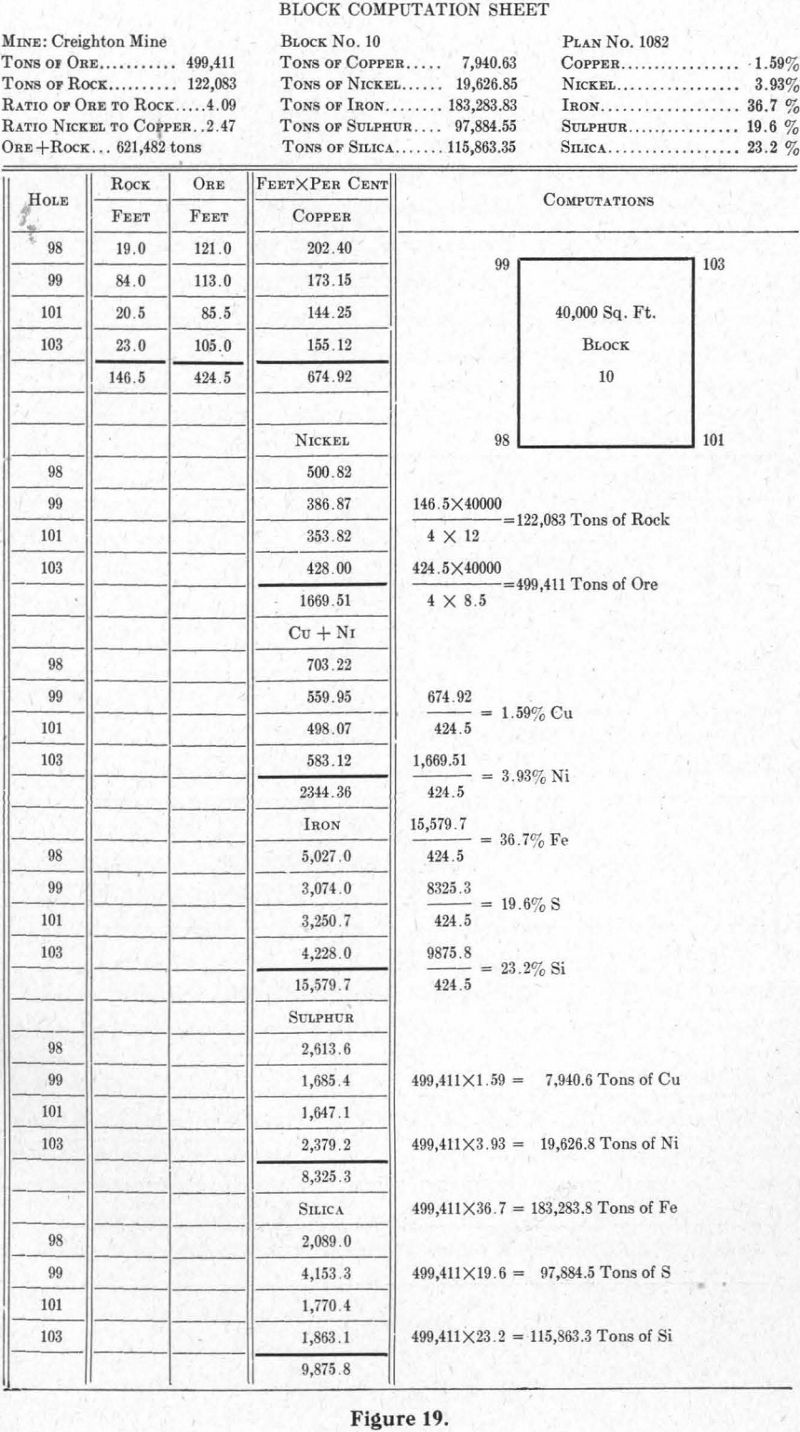
To obtain the tonnage in block 10, the totals (rock, ore, and feet x per cent) are transferred from the hole computation sheets of holes 98, 99, 101, and 103 to the block computation sheet. The same is done for each of the other seventeen blocks. Block computation sheet No. 10 completed is shown in Figure 19.
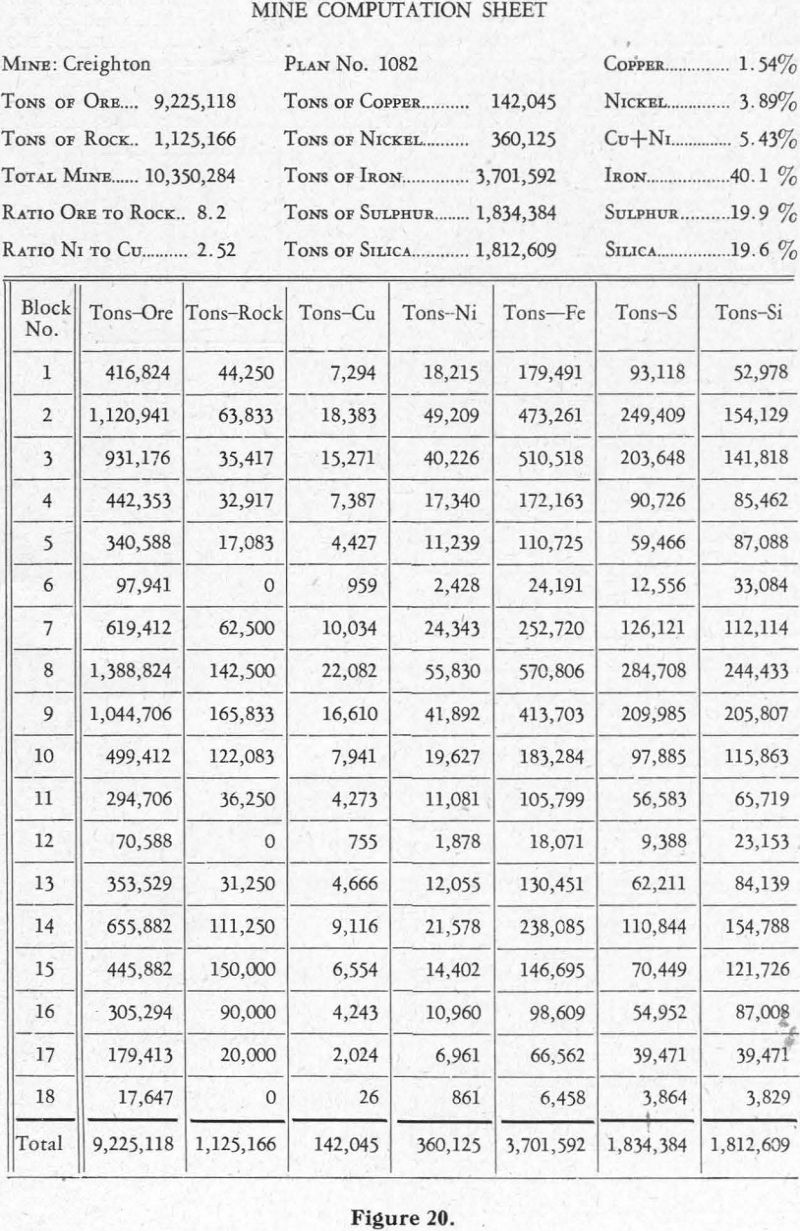
To obtain the total mine tonnage, the totals—tons of ore, rock, copper, nickel, iron, sulphur, and silica—are then transferred to the mine computation sheet (Figure 20).
In order to check the above tonnage, one computation can be made by averaging the twenty-six holes, weighting the two corner holes one, holes 104, 107, 92, and 96 one and a half, the other side holes two, and the inside holes four.
Any merit such a method may have lies in the fact that another engineer can readily check the computations for tonnage, grade, and quality of the ore.
These computations allow for no ore outside the holes. Considering each of the seventeen holes with a mineable section of ore as the centre of a block 200 feet square, the total tonnage in the dotted area can be expressed as follows:
T = S x A/17 x 8.5 = 2,267.3 x 680,000/17 x 8.5 = 10,669,647 tons
Where
T= total tonnage of ore in the dotted area
S= total mineable ore in the seventeen holes
A=horizontal area within dotted lines
8.5=cu. ft. of ore in place, per ton
Cost Per Ton to Prove Tonnage
The cost per ton to prove tonnage by diamond core-drilling is generally very low. At the present time, the cost per ton is apt to vary from one cent per ton for large deposits up to ten cents per ton for small deposits. The following table gives approximate costs per ton of ore proved at five mines. These costs include the cost of the drilling plus one dollar per foot to cover sampling, analysis, and supervision:

Final Report
In exploring a mineral prospect, no matter what method of exploration is used, the main object should be to prove tonnage, grade, and quality of the ore, as quickly and as cheaply as possible. Where diamond core-drilling has been done with this object in view, the final report can include a plan of the drill-holes, sections, final drill-hole logs, and tonnage computations of any ore proved. The tonnage computations can show not only economic metals but also any elements, such as sulphur, iron, and silica, that have a bearing on the treatment of the ore. Any minerals that may be detrimental to treatment can be described carefully as regards their distribution in the ore-body. A careful description of the rock formations and their relationship to the ore-body will be helpful to the mining man in the development of the mine.
Such a report on a prospect, if favourable, is useful in making a sale of the property or in re-financing to obtain funds for mining development and plant construction. Where proof of economic tonnage has been obtained, mine development and construction of treatment plant can be undertaken at the same time, which brings a prospect into production sooner than can be done when plant construction waits on the results of mine development.

