Table of Contents
- Sampling Methods & Techniques
- Sample Gold and Sulphide Minerals
- Factors to Consider when Sampling
- Geology Sampling Guidelines
- How to Choose a Sampling Method
- How Many Samples and What Size Samples to Collect
- How to Insure Sample Representativity
- Surface Sampling
- Sampling Hand-dug Excavations
- Sampling Machine-dug shafts
- Sampling with a Backhoe Excavators
- Sampling Bulldozer Trench
- Sampling with Churn Drills
- Why use Caution when Sampling
- How to Collect a Bulk Sample
- How to get a Grab Sample
- Drift Mine Sampling
- Sampling a Hydraulic Mining Operation
- How to Sample Around Large Rock or Boulders
- Nugget Effect Sampling
- Sampling Uncased or Small Diameter Drill Holes
Acquiring a representative gold sample is seldom easy and in almost all cases sample results need a large measure of interpretation. Some of the underlying reasons why mining & geology sampling is difficult are:
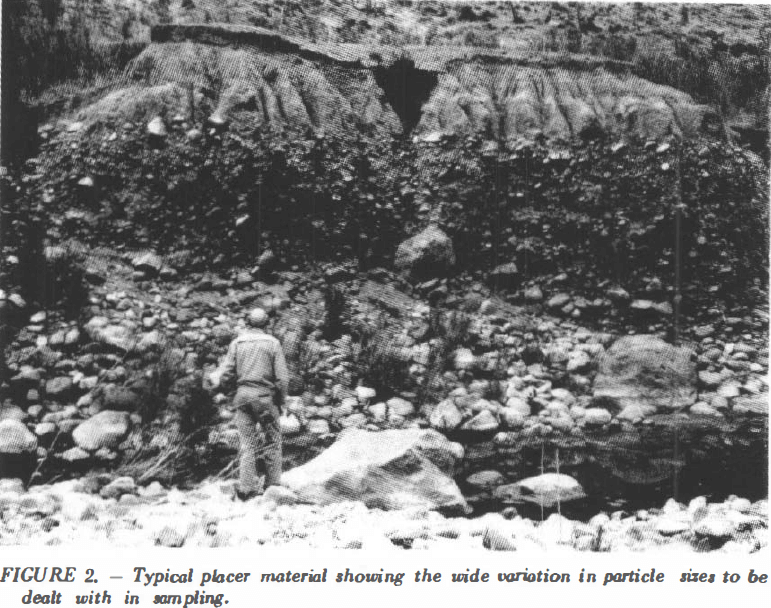
- Large particle sizes to be sampled with. A representative sample should contain all of the constituents of a deposit and in exactly the same proportion in which they occur in the parent mass. But look at Figure 2. This deposit is a mixture of fine sand, pebbles and boulders varying from a few tens of pounds to hundreds of pounds, and in this respect, is typical of many placers. A little study of Figure 2 will show why when dealing with such deposits, it is virtually impossible to take a small sample representative of the whole mass, and why the evaluation of such a deposit can tax the ability of an expert.
- High unit-value of gold. When dealing with the typical placer sample containing a high-value mineral such as gold, any error in mineral content of the sample will be highly magnified in the end result. Consider that in a commercial placer the relative amount of gold (by volume) may be on the order of one part gold to a hundred-million parts of gravel. To the mineral examiner this means that a single fly speck of gold in a pan of gravel is equivalent to say, 2 to 5 cents per cubic yard, depending on the exact size of the speck. The actual separation of small amounts of such gold from overwhelming quantities of sand and gravel seldom presents a serious problem; the real problem is to take a sample that is representative in the first place.
- Erratic distribution of values AKA ‘the nugget effect’. Obtaining a satisfactory placer sample would be a comparatively simple undertaking if the valuable minerals were uniformly distributed throughout the whole mass. In almost all placers. however. the heavy minerals and particularly the gold are more or less segregated. For example, in cases where economic values are confined to pay streaks, these are likely to occur as narrow, discontinuous accumulations with perhaps little or no value in between. Where coarse gold is present it can be expected to be even more erratic in distribution and it should be evident that under such conditions reliable valuation will depend on something more than taking a few small samples and an exercise in arithmetic.
In theory, these problems can be overcome by taking samples large enough to offset the eccentricities of a deposit, but to do so, would mean taking samples measured in tons rather than pounds and it is seldom possible to take such large samples in actual practice.
Some approach the problem by arguing that if enough small samples are taken, the highs will balance the lows and the end figure will represent the average value of the deposit even though no one sample is correct. This may be statistically true but here again, practical considerations seldom permit taking the number of samples needed to achieve this end.
Sampling Methods & Techniques
How do the established placer mining companies evaluate their prospects? First, the prospecting is put in charge of an employee who has had wide experience with the type of deposit or mining project involved. Second, they recognize that any one sample is rarely representative of the overall deposit and by itself may mean little. Third, after studying the combined prospecting data and perhaps taking special check samples, experience-based adjustments known as “correction factors” are applied to the initial sample data where needed and, finally, the calculated values are based on these “adjusted” data. Here, it should be emphasized that the successful placer companies place as much reliance on the experience and insight of their prospecting and management personnel as they do on the sample results. If there is a mathematical formula or a general rule which will replace experience-based judgement, the operating companies have not found it.
Sample Gold and Sulphide Minerals
Parenthetically, it should be noted that placers chiefly valuable for minerals such as monazite, rutile, cassiterite, ilmenite, etc., are generally easier to sample and evaluate than gold placers. There are several reasons. First, the valuable mineral makes up a larger part of the mass. Second, the mineral sought has a relatively low unit value which means that extraneous particles of such mineral (in a sample) may have little effect on the calculated value. Third, deposits containing such minerals are often made up of well sorted, small-size detrital materials such as beach sands and, in such cases, the mechanics of sampling may be simplified by permitting the use of augers or jet drills in lieu of churn drills. Speaking generally, the sampler has considerably more latitude when dealing with minerals of low unit-value than when dealing with gold and his mistakes are less likely to seriously affect the end results.
Factors to Consider when Sampling
Many things other than mineral content have a direct bearing on the commercial value of a placer deposit. The mineral value in itself may be of secondary concern where sampling or examination of the lands for example, show unfavorable bedrock conditions, excessive amounts of sticky clay, large boulders or other factors that would adversely affect a placer mining operation. A good sampling program will provide the information needed to evaluate adverse physical conditions, should they exist, but here again experience is needed to interpret the information and make correct decisions.
Placer samples yield limited information. Correct interpretation of this information depends upon the engineer’s powers of deduction and experienced judgement, rather than on the rigid application of formulae.
Geology Sampling Guidelines
For practical reasons, placer sampling incorporates a series of steps which may be carried out one at a time or in some cases are more or less combined. These may be defined as:
- Reconnaissance of the lands.
- Sampling.
- Sample processing.
- Data processing.
- Evaluation of results.
The first step can be further divided into three parts which will be discussed here under the following headings:
a. Pre-sampling reconnaissance.
b. Choosing a sampling method.
c. Number and size of samples.
Geological Reconnaissance
A preliminary inspection of the lands should precede any placer sampling work. If the property is small this may take less than an hour but if it is large or if it contains significant mineral exposures, several days of pre-sampling reconnaissance may be in order. The importance of this preliminary work should be self-evident for, obviously, before the engineer can make intelligent sampling plans he must have some idea of the size, shape and the general characteristics of the deposit being investigated. Unfortunately, this first step appears short-changed in many sampling programs.
If aerial photographs of the lands under study are available, copies should be obtained before starting the reconnaissance. Photographs of the type available from the U.S. Geological Survey or Forest Service are often the most useful reconnaissance tool. This is particularly true when used in stereoscopic pairs. Aside from providing a quick, overall perspective of the lands, good aerial photographs reveal details of topography, drainage and other features not easily discernible on the ground.
A review of published material relating to the lands under study should be part of any reconnaissance because information thus obtained can be a great time saver, particularly where the regional or local geology has been worked out by qualified observers and reported in authoritative publications. On the other hand, too much reliance on published material can lead to erroneous prejudgements, particularly among younger engineers not in a position to weigh the statements and conclusions of others against their own experience.
The history of a mining district can play an important role in the selection and interpretation of placer samples and should be considered an element of the reconnaissance. Any old diggings on the lands to be sampled merit careful consideration, particularly those from which some production has been made. Where production records are available, they often serve as a useful guide in the selection and interpretation of new samples. Nearby mines should also be visited and examined where possible to do so.
Because the reconnaissance must be tailored to suit the job at hand, no fixed procedures can be set out here. The effort and time required for an adequate job will depend on the examining engineer’s experience and perception.
How to Choose a Sampling Method
What sampling method should be used? This question comes up early in most placer investigations but there is no easy answer. Because each deposit has unique characteristics there is no single “best” method of sampling and no procedure can be applied universally. In some cases, decisions will have to be made on a sample-by-sample basis but a good pre-sampling reconnaissance will usually indicate if the ground should be tested by means of pits, shafts, churn drilling, or other means. It is a paradox that the very things which are to be determined by sampling are often things which govern the type of sample to be taken in the first place. This is a “chicken-and-egg” type of situation in which we sometimes cannot tell which comes first. Something to keep in mind is the fact that today’s placer sampling is expensive. Because of this, the method or sampling program adopted should be no more elaborate than needed to provide the amount of detail and the end accuracy required for a particular determination. For example, the prospector, whose main concern is to expose enough of a “showing” to interest a second party or mining company in his prospect would be foolish to expend his own time and money attempting to carry out an elaborate sampling program; that is, sampling which any cautious mining company would do over again for their own satisfaction and protection. Very often the first placer sampling is of a cursory nature sufficient only to indicate if further interest in the property is warranted or to serve as a guide in future sampling or exploratory work.
Some sampling methods to be considered are:
- Sampling existing exposures.
- Use of hand-dug excavations.
- Machine-dug shafts.
- Backhoe pits or trenches.
- Bulldozer trenches.
- Churn drill holes.
- Bulk samples.
- Grab samples.
The order in which these methods are presented has no bearing on their relative importance or applicability in a given situation. Their applications are described in the section titled “Sampling Methods.”
How Many Samples and What Size Samples to Collect
When investigating placers, the problem of how many samples are needed and where they should be taken, and how large they should be, is often a perplexing one. Here there is no formula, rule of thumb, or pat answer to reliably guide the sampler; in fact, placer sampling procedures may vary not only with every property but with the purpose of the examination and, to some extent, with the type of mining contemplated.
How can the mineral examiner cope with this problem? First, he must know what he is dealing with. Is it a large, regular deposit in which the gold or other valuable mineral is distributed somewhat uniformly? Or, is it a boulder-strewn, stream-type deposit containing coarse, erratically distributed gold? It is a generally accepted principle that the smaller and more uniform the size of the gravel, and the more evenly distributed the mineralization, the fewer samples needed for an intelligent estimate of value. While we may accept this principle as fact, the degree to which such characteristics affect sample size and the number of samples required remains largely a matter of judgement. To put it another way, textbooks tell us that for ordinary gold ore, the size of the largest piece of rock in the sample determines the weight of sample needed. According to Woodbridge (1916, p. 57) 1/, if the largest piece is one inch, the minimum sample weight should be 2,000 pounds. Where the largest piece is two inches, the minimum weight should be 10,000 pounds, etc. If this progressive scale were applied to placer gravels, the required weights for typical samples would be measured in tens of tons. This points out that sampling procedures based on pure theory are too unwieldy for placer application and, in turn, it shows why the placer sampler must to a large extent rely on his own judgement and good sense to determine what is an adequate-size sample in a given case.
Now, consider a single sample. While a single sample may provide much information about the material it actually penetrates, it rarely, if ever, provides sufficient information for the valuation of a deposit. Where a single sample is taken its assumed area of influence will reflect the insight or optimism of the viewer. But, how do you measure these? There are placer deposits of such a character that it is safe to project sample data several hundred feet and there are others where the gold distribution is so erratic that a ten-foot projection would be a dangerous assumption.
But now suppose we take a second, third and fourth-or an extended series of samples. Obviously as each sample is taken, its area of influence extends only partway to adjacent samples and as more samples are taken at closer and closer intervals, the areas of influence become progressively smaller and the combined sample results progressively more representative until, in theory, a point is reached where the combined average equals the true value of the whole. This is known as sampling to a uniform average.
Sampling to a uniform average is simple in concept but its objective can seldom be reached in practice. In other words, for practical reasons the desired number of samples can rarely be taken and in the end, the placer operator must either reject a property or go forward on the strength of a valuation which is not 100 percent reliable and, hence, he must always accept some degree of risk. Realistically then, the minimum number of samples might be considered the number required to hold this risk within acceptable limits. A method for graphically examining this problem has been described by Herr.
As a practical example, consider an actual sampling program carried out by an experienced gold dredging company. In this case the ground had a history of superficial hand mining operations going back many years and the geologic and physical conditions indicated a possible depth and volume sufficient to support a bucket-line dredge. A comprehensive drilling program was needed to determine the average tenor and to define possible mining limits.
As a first step, a 6-inch placer drill was moved to the property and four holes drilled at random points to test the depth, character of material, and to get some idea of its gold content at depth. Results from the four preliminary holes enhanced the overall prospect and indicated a need for further sampling.
At this point a rectangular grid in the form of 800’ x 1600’ rectangles was laid out and holes were drilled at each intersection. This initial wide-spaced drilling over a 1500-acre tract was designed to determine the approximate size, shape, and possible value of the deposit. Using results from this drilling as a guide, the prospect data were further refined by drilling intermediate holes along some of the 1600’ sides and, in turn, a selected area was divided into 400’ blocks by intermediate drilling along the 800’ lines. Each step, progressively taken, was designed to furnish the amount of information needed for evaluation at that stage. Had the results from any one step been unfavorable the project would have been dropped at that point. It should be apparent that a high degree of training and diagnostic skill is needed in this work. In the foregoing example, a reliable placer valuation was based on a sampling density of one hole for each 3½ acres of dredge ground which in this case was equivalent to a volumetric sample factor of about 1/500,000. For comparison, there are cases in which one hole for each 10 acres was found adequate and some in which no amount of drilling would suffice.
How to Insure Sample Representativity
We can seldom, if ever, predetermine an optimum sampling pattern or the total number of samples required to insure representativity. For this reason initial sampling programs should be tentative or at least should be flexible enough to accommodate any changes dictated by the work as it progresses. In any case, detailed placer sampling is expensive and for this if no other reason, even the most comprehensive sampling program should progress from a simple beginning to its final form in a series of carefully evaluated steps.
Also, it is important that a distinction be made between sampling for the purpose of initial valuation and sampling to block out a finite parcel of mining ground. It sometimes takes only a few judiciously selected samples to determine that a property has no economic value while, on the other hand, an area showing good potential may require a thorough sampling in order to determine the value and other information needed to plan a successful mining operation.
Parenthetically, it should be pointed out that there is no final proof of the accuracy of placer sampling because in an ensuing operation, the mining and metallurgical losses can never be fully identified or measured. This is particularly true in the case of gold dredging.
Surface Sampling
During the early stage of a placer investigation a quick answer may be needed to determine if a significant expenditure of time or money is justified for further investigation. At this stage, practical considerations may limit initial testing to a few samples taken from Surface and existing exposures such as creek or dry wash banks, road cuts, old mining pits, etc. These can be informative if properly used.
Existing exposures are usually tested by panning, particularly where the exposure is small. In most cases the bedrock will not be exposed and the distribution of available sample points will be far from ideal and, in either event, it should be obvious that extreme care is needed when evaluating the sample results. On the other hand, the only preparation needed may be the cleaning away of sloughed or weathered material to expose fresh surfaces and, because of this, the use of existing exposures offers a cheap, fast method for preliminary testing.
By themselves, small samples obtained from existing exposures can seldom be expected to indicate the actual value of the ground. They may, however, prove or disprove the presence of gold and, if correctly interpreted, they can indicate the range of values to be expected. Nevertheless, many reports intended to prove or disprove the actual value of placer lands are based on a few pan-size samples taken from existing exposures and offered at face value. Such reports and sample data must always be viewed critically and accepted with reservation until proved valid. The very offering of this type of data, without qualification, may be good reason to question the expertness or intent of the vendor.
In brief, samples from existing exposures taken in conjunction with a placer investigation can, if properly evaluated, provide valid, useful data. But, for the inexperienced or the unwary sampler, existing exposures offer an inviting and sometimes unrecognized trap.
Sampling Hand-dug Excavations
Hand-dug excavations in the form of pits, trenches or small shafts are generally suited to dry, shallow ground. They are most effectively used to depths of about 7 feet which is the depth from which material can readily be thrown with a shovel. Where practicable, they may provide the best means for sampling a placer. They generally do not require such close supervision as drilling nor do they require the high cost, specialized equipment or highly trained personnel needed for placer drilling. An extra bonus is offered by hand-dug excavations in cases where they remain open for some time, permitting resampling at a later date. In the case of dredge prospects, the principal point in favor of pits or shafts, where applicable, is the fact that they provide a much better idea of boulder content and gravel sizes than do small-diameter drill holes. Boulders are always an important factor in dredging operations.
The simple equipment needed for hand-dug sample pits or shafts is a particular advantage in remote areas or where only a limited amount of sampling is anticipated. A few strategically located pits or shafts may show that the ground is entirely unfit for mining or that it will not warrant the expense of drilling. On the other hand, if they return good prospects and the ground is subsequently drilled, the expense of preliminary hand work will be but a small part of the overall cost. Successful mining companies learned long ago to approach placer prospects cautiously and to make a few diagnostic tests before putting their money in an expensive sampling program. In many cases hand-dug excavations adapt well to this need.
The use of hand-dug shafts for general placer sampling was common practice at the turn of the century when labor was cheap and experienced shaft men were readily available but, today, because of the high cost of labor and a scarcity of experienced men, they are seldom used on a wide scale. But they may still be used to advantage in special situations; for example, by prospectors who expect to find good bedrock values in ground too deep for effective use of pits or trenches. In such cases one or more shafts will usually be put down to test the gravels lying on bedrock. This approach is common where the owner or a promoter’s main concern is to convince someone that the property should be more thoroughly prospected by drilling or other means.
Hand-dug shafts are commonly used to check selected churn drill holes and in many cases they are essential to correct interpretation of the overall drilling results. This is taken up in the section dealing with sampling by means of churn drills.
Most engineers agree that where feasible all of the material taken from a test pit or shaft should be washed. If the ground stands well and the walls of the excavation are cut square and parallel, it is an easy matter to determine the in-place volume of material removed and to directly compute its value after washing. An excellent description of a sampling program employing this procedure is found in an article by Sawyer. The use of hand-dug shafts to prospect ground worked by the Wyandotte Gold Dredging Company of California has been described by Magee. Where an excavation cannot be measured accurately, it will be necessary to weigh the sample material or to measure its loose volume in a box or other container. In either case the indicated gold value will have to be converted to in-place or “bank” value by use of suitable conversion factors.
Where it is not practicable to wash all material, a good approximation of the ground’s worth may be made by washing several pans per foot of depth as the excavation advances. But, this method is always risky unless the man in charge is completely impartial in his selection of material for panning and unless he is a trained placer sampler capable of applying experience-based judgement to the findings.
A somewhat similar procedure but one in which the personal factor is in part eliminated may be carried out as follows: Carefully deepen the pit or shaft in uniform, measured drops of say one foot at a time. Just prior to each deepening, carefully remove a sample by digging below the bottom of the pit or shaft to a depth exactly equalling the distance the bottom is to be dropped during the next deepening step. The minimum-size sample that can be conveniently taken in this manner will be one having a 12” x 12” cross section but if many rocks are present it may be somewhat larger. A sheet-iron caisson 18 or 24 inches in diameter by about 12 inches long can be used to advantage when the bottom sample must be taken from wet or ravelling ground. This type of sample may be taken from the center of the pit or shaft bottom or from any suitable place but once started, its location should remain fixed. By following this procedure, a progressive sample can be obtained from undisturbed material ahead of the main excavation.
Where the excavation walls stand reasonably well, a sample can be obtained by cutting a vertical channel up one ride of the pit or shaft. The excavated sample material can be allowed to fall on a canvas placed at the bottom of the pit or it may be caught in a bucket or box held close to the point of cutting. Where conditions permit taking a true channel, the sample volume can be determined by direct measurement but in any case it is best to weigh each sample as a check.
The first step in channel sampling is to clear away all foreign material from the ground surface above the place to be sampled. Next, thoroughly clean the sample area by scaling down the face to be cut. Following this, remove any loose material from the bottom of the pit where it might interfere with the sampling operation and, finally, check the bottom for bedrock. A piece of heavy canvas or a tarp is then spread at the bottom of the face to be sampled and this is positioned to catch all material falling from the sample cut. Starting at the bottom, a uniform rectangular channel is cut upward to the top of the prospect pit or in some cases, to the top of a particular formation or sample increment. When starting a sample, the cuttings are usually allowed to fall on the canvas but when sufficient room becomes available, it is best to catch them in a suitable box or metal container held close to the point of cutting. As the sample channel advances upward, the cuttings are periodically transferred to one or more sample sacks which should be kept in the sampler’s possession or under surveillance throughout the sampling operation. In most situations an ordinary prospect pick will be found satisfactory for cutting channel-type placer samples.
How large should the channel cut be? There is no simple answer because like other aspects of placer sampling there may be special factors to consider in each case. Speaking generally, however, it will be found that experienced placer samplers usually select a size somewhere between 3” x 6” and 12” x 12” in cross section but, contrary to popular belief, there is no minimum or optimum size which by itself will insure an adequate sample.
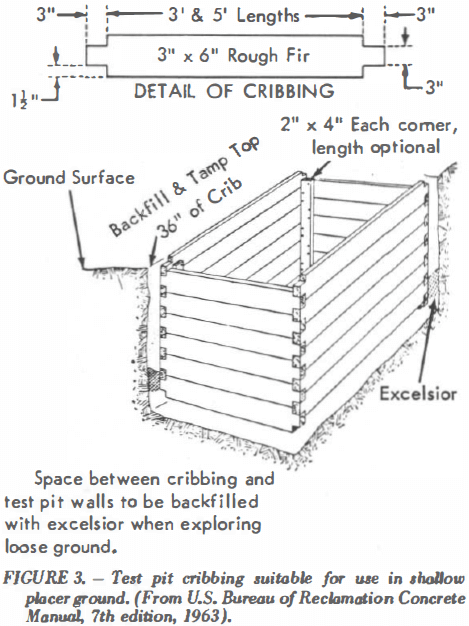
In ground where the water level is several feet below the surface, it is sometimes possible to sink pits or small shafts to bedrock using only buckets or a small pump to remove the water. These wet excavations are usually difficult to keep squared up but in any case, some form of ground support may be needed to eliminate the working hazard and to minimize sampling errors which result when inflowing water caries values into the pit. A simple, easily-framed style of cribbing suitable for most shallow work is shown in Figure 3.
In loose, water-logged ground it may be impracticable to sink prospect shafts without the use of telescoping steel caissons. Certain problems and special procedures associated with caisson work have been discussed.
At first glance the use of hand-dug pits or shafts would seem to be an effective inexpensive way of prospecting shallow placers but this approach is too expensive for general use today, where a high dollar value must be placed on time. Nevertheless, hand-dug excavations intelligently used can serve a useful purpose in that, under favorable conditions, a few well located pits or shafts may indicate the value of a prospect before any great expenditure of money is made.
Sampling Machine-dug shafts
Machine-dug shafts have been found both useful and economic in a number of instances but they are not a cure-all for placer sampling problems. The equipment used can broadly be divided into two types: rotary bucket drills and clamshell-type excavators. To be effective, either type must be capable of doing three things:
- dig a hole large enough for a man to enter and inspect the ground or to cut samples from the shaft walls;
- have a reasonably fast digging rate; and
- be self-contained, freely mobile and capable of negotiating rough terrain.
Truck-mounted bucket drills have been in use for many years by excavation contractors, particularly those specializing in foundation test work. Their equipment is usually designed to dig a hole 24 or 36 inches in diameter and to depths of 60 feet or more. The digging unit can best be described as a straight-sided bucket which has two radial openings in its bottom and excavating blades extending below the openings. Rubber flaps fitted over the openings allow cuttings and rocks to 6-or 8-inch size to pass into the bucket but seal the openings when the loaded bucket is being hoisted. The bucket is rotated by means of a square “Kelly” bar which, in tum, is rotated by a ring gear on the drill rig. See Figure 4.
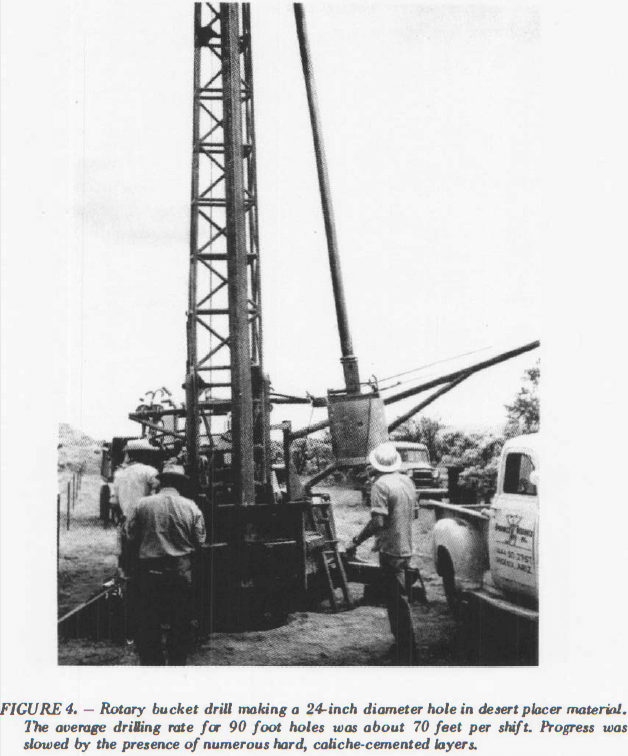
Attempts to adapt this type of drill to placer sampling have met with mixed success but speaking generally, rotary bucket drills have been found useful where the ground is dry and firm and where there are few rocks too large to pass through the bucket openings. On the other hand, they have been found poorly suited to the hard, rocky ground encountered in many gold placers.
The successful use of rotary bucket drills to sample dry placers has been described in articles by Draper and by Prommel. Prommel describes a sampling project in which 1,239 test holes 28 inches in diameter were drilled in 147 days. Their combined depths amounted to 16,705 feet. The cost of this work using two rotary bucket drills was 98.6 cents per foot of hole but this did not include engineering or sample testing charges and, it should be noted that the low cost reflects depression-level prices.
Two clamshell-type machines designed specifically for placer prospecting are: An air-actuated unit sold under the trade name KLAM, and a cable-actuated unit known as the PAR-X Placer Sampler. The KLAM is essentially a manganese steel clamshell bucket of I cubic foot capacity, fitted with replaceable teeth and actuated by compressed air. The digging unit consists of the bucket, an air cylinder placed directly above the bucket and a 15-foot stem as shown in Figure 5. The combined digging unit which weighs one ton is suspended from the mast of a drill truck by means of a wire line spooled on a suitable hoist. According to the manufacturer, the standard unit digs a round, vertical hole 24 inches in diameter. and is efficient to a depth of 100 feet. It is said to dig from 2 to 20 feet per hour depending upon depth, formation, and on whether or not casing is used.
The PAR-X machine differs from the KLAM in that the clamshell is attached to a telescoping stem or bucket carrier which limits the depth of hole to about 30 feet. The opening and closing action is controlled by wire ropes. The unit is truck-mounted and, according to Huttl (1941, pp. 55, 56), its digging speed averages 35 feet per day in normal ground. It digs a hole 28 inches square without casing.
Machine-dug shafts are best suited to bulk sampling, that is, sampling in which the entire volume of material removed from the shaft is run as a sample. Where the ground stands well channel samples can be cut from the shaft walls but there is hardly room for a man to work effectively in a 24-inch diameter hole. However, the fact that machine-dug shafts can be entered for inspection is a point in their favor, particularly in new fields where little is known about the sub-surface conditions.
Something proponents of this method of placer sampling seldom mention is the fact that an uncased, machine-dug shaft passing through alternating hard and soft layers or through ravelling ground will have a non-uniform diameter, that is it may be appreciably larger in the softer horizons than in the hard. This means that where over-diameter shaft sections occur in ground that is above average or below average mineral value, the end result will be an unintentional salting or an impoverishment of the bulk sample.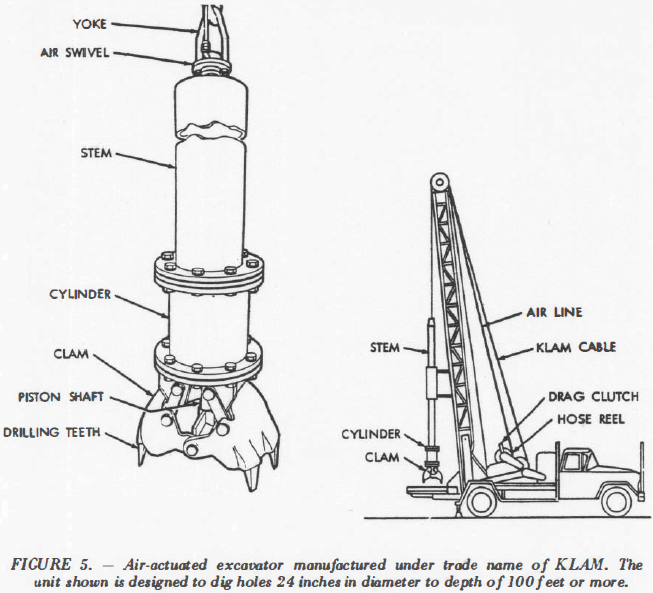
To cite an actual case, a dry, desert placer was sampled by means of 24-inch diameter machine-dug shafts ranging from 60 to 90 feet deep. Both rotary-bucket and Klam-type excavators were used. The valuable mineral was magnetite occurring in the form of black sand. When the completed shafts were entered for inspection, it was found that the shafts had passed through a series of hard, caliche-cemented gravels separated by relatively loose sand and gravel strata and, in all cases, the shaft diameters were appreciably larger in the softer materials than in the cemented horizons. Sections were found enlarged to as much as 2½ times the normal 24-inch diameter. If the grade of material throughout the shaft had been uniform this local enlargement would be of no consequence, but it was found that the enlarged sections were often in magnetite-rich sands. As an end result, samples (representing 30-foot shaft increments) contained too large a proportion of the richer material which in effect amounted to unintentional salting. Had this been a gold prospect the errors caused by non-uniform hole size would have been substantial.
Sampling with a Backhoe Excavators
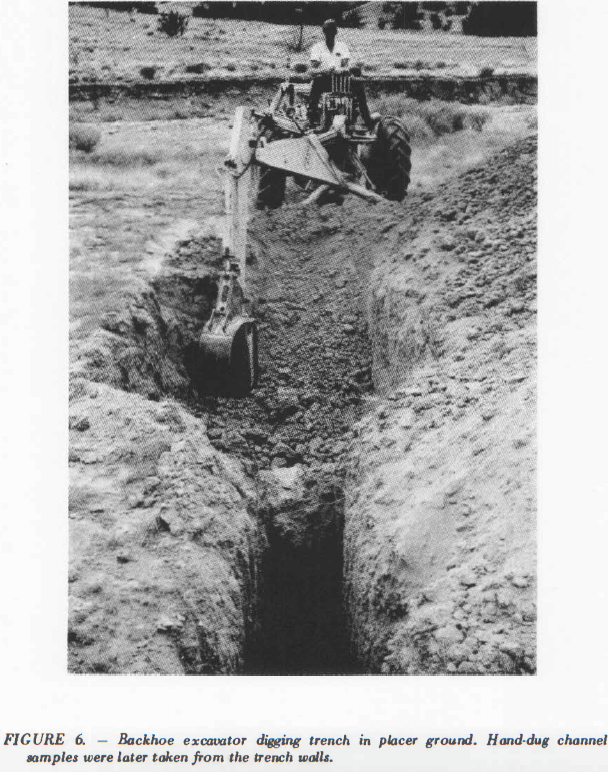
The development of compact, tractor-mounted backhoe excavators in recent years has given the mineral examiner a tool which adapts well to many of his placer sampling needs. These go-anywhere, high-performance machines dig, load and backfill. The combination most frequently employed is a hydraulically-operated backhoe unit mounted on the back end of a rubber-tired tractor plus a scraper or loading bucket at the front end. See Figure 6. A typical rig will dig 10 feet deep, reach more than 15 feet from the pivot point and will load into a truck 11 feet high. The backhoe bucket has more than 7,000 pounds digging force and generates a pry out force of 15,000 pounds or more. Most placer ground is handled with ease. A 1 ½-yard, track-mounted backhoe (Thew-Lorain) has a depth capacity of 27 feet and is available with a range of buckets that provide cutting widths from 12 to 38 inches.
In most areas this type of equipment is available on a rental basis from contractors who will be found listed in the yellow pages of the telephone book under “excavating contractors.” Rental rates vary with locality and machine size but $10 to $14 per hour is not unusual. This price includes the operator. On short-term jobs the charge starts at the time the equipment leaves the contractor’s yard so it is well to have the work well planned and laid out in advance.
In connection with a placer sampling job near Grants Pass, Oregon, in 1966, thirteen shafts ranging from 4 to 12 feet deep were dug using a tractor-mounted backhoe equipped with a 38-inch “graveyard” bucket. The backhoe with operator rented for $11 per hour. The 13 shafts were dug in 6 hours and the travel time was two hours bringing the total charge to $88. This amounted to a little less than $ 1 per foot of shaft and provides a good example of the cost and work accomplishment that can be expected when using this type of machine.
In most placer gravels the walls of backhoe-dug pits or trenches stand well and can be sampled by cutting a vertical channel in the face of the standing material. Depending on requirements and conditions, the sample channel can be cut with the backhoe bucket (usually 24” wide) or by hand. Where the presence of much large rock or ravelling ground precludes the use of channel cuts, either all excavated material or alternate buckets can be set aside as a bulk sample. See Table III. The tractor-mounted backhoe is probably the most versatile placer sampling tool available to the mineral examiner today.
Sampling Bulldozer Trench
The use of bulldozers to dig trenches for prospecting shallow placers is too common and too well known to need more than passing mention.
Because of its design, the bulldozer is more effective as a pusher than as a digger and for this reason it is best suited to ground less than 10 feet deep and to a working (pushing) distance not exceeding 200 feet. Two types of blade control are in general use; the blade may be raised and lowered hydraulically or it may be operated by a cable control. For digging prospect trenches the hydraulic blade is considered best as it provides a positive downward pressure; in fact, it allows much of the tractor’s weight to be put on the blade while digging hard ground. The cable-controlled blade has only its own weight to hold it down and as a result its cutting edge has a tendency to ride over any hard spots in the bottom of the trench.
The cost of bulldozer-dug trenches depends so much on the type and size of machine used and on the depth and hardness of the formation, and the operator’s skill; any estimate of working speed or costs must be made on a case-by-case basis. Lorain has tabulated field data for trenching with bulldozers but his 1944 cost figures cannot be used without updating.
Possibly the greatest advantage to be gained in prospecting placers by means of bulldozer trenches, where applicable, is that they permit first-hand inspection of the ground. This makes it possible to visually determine the character and size of gravel to be dealt with and, in addition, the pay or barren sections can sometimes be found by simple inspection and panning of the trench walls. Another feature is that a considerable area of bedrock can be exposed for inspection or testing as compared to pits or drill holes. In many cases, even where the ground is more than 10 feet deep, the results obtained from a few days of trenching with a bulldozer will provide the information needed to decide whether or not a more extensive (and expensive) sampling program is warranted.
Sampling with Churn Drills
Drilling is usually resorted to in deep or wet ground where sampling by means of pits, trenches or shafts is not practical. Many western gold placers, particularly those exploited by bucket-line dredges, have been sampled by churn drilling and it can be said generally that this method adapts well to the dredge operator’s needs.
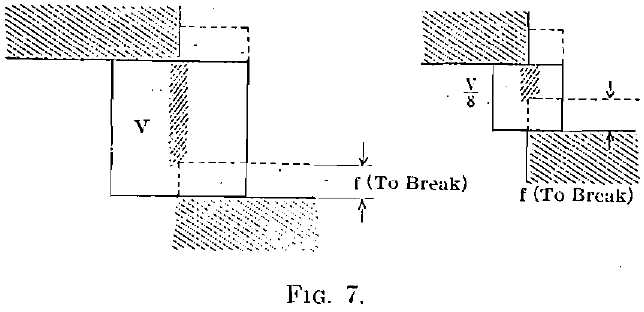
The basic drilling equipment consists of a heavy casing, a chisel-shaped bit suspended from a drill line and a vacuum-type sand pump. The overall operation can be divided into five steps as follows:
- Driving.
- Drilling.
- Pumping.
- Panning.
- Pulling and moving.
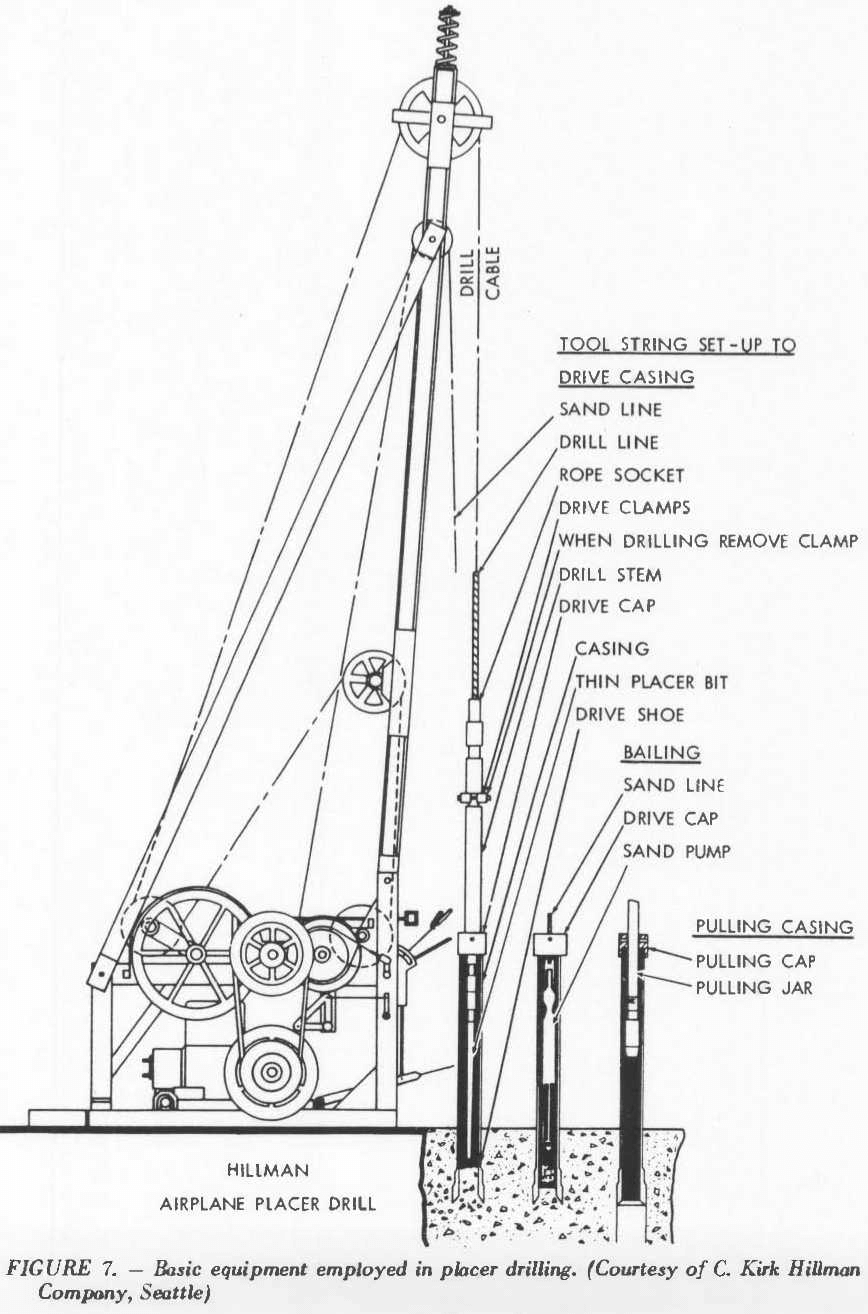
The first step provides a measured core of gravel which serves as the sample. The gravel core is obtained by driving the casing (commonly referred to as the drive pipe) into the ground by striking it with a driving block attached to a heavy drill stem. The bottom end of the drive pipe is fitted with an alloy-steel shoe made with a sharp, beveled cutting edge. The effective diameter of this beveled edge determines the area of gravel or sample cut by the drive shoe as it is forced downward. A second step breaks up the core and prepares it for removal from the pipe. This is done by chopping the core with the drill bit which is repeatedly raised and dropped by means of a walking beam or crank acting on the drill line. Water is added during the drilling operation and when the material is reduced to a size that will permit pumping, the resultant sludge is removed from the hole with a special vacuum-type sand pump. The cuttings are transferred to a measuring bucket which serves as a check to indicate if excess core is being removed or if extraneous material is running into the pipe.
The cuttings are washed in a rocker and the rocker concentrate further reduced by panning. The panner counts the gold colors recovered from each drive, estimates their weight and enters this information in the drill log. Examples of placer drill logs will be found in Appendix D.
The driving, drilling and pumping steps are successively repeated for each drive (usually 1 foot at a time) until the hole is completed. The engineer in charge then weighs the combined gold and calculates the value of the hole. As a final step, the drive pipe is recovered by pulling. The drill is then moved to the next hole.
An illustrated, step-by-step description of the placer drilling process will be found in Appendix D, to which the reader is referred. The basic equipment is illustrated by Figure 7.
As the pipe is driven downward it will, in theory, cut a cylinder of gravel having an area equal to that of the drive shoe and a length equal to the drive. A short length of core left in the bottom of the pipe to serve as a plug will, also in theory, prevent run-ins of extraneous material when pumping. Assuming ideal conditions and a perfect core, the value of the hole (or the sample increment) would be determined by use of the following equation:
cents per cubic yard = W x V x 27/A x D
in which W = weight of gold in milligrams.
V = value of gold in cents per milligram.
A = effective area of drive shoe in sq. ft.
D = length of sample in ft.
27 = cubic feet in a cubic yard.
To illustrate the above equation, assume a 32-foot hole drilled with a standard 6-inch drive pipe and 7 ½-inch (outside diameter) drive shoe with an effective area of 0.3068 sq. ft. Also assume a recovered gold weight of 50 milligrams. As a matter of convenience the gold will be considered 887-fine, which is equivalent to 1/10c per milligram. Substituting we would have:
cents per cubic yard = 50 x 0.1 x 27/0.3068 x 32
cents per cubic yard = 13.7
It should be emphasized that drill hole values calculated in this manner would be correct only if all drives were perfect, that is, if the effective area of the drive shoe were exactly 0.3068 sq. ft., and if the correct length of core had entered the pipe with each drive. In the preceding example, the 50 milligrams of gold would have been obtained from a cylinder of gravel exactly 7½ inches in diameter by 32 feet long.
But in practice a perfect core is rare and we find the measured core rise and the volume of material recovered from each drive to be greater or less than their theoretical amounts. When drilling gold placers, any deviation from the norm is important because when basing value calculations on small-diameter holes, any deviation between the theoretical sample size and the actual sample size becomes critical. For this reason, any excess or deficiency of core should be taken into consideration during the calculation procedure and suitable corrections applied.
Erratic drill cores are caused by a variety of things. A rock partially blocking the drive shoe may move downward with the pipe and force material beneath it to one side. The result would be a deficient core. A normal-length drive in tight ground often gives less core than it should. This is caused by material packing in the pipe and as it becomes more difficult for the core to enter, some will be pushed aside. The experienced driller sometimes prevents this by drilling a short distance ahead of the shoe. He should not, however, “drill ahead” without permission of the engineer in charge because there are cases where drilling below the shoe creates more problems than it solves.
When a drive is made through tailings or through loose, rocky ground, the initial core rise may be normal but subsequent pounding by the drill bit tends to push the core material back down the pipe and out of the hole. As a result, the pump may get little or no core recovery. In loose, wet ground there is always danger of over pumping, that is, pulling excess material in from under the drive shoe. In “running” ground the driller should keep the drive pipe full of water to offset outside ground water pressure (which tends to push loose material into the pipe) but in spite of such precaution, excess cores can be expected.
Ideally, a I-foot drive should produce a 1.7-foot core rise; this 0.7-foot increase reflecting the difference in diameters between a 6-inch drive pipe and its 7½-inch shoe. But in practice we rarely get the theoretical amount of core. Instead, we get too much or too little for a given drive. Now, the most important thing to remember is that if a placer drill sample is to be meaningful it must take into account the amount of material actually obtained from the sample point in question. Stated simply, if a drillhole increment contains too much core its value will have to be downgraded. If it contains too little core its indicated value may be upgraded. Most placer engineers base their adjusting procedures on either the ratio between theoretical and actual core rise, or theoretical and measured core volume. Depending on which is used, the basic formula would be:

In general practice both core rise and volume corrections will be considered, but the most conservative correction will be used.
Experience has shown that adding large plus corrections at their full value is likely to result in an overestimate and for this reason some engineers limit any “corrected” figure to an amount not more than double the initial uncorrected figure. They will, however, apply the full amounts of all minus corrections, this being considered a form of safety factor. Actually, in the case of gold placers, there are no universal rules for interpreting or “correcting” the samples obtained from churn drilling. Validity of the end result will depend largely on insight and the experience of the engineer in charge.
Many of the details to be considered when logging placer drill holes and processing the data have been given by Harding and Daily, to whom the reader is referred. From these it will be seen that placer drilling requires specially trained personnel and that “correcting” the drill results is a specialty that is not within the experience range of most mining engineers. For this reason, any placer valuation based on drilling should be viewed critically until the qualifications of the engineer in charge have been established. This is particularly true where the original drill logs are not available for inspection, or where drilling cannot be compared against past production from the particular deposit or area.
Something should be said about the so-called “Radford” factor which, when used, applies an arbitrary plus correction to the drill hole calculation. Early placer drillers soon became aware that their actual core recoveries were something different than the theoretical amounts and it was reasoned that because of progressive rounding of the cutting edge, a 7½-inch drive shoe will in normal use cut something less than 0. 3068 sq. ft. of material. Mr. Radford, on the basis of his experience and observations, concluded that the sample taken in by a 7½-inch shoe driven 1 foot will, on an average, be 0.27 cu. ft., or as more commonly stated, 1/100 of a cubic yard per foot of drive. This figure was widely accepted by the early drillers.
The Radford factor is applied by substituting 0.27 for “A” in the basic equation where cents per cu. yd. = W x V x 27/A x D
Using our earlier example this equation would become:

The first calculation using the theoretical drive shoe area of 0.3068 sq. ft. for “A” gave a value of 13.7 cents. Substituting 0.27 gave a value of 15.6 cents. It is seen that use of the Radford factor increased the calculated value by 12 percent.
In some cases other factors were applied to decrease rather than to increase the calculated value. Usually, the Radford or other factor was applied to the entire hole, that is, they were not applied on a drive-by-drive basis. It should be obvious that the use of any arbitrary correction factor is hazardous because ground character will vary in different properties and for that matter in different parts of a single drill hole.
Today, considerable difference of opinion exists concerning the validity or use of the Radford factor. It has been mentioned here to alert readers who may not be familiar with placer drilling that many of the placer valuations found in reports, particularly in old reports, have been based on calculations employing the Radford or other arbitrary upgrading factors.
In arctic regions, permanently frozen ground is drilled without casing with exception of a short length at the surface to serve as a collar and tool guide. Sample volumes are determined by measuring the displacement of known quantities of water poured into the hole. Arctic drilling and the special procedures employed have been well described by Doheny.
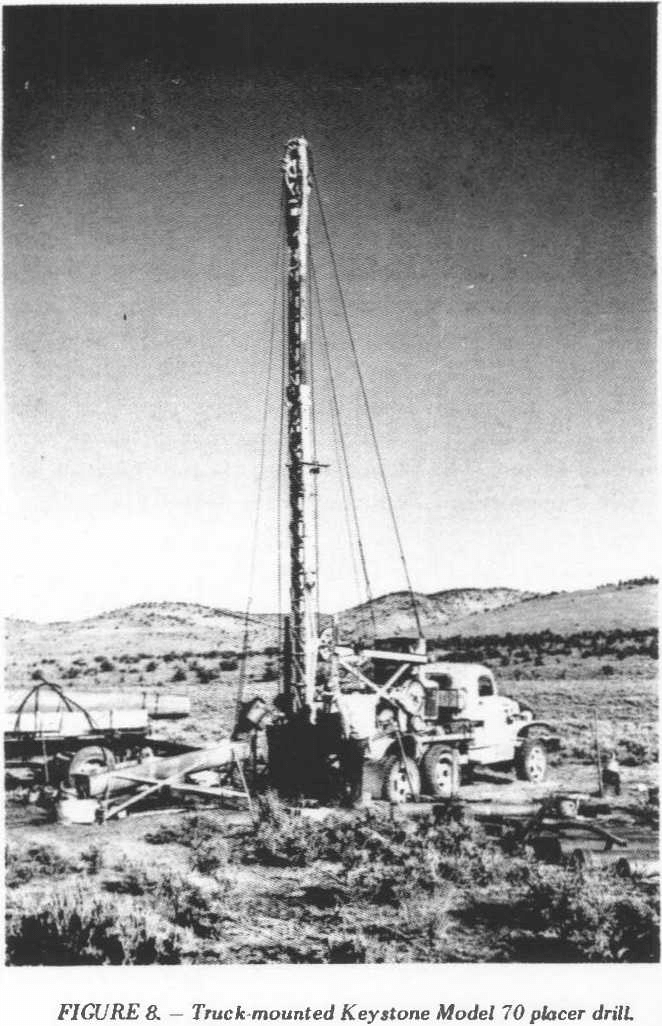
Most placer-type churn drills used in the United States are powered by gasoline engines and designed for use with 6-inch drive pipe and tools. Typical arrangements are illustrated by Figures 8 and 9. Drills in common use are the Keystone Model 70, a truck-mounted unit for use with 6-inch pipe; the Keystone Model 71, a 6-inch traction drill mounted on a crawler base; the BE 22-T, a crawler-mounted 6-inch drill; the Hillman Prospector, a 6-inch truck or crawler-mounted rig and the Hillman Airplane Drill, a compact, skid-mounted machine designed for use with 4 or 5-inch drive pipe. A crawler-type traction drill complete with 40 lengths (about 240 ft.) of drive pipe and the necessary tools will weigh 10 to 15 tons.
Hand-powered drills are widely used in foreign fields and regions where access is difficult and labor cheap. The Banka or Empire drill employs a rotating casing equipped with a serrated cutting shoe. The Ward hand-powered drill employs 4 or 5-inch drive pipe and standard tools.
A drill crew usually consists of the driller who is responsible for operation of the drill, a helper to assist with general work and handling the tools and a panner who must process the samples and keep an accurate log of the hole as it progresses. A typical placer drilling set-up is shown in Figure 10. A fourth man may be required where water must be hauled or drill sites prepared. An experienced driller has become so accustomed to the sound of drilling and the feel of the drill line, he can usually tell just what is happening in the hole. By keeping careful watch and logging all pertinent data, he provides the information needed by the engineer for “correcting” the indicated values. The panner who should have some technical as well as practical training, often serves as the crew foreman.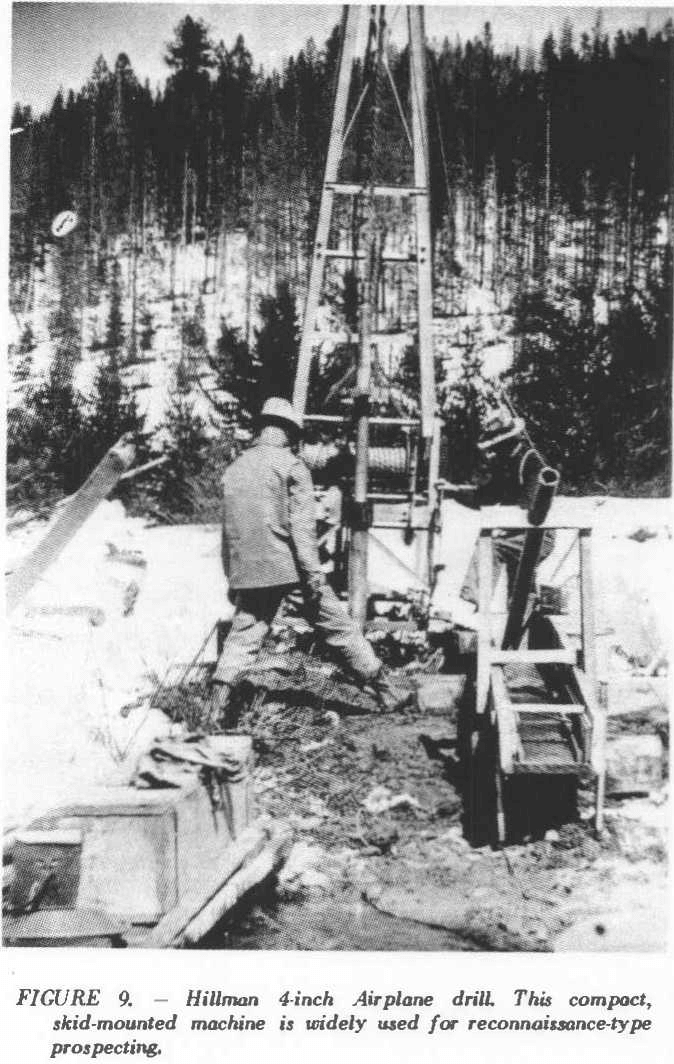
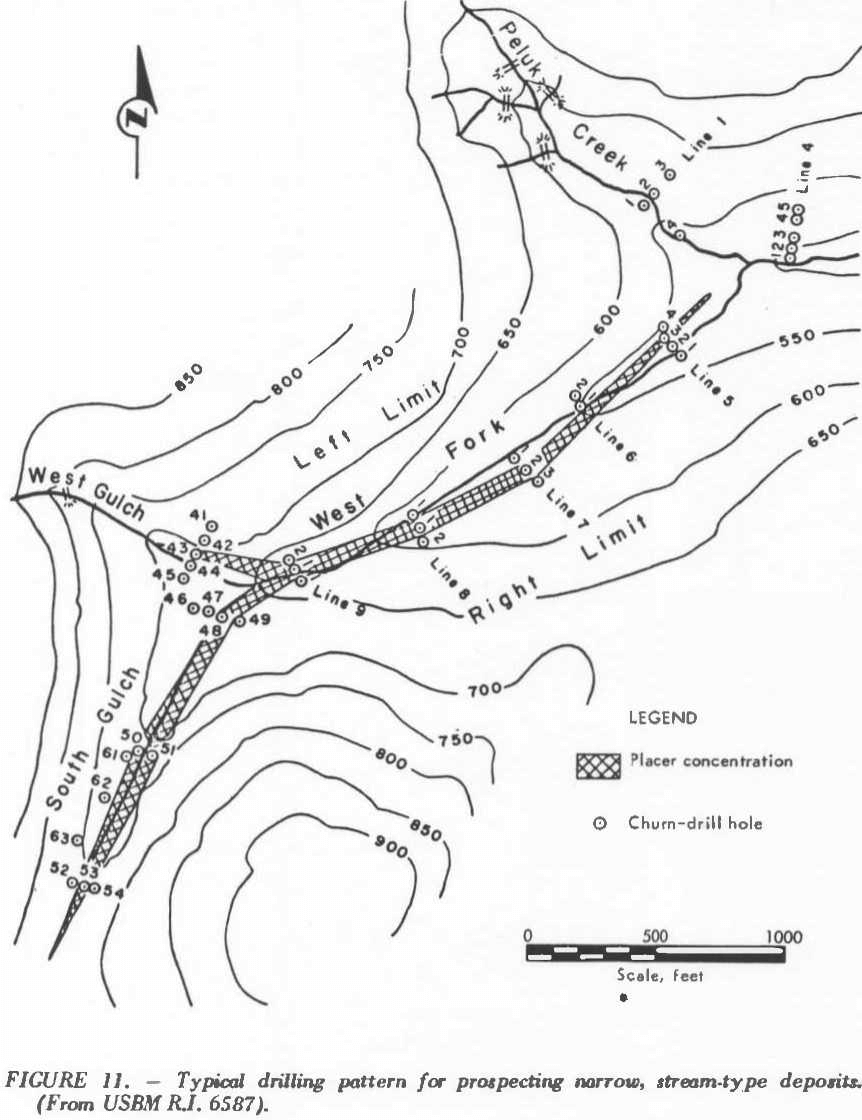
As a rule, when prospecting narrow, stream-type deposits the holes are drilled at relatively close intervals along lines laid out at right angles to the general trend of the deposit as shown in Figure 11. Hole spacing along the line is commonly 100 feet or less, while the distance between drill lines is greater, often on the order of 500 feet or more. This type of drilling pattern is designed to search out and delineate relatively narrow pay channels.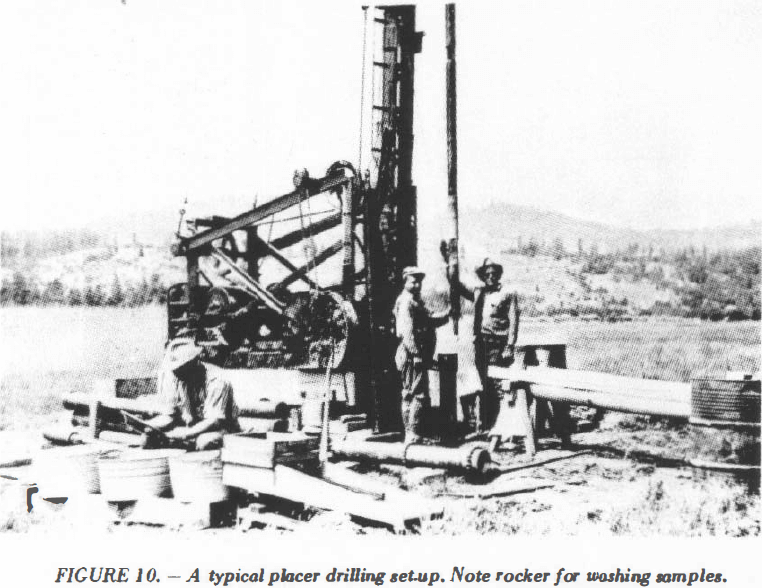
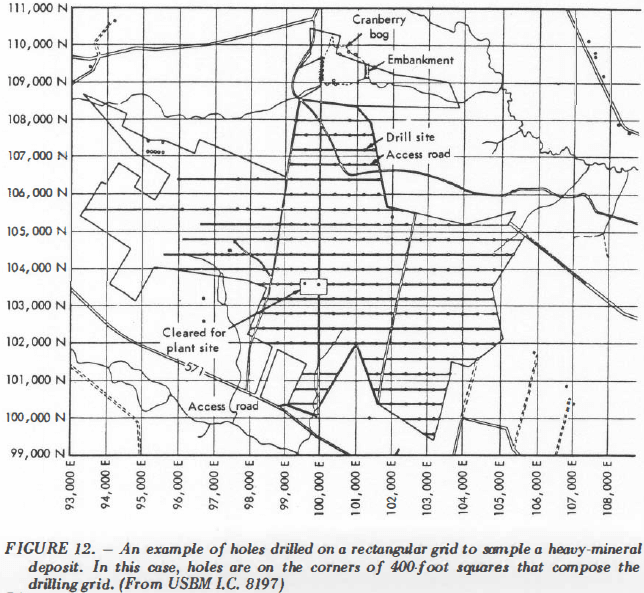
In widespread placers, particularly those having a somewhat uniform mineral distribution, holes are usually put down at the intersections of a rectangular grid pattern designed to cover the deposit as shown in Figure 12. The drilling ratio will vary from one hole for every acre to one hole for every 2, 3 or possibly 10 acres, depending on the distribution of mineral, previous experience in similar ground and other factors. In the Folsom, California dredge field the average hole density was about 1 hole for every 4 acres. On the other hand, there are placers which cannot be adequately sampled by any amount of drilling.
Although a regular drilling pattern may be preferred, there are situations in which an irregular drill pattern should be employed. In any case, it is important to avoid placing the holes in a way that would tend to exaggerate either the higher or the lower-grade areas. The selection of a drilling pattern and the initial placement of holes is normally a responsibility of the engineer in charge.
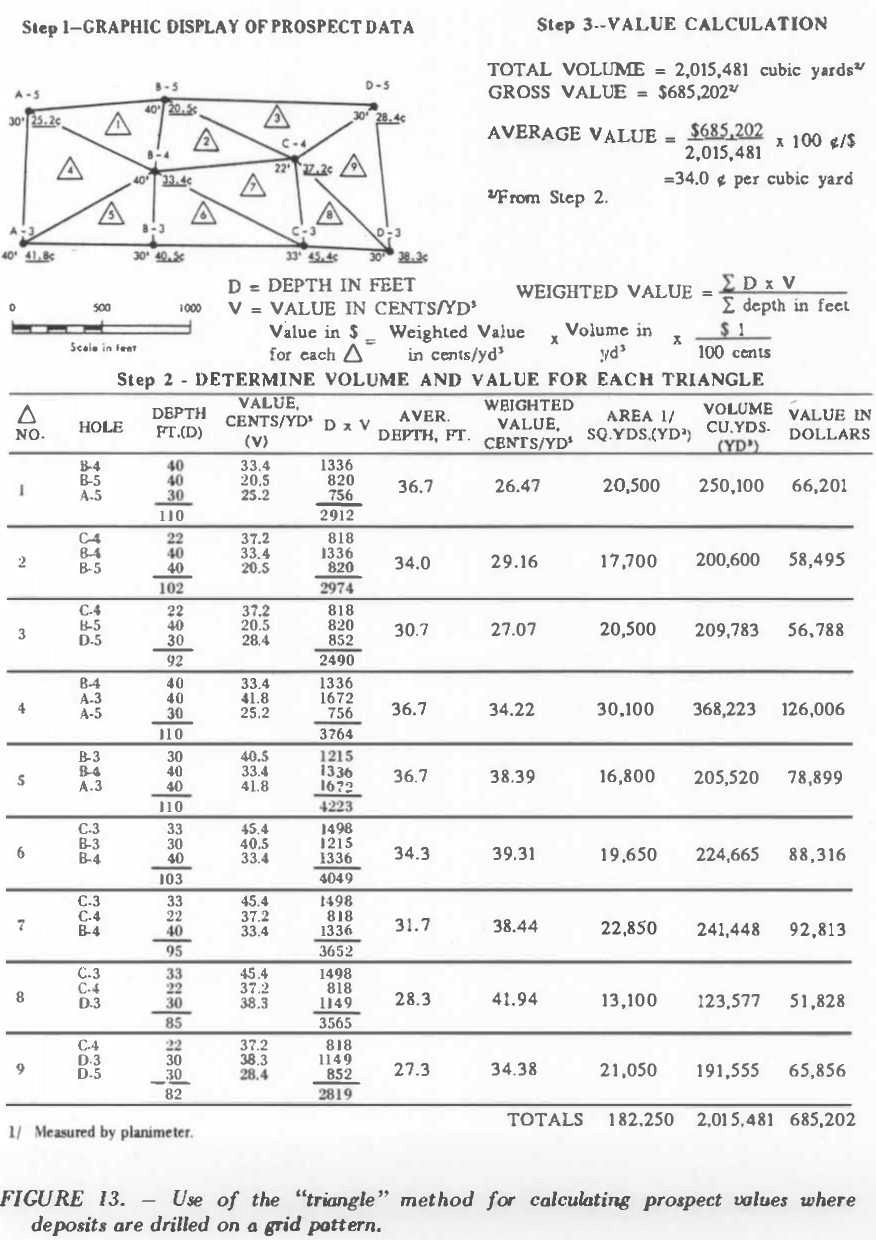
Assuming a completed drilling project with favorable results, the next step is to make an overall evaluation. To calculate the yardage and the average value of a deposit which has been drilled on a grid pattern, the drill holes are first connected by imaginary lines to divide the deposit into blocks or triangles.
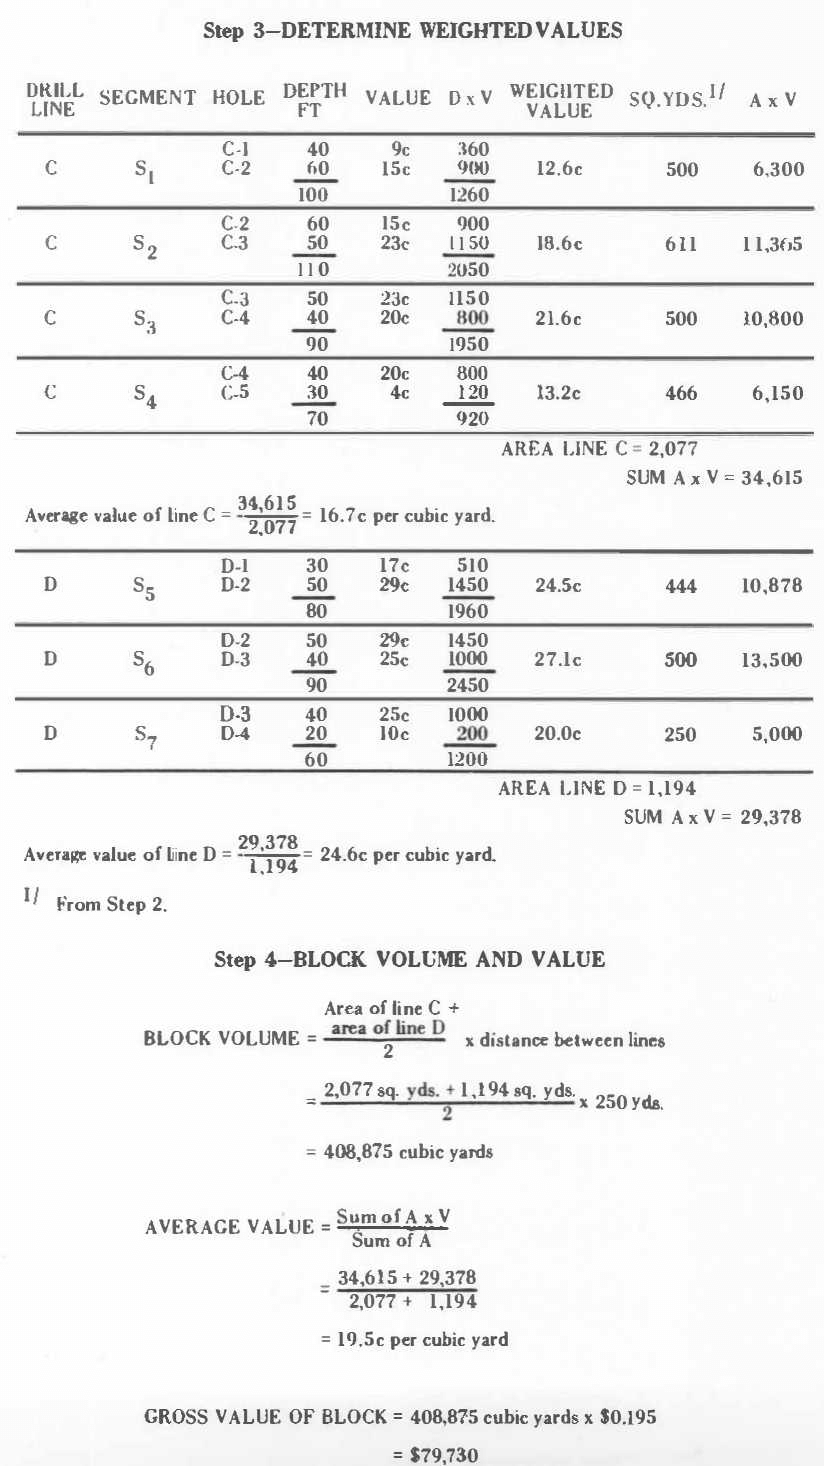
See Fig. 13. The volume and value of each triangle or block is then calculated using weighted drill holes values and standard ore reserve calculation procedures. The procedural details will not be set out here as they are well known to most field engineers and have been adequately covered in the technical literature. Some have described the applications to placers. In principle, the value of each block or triangle is calculated by the following formula:

A value for the deposit is subsequently arrived at by combining the individual triangles as shown in Figure 13.
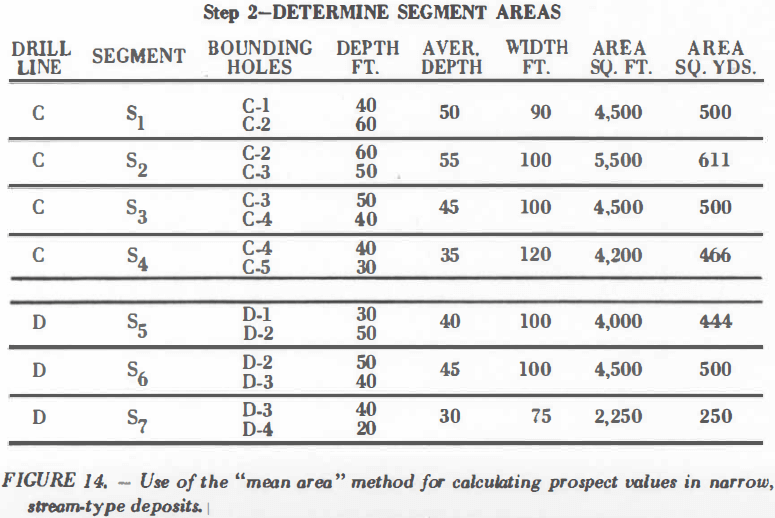
For the valuation of narrow, stream-type deposits where the holes are drilled at close intervals, say 50 or 100 feet apart on relatively far-spaced drill lines, a calculation based on the mean-area formula is usually employed. This relies on a formula used for making cut and fill estimates in road work in which it is inferred that the volume of a prism having somewhat similar end sections can be expressed by the equation:
Volume = A1 + A2 x L
Where:
A1 = the cross sectional area of one end of the block.
A2 = the cross sectional area of the opposite end.
L = distance between ends.
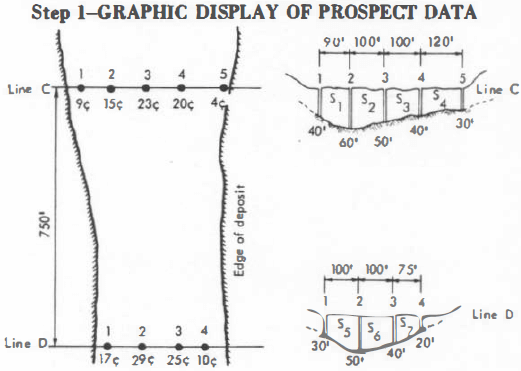
Applied to placer valuation, the average prospect value of the two end sections of a gravel block is calculated and this value applied to the block volume derived from the foregoing equation. See Fig. 14.
When computing the average prospect value of each end section it will, of course, be necessary to consider the area of influence exerted by each drill hole. At the risk of oversimplification, a commonly used procedure can be described as follows:
Consider an elongated block of gravel bounded on its two ends by drill lines containing relatively close-spaced holes. The cross-sectional area between each pair of holes is found by multiplying their average depth by the distance between them. Multiplying this area by the weighted prospect value of the two bounding holes gives an area x value figure. This procedure is repeated for each pair of holes across the line and the same is done at the opposite end of the gravel block. To find the average value of the two drill lines, divide the sum of area x value products (from both lines) by the sum of the individual areas. The resultant weighted prospect value for the combined ends is then applied to the entire volume between the drill lines to arrive at a dollar value for the gravel block. The procedure is illustrated by Figure 14.
When drilling a gold placer, two holes put down in close proximity will rarely check and, in fact, the divergence in value will probably be too great to be reconciled by the layman. This problem is not necessarily a reflection on the drilling itself but, instead, reflects the small sample area encompassed by a 7½-inch drive shoe and the typically irregular distribution of gold in placers. Interpreting “check” holes is another of the many things in placer valuation which rely heavily on experienced-based judgement.
In a like manner shafts sunk over drill holes should be expected to show appreciable variations in value when compared with their respective drill holes. This is particularly true in loose formations or in old tailings where drilling conditions may be far from ideal. Check shafts put down over drill holes do however, allow inspection of the gravel in place thus providing the examining engineer with a wealth of information not available from drilling alone which in turn results in a more accurate evaluation of the deposit.
The average rate and cost of the placer drilling are topics which have received little attention in the technical press, none of which is recent. This largely reflects a tendency for operating companies to keep their prospecting data confidential plus the difficulty in identifying hole-by-hole performance and cost data among general operating records.
Drilling rates when figured on a day-to-day or a hole-to-hole basis will be found to vary widely. The variations reflect many factors including moving and setup time, actual drilling, stuck or lost tools, breakdowns, pipe pulling, etc. To be meaningful, any average figure must take all such contingencies into account, but few do. For those who must make preliminary estimates, a good experience-based figure to use is 10 feet per calendar-day over the life of a drilling project.
This may appear conservative but it also reflects an actual average daily footage obtained under a variety of drilling conditions in the United States, Canada and South America.
Why use Caution when Sampling
Where placer drilling is contracted and the contractor’s payment is based on footage drilled, there may be a tendency to sacrifice accuracy for speed. Under such conditions the engineer in charge must be constantly alert and he should insist on having full authority over all aspects of the work.
The cost of placer drilling where no unusual problems are encountered will directly reflect the cost of labor. Because of the scarcity of qualified placer drillers and panners, drill crews are hard to find and, as a result, they can demand and usually receive premium wages. Other expenses include the purchase or rental of a drill rig, tools and supplemental equipment such as flatbed and pickup trucks, transportation to the job, supervision, engineering, insurance, fuel, supplies and incidental labor. Today, in the United States the minimum direct cost for operating a standard 6-inch placer churn drill on a one-shift basis will be about $125 per day, based on rental of the drill rig and tools at $50 per day and other expenses. Applying the average figure of 10 feet per calendar day over the life of a project, a minimum cost of $12.50 per foot of drilling is indicated but when incidental expenses are considered, the overall drilling cost may be nearer $15 per foot. A company operation utilizing permanent personnel or a contractor working for an extended period of time could quite possibly lower costs but the point being made here is that placer drilling today, if properly done, is expensive. If improperly done it is worse than useless, as shown by too many cases where inadequate drilling that was intended to save money led to the equipping of sub-economic deposits with resultant loss of large capital investments.
Speaking generally, the churn drill today is too expensive for casual or indiscriminate use as a placer sampling tool but it still offers the only feasible means for sampling some placers.
How to Collect a Bulk Sample
Bulk samples may be called for when dealing with placers having an erratic distribution of values, especially where the pay is found as coarse gold or nuggets. Depending on conditions, samples containing a portion of a cubic yard, or as much as tens or hundreds of cubic yards may be needed for a reliable estimate of value.
The so-called “plant run” is a form of large-volume bulk sample in which a portion of the deposit is mined and processed under actual working conditions. A pilot plant employing full-scale processing and recovery equipment is sometimes used. But when relying on plant runs, good judgement must be used to insure that the points or areas selected for large-scale sampling actually represent the deposit as a whole, because high costs usually limit this type of testing to a few points.
One school of thought gives great importance to the supposed superior accuracy of bulk samples as compared to smaller samples such as those provided by churn drills or channel cuts. While bulk sampling per se is a valid method and bulk samples do, in many cases, offer the most satisfactory method of testing erratic, high-value ground, they are at the same time open to certain criticism. For example, bulk samples must be representative of the deposit, a feat not easily achieved where they are few in number. Another important consideration is the fact that all facets of a bulk sampling program cannot have personal supervision all of the time and, for this reason, salting can be perpetrated with comparative ease. It is important that all such possibilities be considered during the evaluation of bulk sampling results or when considering any actions based on this type of sampling.
Bulk samples are sometimes used to check the reliability of other types. In placer drilling, for example, shafts may be put down over selected drill holes to establish a correction or “shaft” factor which when combined with experience-based judgement can be used as a basis for adjusting the calculated drill values as a whole.
How to get a Grab Sample
One thing to avoid or to use with caution when investigating placers is the so-called grab sample. This method of sampling relies on a theory that if enough small “grabs” or portions of material are impartially taken and then combined into a single sample, the combined material will be representative of the deposit or of the exposure, as the case may be. But in practice the average person fails to make allowance for the large rock or boulders normally found in bank-run material and, as a result, their grab samples contain a deceptive proportion of fines. Such oversight can cause serious error in the estimated value, particularly when based on a few pans of material. Every mineral examiner will at one time or another run into a situation where systematic sampling is not practicable or is not called for. For example, a property may have no discernible mineralization or mineral-bearing structure, or the mineral examiner may for other reasons be sure that no significant values exist. Here, a few check samples can serve as “written proof” and as such carry far more weight than a bald statement of fact. Grab samples, if fairly taken, serve this purpose well. Grab samples can sometimes be used to check the presence or the distribution of gold in a gravel exposure and thus used as a guide for subsequent sampling and, judiciously used, they provide an excellent check against salting.
Other uses for grab samples could be cited but the novice will be better served by stressing the fact that in non expert hands they are almost sure to be misleading. With few exceptions, grab sampling cannot be considered a valid method for testing placers.
Drift Mine Sampling
Underground mining procedures are collectively known as “drift mining” where applied to placer gravels. Placers buried under deep masses of low-value gravel or capped by lava flows have been extensively worked in this manner.
Drift mining presupposes the concentration of values in a well defined stratum or channel. Pay streaks in these channels are typically confined within narrow limits, both laterally and vertically, and are commonly related to troughs or other depressions in the bedrock. But it is not unusual to find several generations of “pay leads”, as the miners call them, within a given deposit where several periods of erosion and deposition have superimposed successive channels over one another. Such complications are usually quite difficult to decipher and speaking generally, drift-mine deposits seldom lend themselves to the usual investigative procedures.
These deposits are usually explored by adits or shafts from which drifts are driven into the richer portion of the gravels. Crosscuts are run from the main drifts to establish the outer pay limits and at the same time to block the ground for mining: In the usual drift mining venture, exploration, sampling, development and mining are of necessity integral parts of an overall package.
This is particularly true where the values are confined to sinuous, deeply buried pay streaks. In deep ground the cost of close-interval drilling can be expected to far outweigh its benefits. Drilling can, however, be of great value in guiding an underground exploration program when dealing with this type of placer. A relatively few well-placed drill holes may indicate the course of the pay channel, depth and character of the gravel, grade of bedrock, etc. This type of information is essential to a successful development program where drain tunnels and haulage levels are to be kept below the lowest point of the pay channel. An application of this type of churn drilling at the Vallecito Western drift mine has been described by Steffa.
When evaluating drift mines, prospect data are usually meager and the mineral examiner should take into account the fact that drift mining, by its very nature, is typically a high-risk venture. He should also recognize that sampling, in the usual sense, may not be practicable.
Sampling a Hydraulic Mining Operation
Determining the mineral value of large deposits of the type worked by hydraulic mining is perhaps the most difficult task faced by today’s mineral examiner. A typical large hydraulic deposit presents most of the sampling problems encountered in drift mines plus a few of its own. Anyone familiar with the immense masses of Tertiary gravels that have been partially worked in California’s Sierra Nevada region need not be told that detailed sampling of such deposits ahead of mining would be too costly for practical application. The California hydraulic miner was no stranger to mining risks and, for the most part, who in assessing hydraulic mine sampling said: “ the amount of gold in the gravel cannot be accurately determined by assay or any other proper method. All that can be positively known is the amount obtained in the clean-up.” Whitney went on to say: ‘‘The miner, by panning a sufficient number of samples, judiciously selected, can form a pretty good idea whether the gravel is likely to pay for working; but this is not by any means the same as ascertaining the exact amount of gold which it contains. ”
As indicated above many of the early hydraulic operators relied more on qualified estimates of value than on a formal sampling program. Such estimates were based largely on the production records or estimated gold yield of nearby or similar properties but, in most cases, the question of actual gold value was (and remains) secondary to such factors as the area of minable ground, its character, width and course of the deposit, the depth and slope of bedrock, facilities for washing, dump room, water supply, cost of water, etc.
It is obvious that some factors cannot be readily appraised without some underground exploration. Such work, where provided, is usually in the form of a few shafts and some drifting or small-scale operations. Churn drilling may be employed to a limited extent to investigate the Course of the channel or bedrock contours. Some examples follow:
The initial sampling and exploratory work at the Malakoff mine (one of California’s largest hydraulic operations) consisted essentially of four shafts and 2,000 feet of drifting along the channel. It should be noted that at the time (circa 1880), the expenditure of this great a sum for prospecting and sampling was considered somewhat remarkable.
The initial prospecting and sampling for a medium-size hydraulic property (150-foot banks) in British Columbia was done hydraulically, with exception of a small amount of churn drilling undertaken to determine the course of the channels. In all, six exploratory pits were opened but only one supported a continuing operation.
Existing faces in old hydraulic pits can, in some cases, be sampled by conventional means. At the McGeachin mine in Placer County, California. old hydraulic banks roughly 50 feet in height were sampled by means of vertical hand-dug cuts 2 feet wide by I foot deep. The sampling crew worked from long ladders propped against the gravel faces.
A small hydraulic mine on Fox Creek, Alaska, was prospected and simultaneously worked in the following manner: The deposit, consisting of low bench gravels flanking a small creek, was superficially tested by panning and its 15 to 20-foot depth was determined by use of 3-inch, hand-driven drive pipes. Several hand-dug pits and shafts were put down in the more promising areas and those returning the best prospects were expanded into ground sluice cuts. Pay areas exposed by ground sluicing were, in turn, expanded into pits and worked out by hydraulicking. Once a pit was started, the hydraulic mining proceeded from clean-up to clean-up without further sampling. When the ground stopped paying, the pit was expanded in another direction or abandoned. In other words, this was a hand-to-mouth operation (as are many small placer mining ventures) and it illustrates the type and extent of sampling or testing generally relied on for working small hydraulic mines.
In most cases the initial prospect work has been engulfed or otherwise eradicated by subsequent mining and, today in most hydraulic areas, there remains little to see but abandoned pits and their sloughed faces. What does this mean to the mineral examiner? It means that in the absence of prospecting shafts or other openings in the unworked gravels, it is necessary to use what past records are available and a large measure of common sense in making an evaluation.
How to Sample Around Large Rock or Boulders
At this point something should be said about large rocks or boulders-nemesis of the placer sampler. When sampling placers there is a natural tendency to bypass areas of heavy boulders or, at least, to take the finer material from among them without considering the end effect on indicated values. In many cases the effect is the same as salting the sample, a fact which does not seem to be recognized by some mineral examiners.
Consider that the gold particles or other valuable minerals in placers are found among the finer-size material while on the other hand, the large rocks or boulders contain no recoverable values within themselves. For this reason, when the sampler takes too much fine material or fails to make an allowance for valueless boulders, he is likely to report an incorrect, high value. To put it another way, where all bank-run material including boulders will be handled in a mining operation, the prospecting should reflect this fact by including a proportionate amount of large material in the samples.
A direct approach to sampling the type of ground under consideration would be to cut samples large enough to include the fair proportion of large-size rock and thus obtain samples which truly represent the mine-run material, boulders and all. But where the mineral examiner must work alone or where a limit is placed on the size of his samples through the use of hand tools or for other reasons, the taking of very large samples may not be practicable. In such cases, he must settle for something less than optimum size, but he can guard against possible error in his end valuation by first carefully evaluating the problem and, second, adjusting his calculated sample values (if necessary) to correspond with those which might be obtained from a suitably large-size sample.
In practice this can often be achieved by visually estimating the boulder content of a piece of ground and, where needed, inserting a correction factor in the end sample calculations.
Consider a case where it is estimated that 10 percent of the bank-run gravel consists of rock too large to be included in a 3” x 6” x 4-foot channel cut. Assume that 55.9 pounds of material obtained from this cut contains 2.7 milligrams of placer gold. Using these weights, the unadjusted sample value would be 144.9 milligrams of gold per cubic yard. To obtain a value for the bank-run material, an allowance for the 10% boulder factor must be made. Since the 55.9-pound sample represents 90 percent of the bank-run material. the adjusted weight will be 55.9/0. 90 = 62.1 pounds. Using this new sample weight. the adjusted gold value becomes 3000/62.1 x 2.7 mg = 130.4 milligrams of gold per cubic yard, bank-run value.
The sample notes and subsequent data sheets must, of course, clearly show all such adjustments and they should preferably show both the uncorrected and corrected figures.
Before leaving this topic it will be pointed out that while the foregoing correction procedure is generally reliable, there are placers having boulder problems so severe, they cannot be effectively sampled by any means short of mining the entire deposit.
Nugget Effect Sampling
The usual methods for calculating the value of placer ground rely on an assumption that the value found in a particular sample extends halfway to the next sample. In effect, this assumes that the mineral content changes at a uniform rate between sample points. While valuation procedures based on this concept work well for ground having a general low or uniform average, the finding of erratic high-value samples can create problems. In practice it has been found that to include them at full value will often result in an over-valuation of the lands involved. There are several ways to approach the Nugget Effect Sampling problem:
First, the sections in which they occur should preferably be resampled. If the resulting value is low, it is safer to use the low figure and this is sometimes done. Where the two results are about the same, most engineers will use the average.
Another commonly used method for adjusting erratic high values is to decide what the highest value reasonably expected from the particular ground might be. This is estimated after considering the type of deposit being dealt with, the overall sample results and in particular the neighboring samples. This might be called the “normal” high value expected in a given property or locality. The erratic “too-high ” value is then downgraded to match this figure.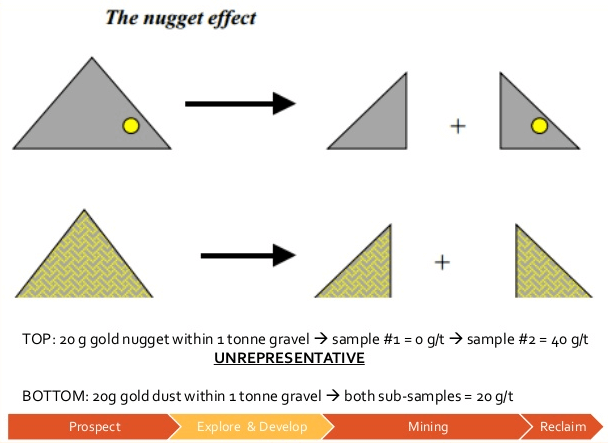
But where it is reasonable to believe that the property as a whole is made valuable by occurrence of erratic, high-value areas, it may be proper to use all sample results at their full value.
There are, of course, other approaches to the problem but in any event the method for handling erratic high values should be governed by conditions found in the particular deposit being investigated. Needless to say, no method of discounting high values should be adopted until the reason for their occurrence is understood.
Sampling Uncased or Small Diameter Drill Holes
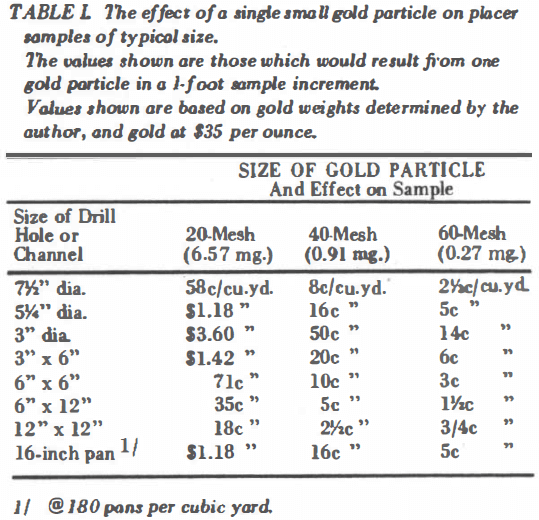
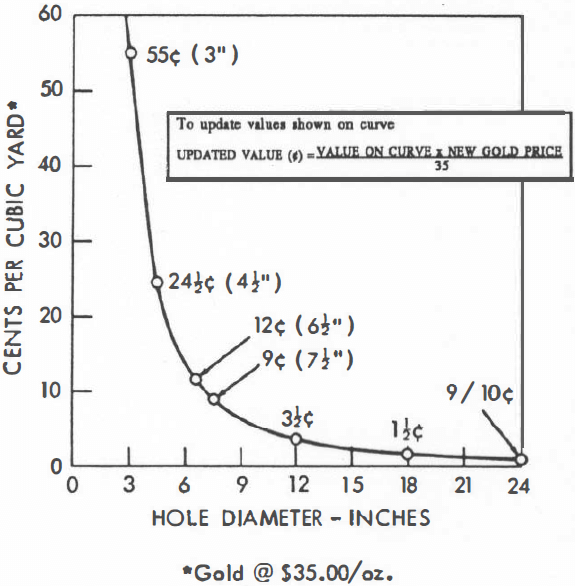
Various attempts to sample gold placers by use of uncased or small-diameter drill holes have for the most part generated more problems than they have solved. As noted earlier, the volumetric gold-to-gravel ratio in 15-cent ground is about one to a hundred million (1:100,000,000). This tells us that calculated drill hole values are extremely sensitive to stray gold particles or incorrect sample volumes. The effect of one gold particle too many or one particle too few is shown in T able II.
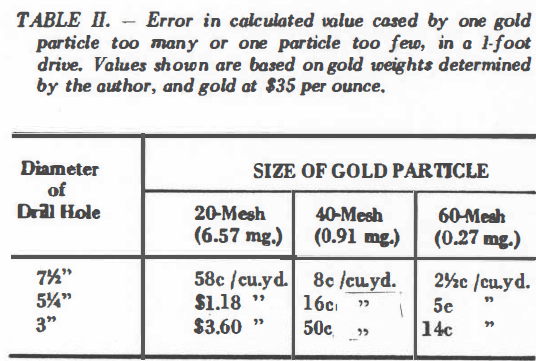
It can be seen that any sloughing of an uncased drill hole, should it occur in a gold-bearing zone, will tend to upgrade the calculated value by significant amounts. If one knew with certainty how much excess material entered a sample and exactly where it came from, the discrepancies might be appraised and allowances made during the calculation process. But experience tells us that this is not always practicable and that when dealing with the usual gold placer uncased drill holes just do not give reliable results. More often than not the ground will be over-valued and this seems to be particularly true when rotary drills are employed, especially those using roller-type bits. In one case, placer ground reported to run 26 cents per cubic yard on the basis of samples obtained from rotary drill holes was found to contain 1¼ cents per cubic yard when checked by an experienced dredging company using a Keystone placer drill and qualified crew.
The mineral examiner should always view critically any placer evaluation based on gold values obtained from uncased or small-diameter drill holes. Figure 15 shows why, in the case of small-diameter holes, the indicated values are not always reliable.
While some gold dredging companies occasionally employ 4-inch churn drills for preliminary prospecting, the 6-inch size equipped with a 7½-inch diameter drive shoe is considered standard.
Under certain conditions, small-diameter drill holes may be both practical and adequate. As an example, when evaluating beach-type deposits valuable for their chrome or titanium-bearing minerals it is often possible to rely on small-diameter (say 2-inch) holes for sampling. Here the fine-grained nature of the deposit, the relatively large proportion of valuable mineral and its low unit value combine to eliminate some of the uncertainties normally associated with small-diameter drill holes. As another example, consider a tin placer containing 1/10 lb. cassiterite per cubic yard. With tin at $1.50 per pound, the indicated value would be 11.6 cents per cubic yard and the volumetric ratio of cassiterite to gravel 1:114,000. In other words, the volume of valuable mineral in this case would be approximately 1,000 times greater than the volume of gold in a comparable gold-placer and this illustrates why low-value placer minerals are, in general, easier to sample.
FIGURE 15.- Curve showing change in calculated value caused by plus or minus 1 milligram of gold in a 1-foot sample. It can be seen that accidental less or addition of a single gold particle can cause serious error when dealing with small-diameter drill holes.
Sample Salting in Geology
