Marked ball wear testing described in a 1948 paper by Norman is an invaluable test method to measure relative and/or absolute wear rates of balls under identical mill operating conditions. Preparation of balls at Armco consists of drilling a 6.4 mm diameter hole in each ball with an electrical discharge machine (EDM), cleaning, weighing, placing a coded identifying marker in the hole, and plugging with a low melting-point alloy. Individual identification of balls reduces the scatter of the test results and, therefore, increases the ability to discriminate between ball alloys which have similar wear rates. At this point, balls are charged to the mill for a predetermined test period. Post test analysis includes recovery from the mill, melting the plugging material, removing the coded markers, and weighing. Detailed calculations of weight loss, diameter loss, etc. are made for each ball.
The wear rate of martensitic alloy steel balls was established by charging 20, 76 mm production heat treated Armco MOLY-COP balls to Unit 14 Ball Mill and testing for 534.1 operating hours. Twenty 76 mm pearlitic carbon steel balls, representative of the host charge, were tested concurrently by Climax for control purposes. Wear rate was determined by calculating the group average diameter loss per unit time (µm/h) and the group average weight loss per unit surface area (g/cm²) for the recovered balls. The wear rate of this martensitic steel ball was 20.2 µm/h per hour (0.410 g/cm²). The standard deviation of diameter loss per unit time was 0.21 µm/h. Total diameter loss was 10.8 mm. The wear rate of the pearlitic balls was 28.0 µm/h, or 38.6% higher than the wear rate of MOLY-COP.
The wear law for Unit 14 was determined by charging two additional groups of 20, 76 mm production heat treated martensitic steel balls during the course of the MBWT. Test times for these groups were 141.3 and 280.1 hours, respectively. All balls were recovered from the MBWT on the same date. Wear rate versus test time results showed that diameter loss per unit time and weight loss per unit surface area were nearly constant for this test (see summary below).
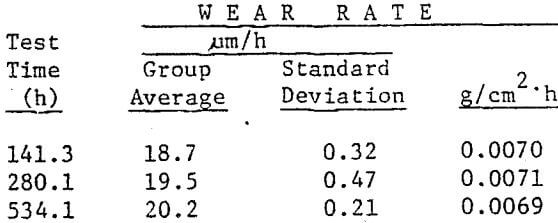
Since the microstructure was constant through the portion of the 76 mm ball cross-section exposed during the MBWT, it was concluded that the wear law for the 2.93 m Climax mills could be approximated by the equation
∆w/∆t = K (D)2.0……………………………………………………(1)
where ∆w/∆t = Weight loss per unit time for a ball whose diameter is D.
D = Ball Diameter
K = Constant of Proportionality
Results
To simulate the transition from a seasoned 76 mm pearlitic carbon steel charge to a seasoned 50% 76 mm plus 50% 51 mm martensitic alloy steel ball charge, the following information was used:
Total ball charge weight = 31,750 kg (45% volume loading)
Wear law = Equation 1
Ball density = 7.82 g/cm³
Ball discharge size = 0
Average daily recharge weight – pearlitic balls = 1200 kg
Average wear rate Armco MOLY-COP = 20.2 µm/h
The estimated recharge schedule is presented in Figure 7. Ball consumption decreases from 1200 to 870 kg/d after 80 operating days. This period corresponds to the amount of time required to purge the original pearlitic ball charge. During the next 40 operating days, ball consumption increases slightly to 880 kg/d. This period is necessary to establish a full size range of rationed 76 mm and 51 mm balls.
The estimated ball size distribution for a seasoned 50% 76 mm plus 50% 51 mm martensitic steel ball charge is compared to a seasoned charge of 76 mm pearlitic balls in Figure 8. According to computer simulation, the surface area of the ball charge should increase 21.4% using the rationed martensitic ball charge.
Marked Ball Testing
A ball mill and its circuit have many characteristics which can affect grinding media performance. Ball size, volume load, geometry of the lining, mill rotational speed, mill diameter, and slurry composition as indicated in Fig. 2 are but a few of the characteristics one considers when evaluating wear by abrasion, corrosion, and impact. To assess the relative effect of each wear mechanism, it is necessary to run full scale mill tests using several different alloys and measure their respective wear rates.
The test is conducted by introducing fully heat-treated and weighed marked balls
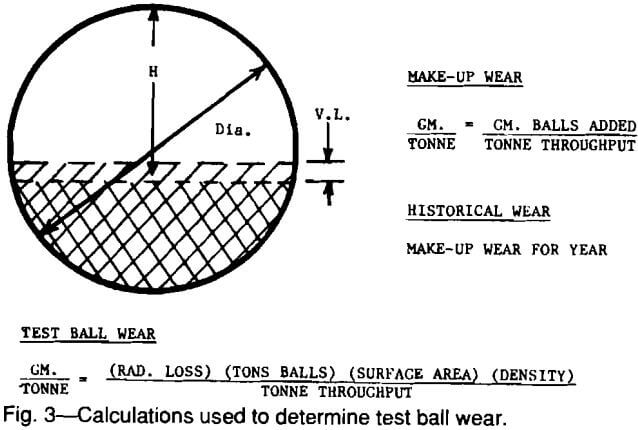
(usually marked by a drilled hole) into the mill which is subsequently operated in the normal manner. The volume load (VL) of grinding media at the start of testing must be recorded. The tons of material throughput and makeup balls added are both accurately recorded throughout the test period. After some predetermined length of time, depending on historical wear rate, the mill is stopped and the marked test balls are recovered. The individual alloy’s radius loss, current volume load, and tons throughput for the test period are used to calculate grams per tonne (pounds per ton) wear as shown in Fig. 3. Only if volume load is kept constant or corrections made for changing volume loads are calculated, can wear rates be reliable and reproducible. The calculation must, of course, be made for each alloy tested in the mill during the designated test period.
From this type of data it is possible to determine the relative amount of each wear mechanisms operative. Alloy composition and other parameters, which are generally achieved through heat treatment, can then be selected that will give optimum performance in terms of cost per ton of throughput.
Marked Ball Wear Tests
The effect of mill atmosphere on the ball wear of mild steel during grinding of coal with and without additions of pyrrhotite is shown in Figure 1. The ball wear after 60 minutes of grinding increased from 4.7 to 8.5 to 23.0 mg/ball when the mill atmosphere was changed from nitrogen to air to oxygen, respectively. A plot of ball wear versus percent oxygen in the mill atmosphere appeared to be linear. The addition of 5% pyrrhotite to the grinding mill feed caused the ball wear to increase only slightly. It appears, therefore, that an interaction between pyritic sulfur in the coal and oxygen may not be the major cause of the increased corrosive wear under an air or oxygen atmosphere.
To determine whether some solubilized species from coal may be causing the accelerated ball wear under an oxygen atmosphere, a marked ball wear test was carried out using the filtrate from the previous grinding for the next grinding. The ball weight loss of the second 30-minute grinding under an oxygen atmosphere was 11.0 mg/ball, which indicated that corrosive wear of the mild steel was not due to the solubilized species coming from coal oxidation.
The pH values of the coal slurries increased from 4.5 initially to 5.0 after 30-minute grinding and to 5.5 after 60-minute grinding under an oxygen atmosphere, whereas the pH values increased to 6.3 and 6.4 after 30- and 60-minute grinding, respectively, under a nitrogen atmosphere. Since mild steel is an active metal, the acidic pH, particularly in an oxygen atmosphere, may accelerate the corrosive wear. Accordingly, the effect of pH was investigated by using an acetic acid-sodium acetate buffer in the marked bail wear tests. It was found necessary to use a strong buffer in order to maintain the pulp pH reasonably constant during grinding. The buffer solution were prepared by adding glacial acetic acid to 1 mol L sodium acetate so that the solution pH ranged from 5 to 7. The results of the marked ball wear tests under oxygen- and nitrogen-flushing conditions arc shown in Figure 2. In the figure, the pH of the buffer solutions and the final pulp pH after 60-minute grinding arc indicated. Even though the concentration of the buffers were made as high as 1 mol/L, the pulp pH shifted after grinding. Nevertheless, it is clearly evident that the ball wear depends more strongly on the presence of oxygen than on the pulp pH within the pH range studied.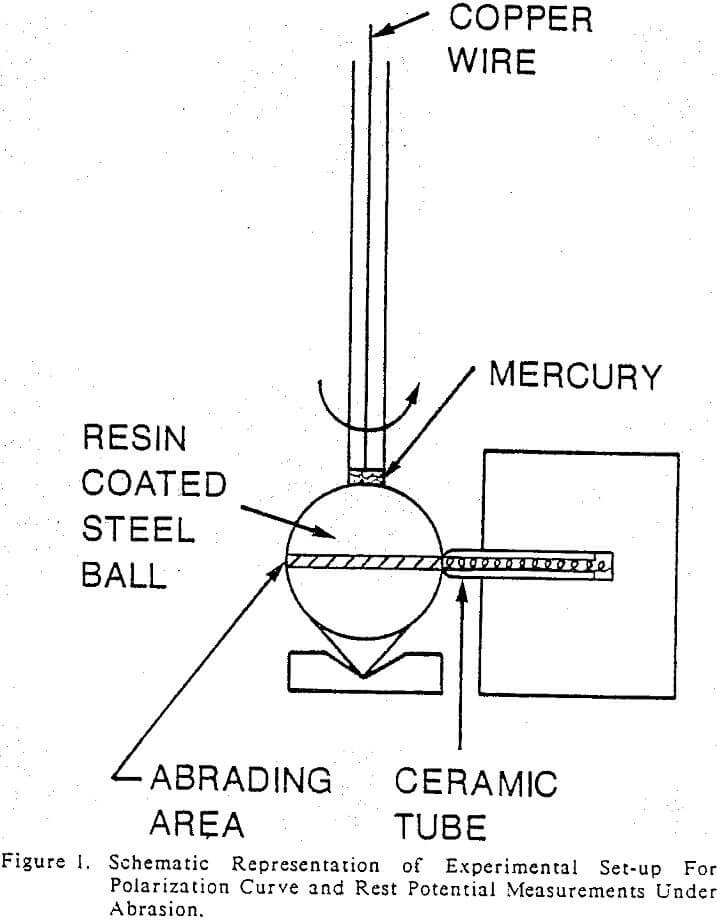
Surface Morphology of Grinding Balls
Figure 3 shows the SEM photomicrographs of mild steel ball surfaces after grinding under nitrogen-flushing and with oxygen-flushing conditions, respectively. The micrographs show numerous gouges and scratch streaks created when the balls rub against each other with coal particles in between. This type of ball morphology is characteristic of comminution by attrition. It appears that grinding with oxygen flushing resulted in a surface with less detail visible than when grinding with nitrogen flushing suggesting that corrosion might have obscured the gouges and scratch streaks.
Electrochemical Measurements
To study the corrosion behaviors of mild steel in coal slurries, polarization curves of mild steel were made under nitrogen and oxygen atmospheres and the results are plotted in Figure 4. The rest potential under an oxygen atmosphere was nobler than that under a nitrogen atmosphere by approximately 80 mV. The anodic polarization curves under nitrogen and oxygen atmospheres approached about the same value as expected, whereas the cathodic polarization curves were nearly an order of magnitude apart due to the difference in the dissolved oxygen concentrations. The corrosion currents of the mild steel may be estimated from the intersection by extrapolating the cathodic and anodic polarization curves. The corrosion currents under nitrogen and oxygen atmospheres thereby obtained were 8.5 x 10 4 and 7.2 x 10 5 nA/cm², respectively.
For comparison, the figure includes the polarization curves of a stationary mild steel electrode in 0.05 M sodium sulfate with nitrogen and oxygen aeration. The corrosion currents estimated in a similar manner amounted to 1.7 x 10 4 and 1.6 x 10 5 nA/cm², respectively, which clearly indicate that the presence of coal increased the corrosion of mild steel by several fold.
The electrodes of cylindrically-shaped pyrrhotite and of the as-received and heat-treated MSS. ASS and HCLA steel balls were made. The test slurry was prepared by grinding 579 g of minus 1.70 mm i 10 mesh) quartzite together with 355 mL of 0.05 M sodium sulfate solution (62% solids) for one hour. A 203 mm (8 inch) diameter porcelain mill with 126 alumina balls of nominally 25.4 mm (1 inch) in diameter was used.
Electrochemical measurements were made by immersing the electrodes in a ground slurry under static or abrasive conditions. Either nitrogen or oxygen was bubbled into the slurry in order to control the oxygen potential of the slurry. Polarization curves of the grinding media under abrasion were determined by rotating an electrode at different speeds against a round tip of a ceramic rod in a quartz slurry as shown in Figure 1. Tests were performed at 0.150, 300, 400, 600 and 1200 rpm. Galvanic currents between martensite and ferrite of the heat-treated MSS balls and also between the ferrite and pyrrhotite under abrasive conditions, were determined by using an experimental set-up reported by Pozzo and Iwasaki (1987). A porcelain ball of 25.4 mm (1 inch) in diameter was rotated at 230 rpm against the two electrodes in a quartzite slurry. All the measurements were made with an EG & G model 350A corrosion measurement console. A saturated calomel electrode (SCE) was used as the reference electrode via a salt bridge containing a saturated solution of ammonium nitrate. The exposed surfaces of the electrodes were coated with an electrically insulating resin, so that only the contact areas of the abrading electrodes were exposed to the slurry. The contact areas of the electrodes were measured after each test. The details are given elsewhere.
Marked Ball Wear Tests
The marked ball wear tests were carried out in a 203 mm (8 inch) porcelain mill using the grinding media mentioned previously. The mill charge consisted of 1150 g of a quartz + 10% pyrrhotite mixture and 770 mL of distilled water (60% solids) together with 126 balls including 15 marked ones from each group of the grinding media for measuring the weight losses. Either nitrogen, air, or oxygen was introduced into the mill in order to control the atmosphere inside. Each test was carried out for one hour at 51 rpm. The detailed test procedure is given elsewhere.
Laboratory Batch Flotation Tests
To relate the foregoing electrochemical measurement results with flotation behaviors, a series of batch flotation tests was performed on freshly ground artificial mixtures of quartzite with 5% pyrrhotite in a Denver laboratory flotation cell. The mixtures in the amount of 600 g were ground at 60% solids to minus 100 mesh in a 203 mm (8-inch) porcelain mill containing 126 grinding balls of either ASS, as-received MSS, or HCLA steel, all nominally 25.4 mm (1 inch) in diameter under a nitrogen or an oxygen atmosphere. Potassium ethyl xanthate was used as a collector and the level of its addition ranged from 0.005 to 0.1 kg/t (0.01 to 0.2 lb/st). The flotation tests were carried out for 3 minutes using nitrogen for aeration in order to prevent the oxidation of abraded steel debris during flotation.
Percent Martensite Hardness Marked Ball Wear Tests
As the heat-treated MSS ball surfaces wore away by repeated marked ball wear tests, the percentages of martensite increased at the surfaces of the furnace-cooled and the ice-water-quenched MSS balls, whereas the amount of martensite of the as-received MSS ball remained high and constant (Figure 2(a)).
The hardness of each component in the MSS balls was measured at 0.02 mm below the surface and the results are plotted in Figure 2(b). The hardnesses of ferrite in the furnace-cooled and the ice-water-quenched MSS balls increased slightly as the marked ball wear tests were repeated due presumably to deformation hardening. The hardness of martensite in the furnace-cooled MSS balls appeared to undergo a maximum within the intermediate zone and then decreased towards the bulk hardness of 280. The hardnesses of martensite in the ice-water-quenched and the as-received MSS balls remained nearly constant at 805 and 417, respectively.
The wear rate data for each group of the MSS balls are given in Figure 2(c). The wear of all the balls decreased as the marked ball wear tests were repeated. The furnace-cooled MSS balls wore the most, followed by the as-received MSS balls and then by the ice- water-quenched MSS balls. By switching the atmosphere from nitrogen to oxygen, the wear of the as-received MSS balls with a martensitic structure increased while the wear of the furnace-cooled and the ice-water-quenched balls with predominantly ferrite layers decreased.
Scanning Electron Microscopy
The ball surfaces from each group after grinding in oxygen or nitrogen environments were examined under a scanning electron microscope in an attempt to explore the mode of wear. Figure 3 shows the typical surface morphology of the ice-water-quenched MSS balls after grinding in nitrogen and oxygen environments (Jang et al., 1988). The surfaces exhibited two different modes of wear; an area with sharp indentations and another area which was relatively smooth with scratch streaks. Each of the three types of balls exhibited different proportions of these two modes of wear. The smooth areas exhibited an evidence of increased corrosion after grinding in an oxygen environment, as seen in the extent and the morphology of the rough texture surrounding the smooth areas (Figure 3(b)) as compared to the surfaces after grinding in a nitrogen environment (Figure 3(a)). The indentation areas showed similar surface morphologies both in oxygen and nitrogen environments indicating that there was very little corrosion (Figure 3(c) and (d)). The EDS analyses showed that the smooth areas were higher in Cr than the areas with indentations.
Laboratory Batch Flotation Tests
The results of the flotation tests are given in Figure 6 as grade-recovery plots. The sulfur (or pyrrhotite) recoveries of the samples ground with HCLA steel balls in a nitrogen environment remained below 30%. The recoveries improved when the samples were ground in an oxygen atmosphere, but the recovery did not exceed 70% even with a collector addition as high as 0.1 kg/t (0.2 lb/st).
The as-received MSS balls also adversely affected the recoveries when the samples were ground in a nitrogen environment, but the recoveries improved markedly with the level of the collector addition. Grinding in an oxygen environment resulted in recoveries approaching 90% regardless of the level of the collector addition. It is interesting to note that with ASS ball ground pulps, the recoveries exceeded 90% even with the collector addition as low as 0.005 kg/t (0.01 lb/st).
 |
 |
