In the mineral processing Industry, there are different grinding environments in which grinding media are used. These include semi-autogenous (SAG) mills, rod mills, conventional ball mills, and tower mills. The different types of grinding media available for these grinding applications include heat treated and as rolled grinding rods, forged steel balls, cast steel balls, cast high chrome iron balls, and cast slugs (or cylpebs). Some media types are best suited for specific grinding applications. However, the areas of application often overlap, allowing a choice of more than one type of media for a given grinding application.
The consumption of grinding media in the mineral processing industry represents a substantial cost to the comminution process. Second to energy, grinding media is most often found to be the next highest consumable cost involved in mineral processing. To allow selection of the cost effective media, one must determine the specific wear mechanisms present in a given grinding application and decide which media system addresses these mechanisms most economically.
The effectiveness of grinding media in the mineral processing industry is evaluated in terms of wear resistance and grinding performance. Wear resistance is a function of alloy selection and processing, mill operation procedures, and the mill environment. The weight consumption of media vs. tons milled or operating hours are common methods of inferring wear resistance. Factors influencing grinding performance include media size selections, shape considerations, and media quality. Grinding performance is measured in terms of throughput, fineness of grind, or the ability to produce desired size distributions in the product. It is the combination of a media’s wear resistance and grinding performance in relation to its cost which establishes the true cost-effectiveness of the grinding media.
This list is to provide the grinding media user with some tools and insight on how to evaluate grinding media. The primary focus is on grinding balls, but the same analysis can be applied to grinding rods. The wear law for grinding media is discussed, and the relationship between marked ball wear test data and production wear rates is demonstrated. Test results from each of the major grinding ball application categories are presented.
- The three recognized components of wear are: impact, abrasion, and corrosion. Impact wear is proportional to the ball’s weight (∝ D³) while abrasive and corrosive wear is proportional to the ball’s surface area (∝D²)
- The wear behavior of grinding balls can be mathematically represented by the wear law equation:
dw/dt = KDn - The wear rate exponent, n, is essentially equal to 2 for conventional ball milling. When n = 2, the production wear rate is directly proportional to the wear speed, as determined by MBWT, according to the equation:
WR = R(WS) (CW)/(DR) (TpH)
In addition to wear speed, ball size and recharge practice, charge volume, and feed rate are significant factors affecting the actual production wear rate. Wear speeds are largely independent of ball size and ball charge volume.
- The wear rate exponent for SAG milling was experimentally determined to be n = 2.8. This corresponds to stating that impact is the predominant component of wear in SAG milling environments. At wear rate exponents greater than n = 2, a ball will wear at its greatest rate at its Initial size. As the ball wears to smaller diameters, the wear rate decreases proportionally. In SAG milling, wear speeds are dependent on ball size and ball charge volume.
- The relative performance of high Cr balls to forged steel balls is dependent on the milling environment:
a) In high wear rate applications like SAG and primary grinding, the high Cr ball has 0 – 30% lower wear.
b) In low wear rate applications, the high Cr relative performance will depend on the corrosivity and abrasivity of the environment. In high corrosivity environments, the high Cr balls can have less than half the wear of forged steel.


Relative Wear Rates of Various Diameter Grinding Balls
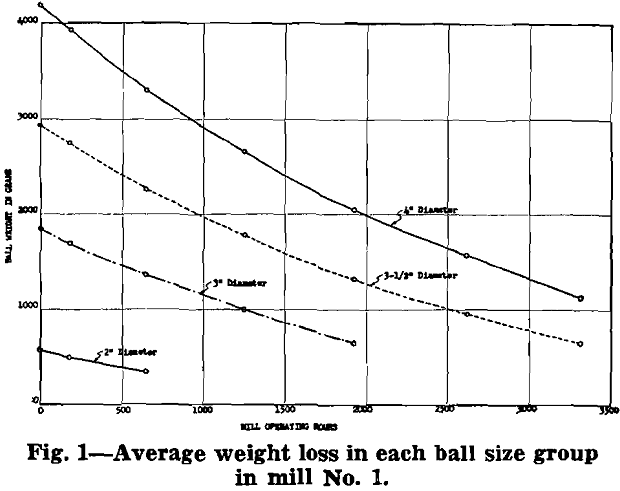
In order to determine the relative wear rates of several sizes of grinding balls, groups of 4, 3½, 3, and 2 in. balls were marked individually and were charged, all at the same time, into each of two production mills grinding copper ore. The remainder, and vast majority, of the ball charge consisted of 2 in. diam, and smaller, white, cast iron balls. The original weight of each test ball was determined and recorded. Some of each group of test balls were recovered from the mills periodically, individually reidentified, and reweighed. The test balls were recovered during regular maintenance shutdowns, at approximately thirty-day intervals, so as to avoid disrupting operations.
All of the test balls were of forged, alloy steel composition with only slight variations in chemistry that would not be expected to affect the physical properties. All were heat treated in the same manner to produce a high hardness, as equal as possible for all sizes and as uniform as possible from surface to center.
The method of marking the test balls consisted of forming a small, round hole, 3/16 or ¼ in. diam, into the center of each test ball with a Thomas Metal Master disintegrator, which produces a hole in fully hardened steel without affecting the hardness of the surrounding metal.
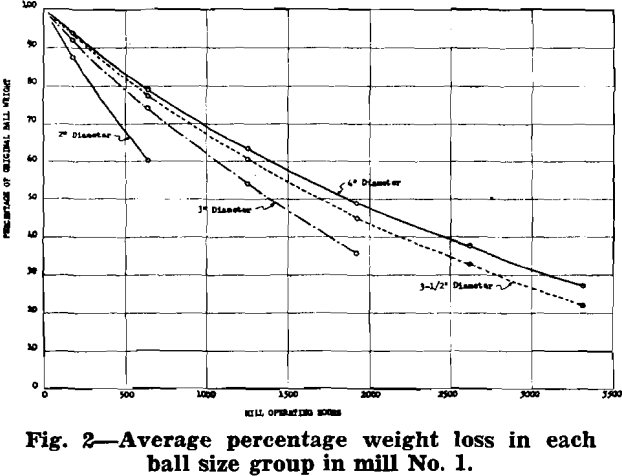
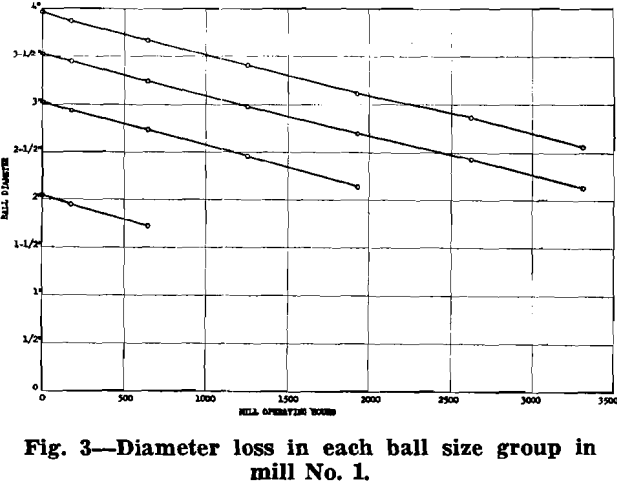
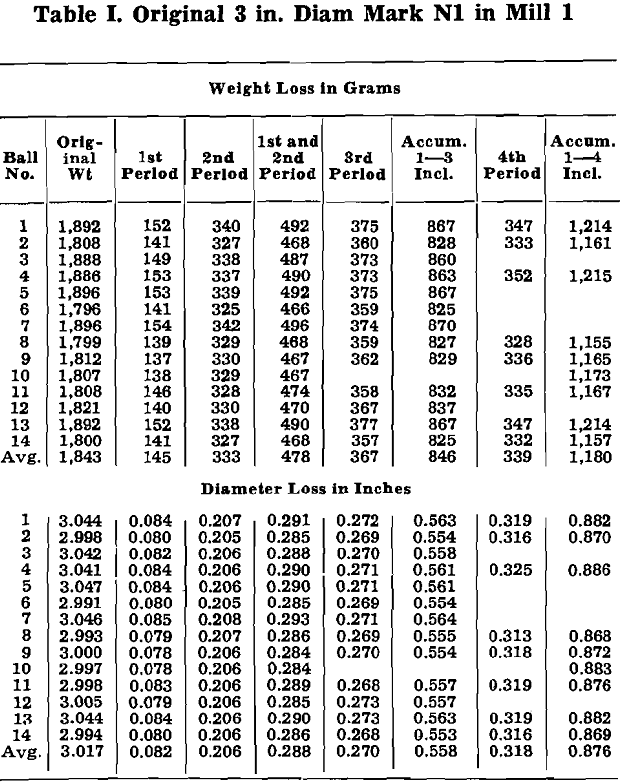
The indicated life of the test balls in the test mills, assuming discharge at ½ in. diam, is approximately as follows:

