Impact and abrasion properties of various commercial US grinding balls were evaluated and compared by the Bureau of Mines, US Department of the Interior. Laboratory tests were conducted on balls obtained from eight major US manufacturers. The balls included forged steel, cast steel, and alloyed white cast iron and were subjected to repeated impacts until they broke or until 300,000 impacts were exceeded. Pin abrasion tests also were conducted. The results showed wide differences in impact lives, ranging from a few thousand to over 500,000 impacts. The life of inferior commercial balls was increased five to six times by a laboratory tempering heat treatment. For balls that did not break, the major impact wear mode was spoiling and ranged from an average rate of 0.28 to 4.46 mg per impact. The softest balls (steel) had excellent impact resistance but low abrasion resistance. The abrasion resistance of the steel balls generally increased with hardness. The alloyed white cast irons had about twice the abrasion resistance of the steel balls. Users should become aware of the wide variations among commercial balls, and ball manufacturers should be aware that their product can be improved.
Wear and breakage of grinding media result in a major expense to the US minerals industry, therefore improving the cost-to-wear ratio associated with these materials is crucial. In 1973 alone, an industry survey documented consumption of over 214,000 tons of grinding media. (Nass, 1974). In an effort to assist the minerals industry in reducing the cost of grinding, the Bureau of Mines, US Department of the Interior, is conducting research directed at reducing the breakage and abrasion of commercial grinding balls.
Most commercial balls are made of steel with a carbon content of about 0.5 to 1.0 wt % and heat treated to maximize resistance to abrasion, fracture, and spalling. Fully hardened balls have a tendency to fracture and spall. The odd shaped “balls” found inside ball mills are a result of fracture and spalling which result in higher ball consumption.
An even more abrasion-resistant material is high-chromium white cast iron; however, it has major problems with breaking and spalling. Under milling conditions of low impact and high abrasion, the more expensive high-Cr white cast irons can be cost effective (Farge and Barclay, 1975). Our previous research (Blickensderfer, et al., 1983) showed that the impact resistance of high-chromium white cast iron is greatly affected by heat treatment.
Improvement of grinding media has been a slow process. Grinding balls can be evaluated by the user by keeping records of ball consumption and ore tonnage. But this procedure requires long testing times of months or years (Norman, 1948; El-Koussy, et al., 1981; Moroz and Lorenzetti, 1981; Howat, 1983; Malghan, 1982). In addition, if the operating parameters such as ore size, type, charge, etc., change, the evaluation may lead to the wrong conclusion as to which type of balls are best (Avery, 1961). Small-scale ball mill tests are convenient but could give misleading results because they do not produce the severe ball impacts of full-sized mills.
During ball milling, balls are subjected to three conditions: impact, abrasion, and corrosion. Much effort has been made to simulate these conditions in the laboratory. The impact of balls in mills is known to result in fracture and spalling, but spalling has been especially difficult to duplicate in the laboratory. Fracture of balls that occur in real ball mills does not correlate well with fracture toughness measurements. Dixon (1961) and Durman (1973) conducted ball-on-block drop tests that produced fracture of alloyed white cast iron balls. But it wasn’t until the development of the ball-on-ball impact-spalling test by the Bureau of Mines (Blickensderfer and Tylczak, 1983) that spalling was produced by repeated impact under laboratory conditions. Furthermore, by producing impacts at a much faster rate than previously possible in laboratory tests, the impact evaluation of balls became feasible.
Abrasion accounts for the primary wear mode when balls do not fracture or spall. The pin abrasion test used in the present work is similar to those of Muscara and Sinnot (1972) and Mutton (1978). The pin abrasion test produces sufficiently high loading to crush the abrasive particles, thus simulating the grinding of ore between balls in a ball mill (Diesburg and Borik, 1975; Gundlach and Parks, 1978).
Corrosion can account for a third cause of ball degradation when grinding ore wet. In laboratory tests under very acidic conditions of pH 2, we found that corrosion and abrasion combined to aggravate wear (Tylczak, et al., 1986). Moore et al., (1984) found corrosion effects during wet milling of Cu- Ni gabbro sulfide ore and magnetic taconite ore in a very small laboratory mill. It is known that as mill diam is increased, the impact and abrasion conditions increase and consequently abrasion becomes much more significant than corrosion. Under the neutral or basic conditions existing during the bulk of milling, corrosion effects are negligible relative to abrasion. Therefore, laboratory corrosion tests were not conducted as part of the evaluation of commercial grinding balls.
An evaluation of commercial grinding balls was undertaken as part of the wear research program of the Bureau of Mines. The findings may be helpful to operators of grinding mills and to ball manufacturers.
Description of the Grinding Balls
General
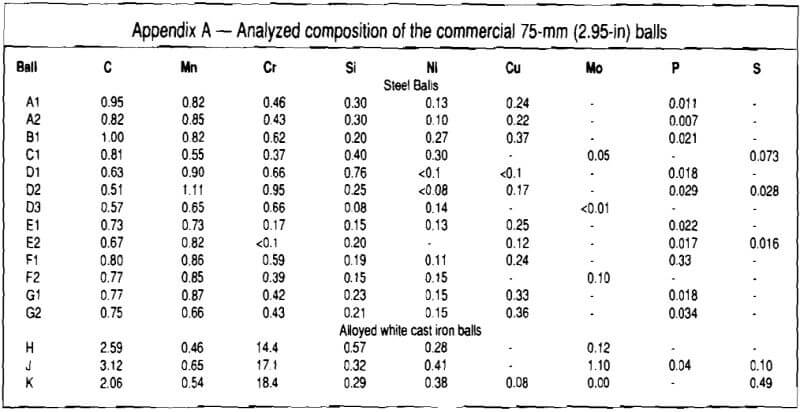
Numerous grinding balls were obtained from eight major US manufacturers. All balls were nominally 75-mm diam. Steel grinding balls came from 6 manufacturers in 13 different lots, and alloyed white cast iron balls came from 3 manufacturers in 1 lot each. At least three balls selected at random from each lot were evaluated. The balls are described in Table 1 and the chemical composition is given in the appendix. The original hardness of the steel balls ranged from HB 234 to 822, with 77 % of them being harder than HB 650.
The shape and the surface condition of the balls differed considerably. Although some of the forged balls were nearly spherical, most had two opposing flat spots as a result of using a cylindrical forge blank that did not quite fill the dies. Many of the groups of balls were out of round, that is, the two halves were offset because of misalignment of the forging dies. Type
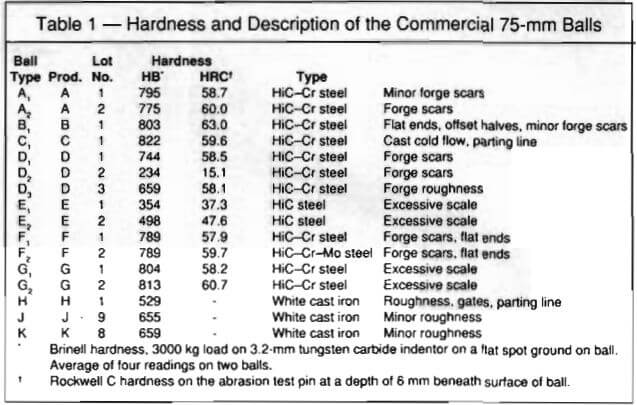
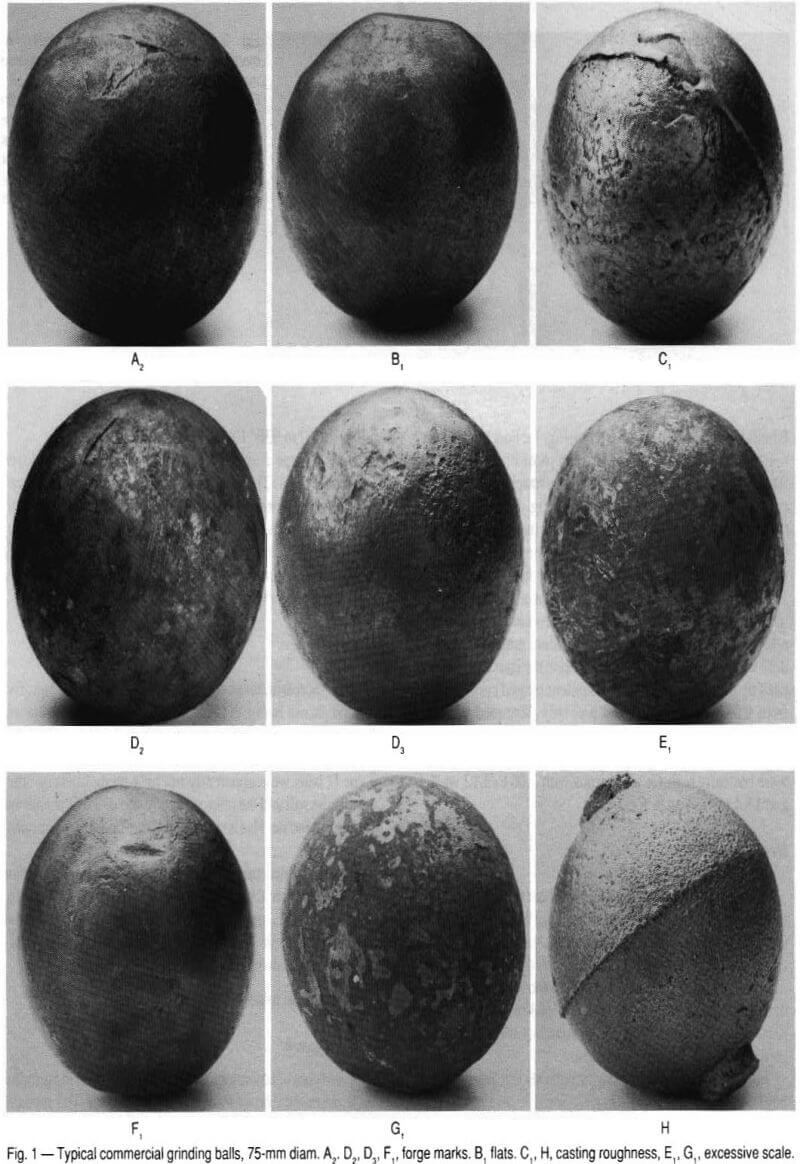
B balls were especially out of round, Fig. 1a. Forging tears and scars to some extent were visible on most of the balls. The flaws in the cast balls included surface roughness from sand casting and presence of a parting line, Fig. 1b. The compositions of the steel balls, which constitute the greatest tonnage of grinding media in the US, did not differ greatly among the different manufacturers and are basically high-carbon (0.5 to 1.0 wt %), low-alloy steels. It appears that only E balls did not have a chromium addition; the mean chromium content of the others was 0.54 wt %. The copper content ranged from nil to 0.37 wt %, presumably depending upon the starting materials used by the melter. The silicon content ranged considerably, from 0.08 to 0.76 wt %, and probably depended upon the melter’s preferred practice.
The three alloyed white cast iron types of balls, H, J, and K, were basically high-Cr white irons with 2.06 to 3.12 wt % C and 14.4 to 18.4 wt % Cr.
Heat treatments
Most manufacturers consider their heat treatments as proprietary information. For steel balls, it is generally known that the balls normally are reaustenitized by heating them in air at temperatures around 800° C (1470° F), and are then quenched in water. The balls may be quenched to room temperature and then tempered, usually at 250 to 400° C (480 to 750° F), or they may be quenched only to an intermediate temperature and then air-cooled to room temperature.
For alloyed white cast irons, the balls also are reaustenized, but Table 1 times are much longer, 10 hr or 12 hr, to allow the cast structure to equilibrate. The balls are air-cooled to room temperature. Subsequently, they are reheated to about 350 to 500° C (660 to 930° F) and air-cooled.
Balls of type J and K represent special cases of alloyed white cast irons. These balls, made from commercial alloys, were selected from among 10 lots of different heat treatments that were evaluated by the Bureau of Mines to provide the best combination of abrasion resistance and toughness (resistance to fracture and spalling). Type H balls were made by a foundry whose heat treatment was proprietary.

Microstructure
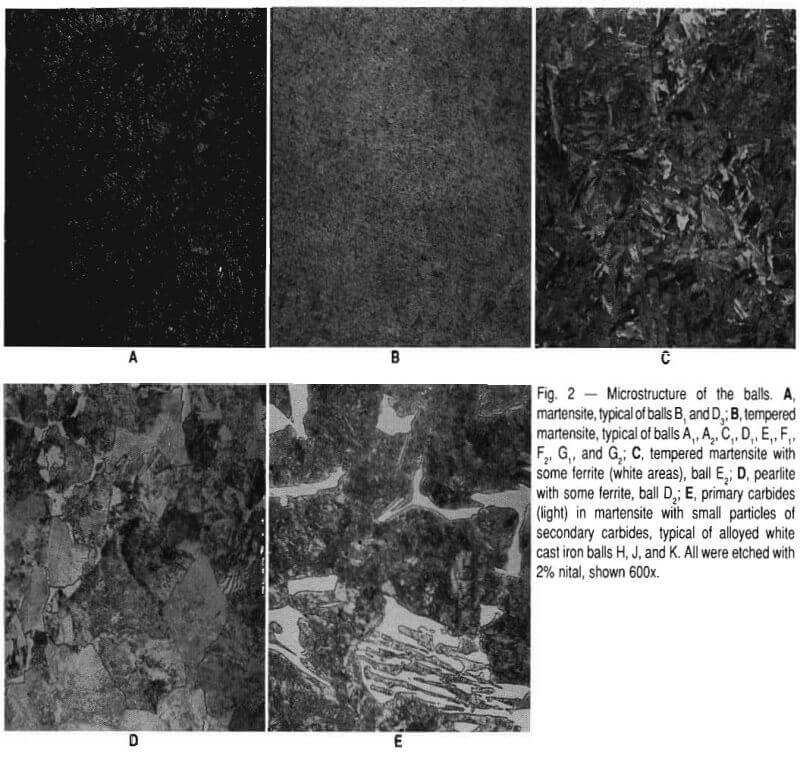
The microstructures of the balls were classified into five groups, shown in Fig. 2. In most steel balls the martensite was fine but in types B and D the martensite was relatively coarse. Type E balls contained coarse martensite with some ferrite. Type D balls were apparently not heat-treated because they were quite soft and the microstructure consisted of perlite and ferrite. All the steel balls contained about 1 percent of impurity phases.
The microstructure of the alloyed white cast irons consisted of the typical blade shaped eutectic carbides, (Fe,Cr) C, surrounded by a matrix of martensite that contained small secondary carbide particles and small amounts of retained austenite, as shown in Fig. 2E.
Experimental Procedure
Test equipment
Two types of laboratory wear tests were run on the grinding balls, repeated impact tests and abrasion tests. The repeated impact tests simulated the ball-on-ball impacts that occur in rotating ball mills that are known to cause balls to spall and break. The abrasion test was chosen to simulate the abrasive wear that results from contact between ore and balls in ball mills. No corrosion tests were run because corrosion effects in large ball mills are normally small relative to abrasion.
Ball-on-ball repeated impact test
The ball-on-ball impact-spalling apparatus, Fig. 3, provided large numbers of impacts in a relatively short time. During operation, balls were dropped 3.5 m on to a line of 21 balls selected at random from the various lots and contained in a curved tube. The impact Shockwave was propagated, with continuously decreasing energy, through the balls, with each successive ball receiving an impact on each side. The kinetic energy of the impacts ranged from 54 J for the first impact to about 5 J for the last impact, just sufficient to cause it to leave the end of the tube and enter a ramp leading to a conveyor. The conveyor carried the ball to the top of the machine, where it was dropped. This process continued until a ball broke, or spalled to the extent of about 100 to 150 g and therefore did not roll. The balls were removed and weighed after approximately 10,000 impacts per ball. Failed balls were replaced by new ones selected at random. Balls also were replaced after they had received more than 300,000 to 500,000 impacts.
Pin-on-drum abrasive wear test
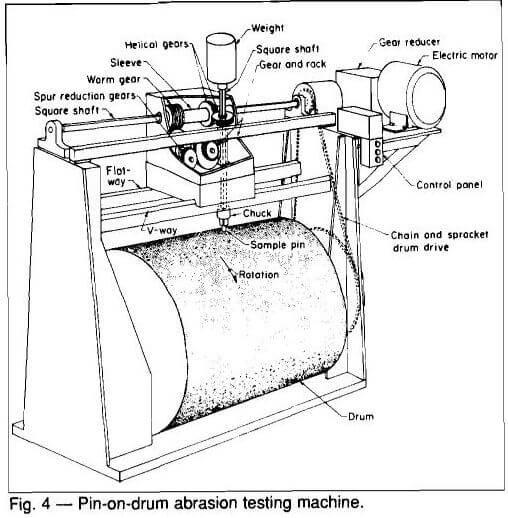
The pin-on-drum abrasive wear test machine is illustrated in Fig. 4, and is described more fully by Blickensderfer and Laird (1987). In this test, one end of a test pin moves over an abrasive cloth. The pin was loaded sufficiently to crush the abrasive particles in order to simulate the wear that takes place during the grinding of ore. Specimens were prepared by electrodischarge machining pins from unused balls and then finish grinding them in a lathe in order to minimize any surface damage or alteration of the material. The pins were 6.35 mm in diam by 2 to 3 cm in length. The end of the pin, 6 mm beneath the surface of the ball, was wear tested. Only fresh
abrasive was encountered by the pin. The test parameters were: applied load of 66.7 N, drum surface speed of 2.7 m/ min, pin rotation of 1.7 rpm, and abrasive cloth of 105 µm garnet. The wear value was corrected for variations in the abrasivity of the garnet cloth by testing a standard pin in a parallel wear track. After measuring the density of the test pin, wear values were reported in units of cubic millimeters per meter of path length.
Results
Steel balls – repeated impact tests
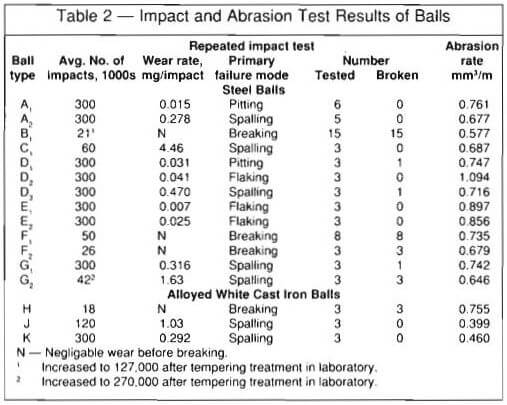
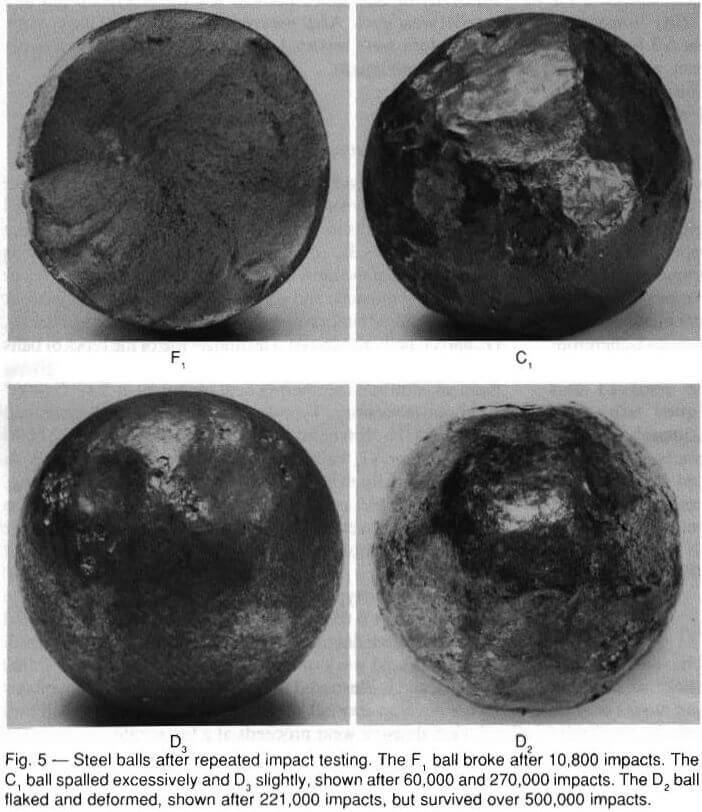
The steel balls subjected to repeated impacts, failed by four different modes, namely, breaking, spalling, flaking, and pitting. The results are summarized in Table 2. The breaking failures of types B1, F1, F2, and G2, are the most serious because most of the individual balls in Table 2 survived fewer than 30,000 impacts, and some fewer than 5,000 impacts. A typical fractured surface is shown in Fig. 5. One each of the D1 D3 and G1, balls also broke. The impact life of the types of balls that failed prematurely by breaking was improved by giving them an additional tempering heat treatment at 200° C (400° F) in our laboratory. Type B1 balls that originally averaged only 21,000 impacts before breaking were improved to 127,000 impacts; type G2 balls improved from 42,000 impacts to failure originally to over 270,000 impacts without breaking.
Spalling is the second most serious mode of impact failure and resulted in average wear rates of 0.28 to 4.46 mg loss per impact. An example of severe spalling is shown in Fig. 5 for a ball of type C1.
The other two types of wear, flaking and pitting, were quite low—less than 0.05 mg loss per impact. Flaking occurred only on the more ductile types of balls, D, E, and E, as a result of extreme cold work of the surface after more than 100,000 impacts, and is illustrated in Fig. 5. Flaking and pitting modes do not develop normally during grinding of ore in a ball mill because abrasive wear proceeds at a faster rate.
Steel balls abrasion
The abrasive wear of the steel balls determined from the pin-on drum wear test ranged from 0.577 to 1.094 mm³/m. However, the most abrasion resistant type of balls, B1, had too short an impact life to be useful; and the least abrasion- resistant type of balls, D2, with an a typical microstructure of perlite, had too little abrasion resistance to be useful. Among the other steel balls with impact lives over 100,000, the abrasion rate ranged from only 0.677 to 0.897 mm³/m.
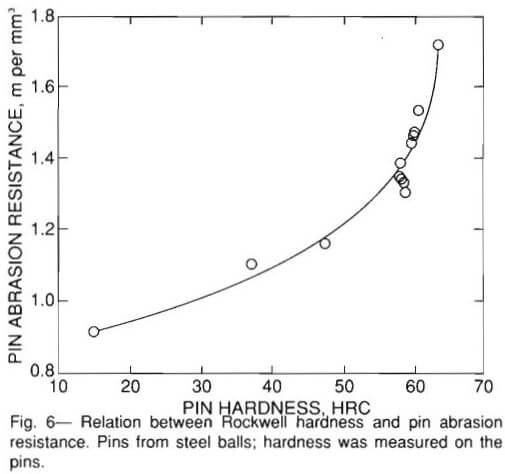
The abrasive wear resistance (reciprocal of abrasion rate) generally increased with increasing Rockwell hardness of the pin, as seen in Fig. 6. The observed relationship between wear resistance and hardness was not linear as it is for most alloys
(Krushchov and Babichev, 1956) but increased sharply above a hardness of HRC 60. The Brinell hardness taken just below the original surface of the balls did not correlate nearly as well with pin wear.
Alloyed white cast iron balls
The average impact life of the alloyed white cast iron H balls was only 18,000 before breaking. The premature failure is attributed to the shrink cavities in all three balls, as revealed by the fracture and illustrated in Fig. 7. The other two types of alloyed white cast iron balls, J and K, survived averages of 120,000 and 300,000 impacts, respectively, without any breaking. However, these balls are not necessarily typical of commercial white iron balls because they represent the near optimum heat treatment from among 10 different heat treatments tried. The spalled surface of J and K balls appeared similar, Fig. 7, even though the spalling rate of J was three times that of type K balls.
The abrasive wear resistance of the C, alloyed white cast iron balls was better than that of steels, as expected. The mean abrasion rate of type J and K alloyed white cast iron balls was 0.43 mm³/m, or about half that of the better steel balls.
Discussion
Although the true wear test of a grinding ball is its life in a real ball mill, the laboratory tests of impact and abrasion may serve as a guide to expected ball life. The two most significant differences found among the commercial balls were the number of impacts to breakage and the impact-spalling rate. Differences in abrasive wear were less but could dictate the choice of ball when the impact properties are sufficient to not limit its life. The ball types that were prone to breaking in the laboratory test are probably suitable only for small diam mills in which impacts are relatively small. The bar graph of Fig. 8 clearly reveals differences among the types of steel balls. All of the A2 type balls
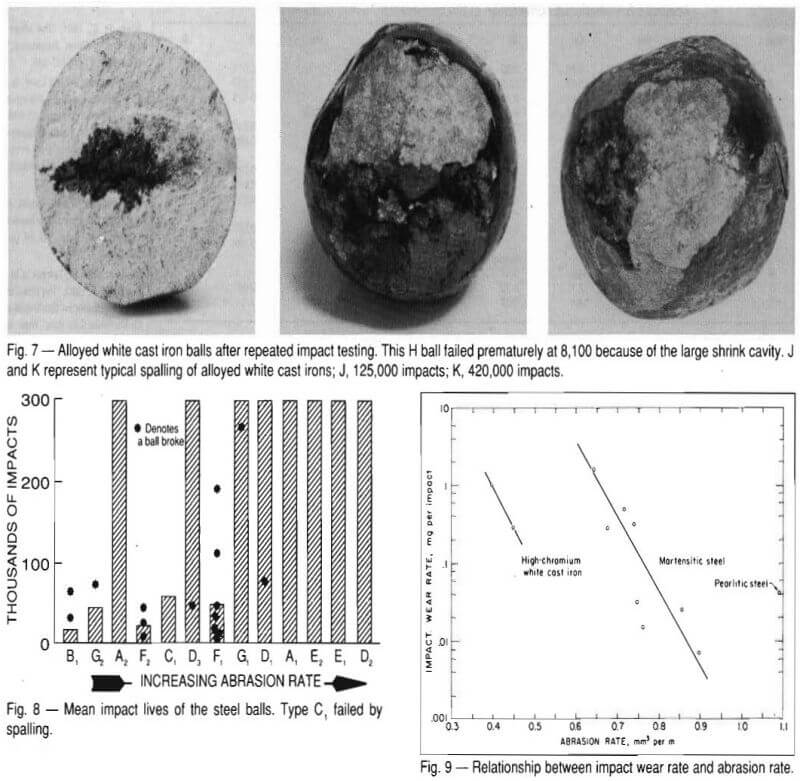
withstood 300,000 impacts and were among the lowest in wear; therefore, they would be a good choice. The F1, type balls probably should be the last choice because many of them broke prematurely, and their abrasion resistance was only about average. However, the choice is confused by the fact that different lots from the same manufacturer, such as A1, and A2, also gave different results.
Among the balls that did not break prematurely, there was a relationship between impact wear rate (spalling, flaking, pitting) and abrasive wear rate. As seen in Fig. 9, a decrease in impact wear tended to result in an increase in abrasive wear and vice versa. Thus, the choice must be a compromise: balls should be selected with impact and abrasion properties that best match the conditions determined by the mill diam and type of ore.
A correlation was attempted between composition and impact properties as well as abrasive wear, but none was found. The carbon equivalent gave about the same general relationship with abrasive wear as did hardness, but neither of these is considered useful for users specifications. Neither did the microstructure, as revealed at X600, determine the impact and abrasion properties, although it is clear that a martensitic structure is desired for abrasion resistance.
The overriding factor that determined impact properties is believed to be the heat treatment. The laboratory tempering treatment of type B, balls resulted in a sixfold improvement in their impact life. The manufacturer should have tempered the balls before selling them. It is doubtful that one specific heat treatment could be adequate for all of the different commercial balls, but rather, the heat treatment for each composition should be selected to provide the desired combination of impact and abrasion resistance.
The user must become aware that great differences exist among the balls supplied by various manufacturers. Furthermore, the user cannot rely on hardness, composition, or microstructure for specifying balls. It may be necessary for the user to specify a minimum impact life and spalling rate in a test such as the Bureau’s ball-on-ball impact-spalling test and to specify abrasive wear standards based on a test known to simulate the given wear situation.
Manufacturers of grinding balls should improve their quality control in order to make balls having better and more consistent impact and abrasive wear properties. After ball properties are improved and made more consistent, it should be possible to classify ball types for the type of application, such as for the diam of the mill and the abrasiveness of the ore.
After the manufacturers make consistent ball products, ball consumption records kept by the user will become much more meaningful. Interaction between the manufacturer and user will help reduce ball consumption. Eventually, the best type of ball can be selected for a given mill, ore, and operating condition.
Recommendations
To reduce the consumption of grinding media, the following are recommended.
- Ball manufacturers should strive for greater consistency in their product. Adoption of standards would drive manufacturers in this direction.
- Preliminary standards should be developed for the impact, spalling, and abrasion resistance of grinding balls. The Bureau’s ball-on-ball impact test and a pin abrasion test
can be used for specification of tests. - Standards should be refined as grinding balls are improved and correlations between ball consumption data and laboratory test data are developed for various sizes of balls, mill diam, and types of ore.
Summary
There is a wide variation in the impact and abrasion properties among different lots and makes of 75-mm commercial grinding balls, according to laboratory tests. The mean impact lives to breakage ranged from 21,000 to over 300,000 for steel balls and from 18,000 to over 300,000 for alloyed white cast iron balls. For the harder steel types that did not break and for all alloyed white cast irons, the major impact wear mode was spalling, with rates of 0.28 to 4.5 mg per impact. The softer types of balls did not break or spall, but they suffered from abrasive wear. There is a tradeoff between impact wear and abrasion, although a few types of balls were relatively good in both regards.
Heat treatment has a dominant and critical effect on the impact life of grinding balls, whether they be steel or alloyed white cast iron balls.
The user needs new standards for specifying balls because hardness, composition, and microstructure are inadequate. Standards for resistance to repeated impacts and resistance to abrasion should be developed.
If ball quality were improved and if ball properties were adjusted to match the given application, grinding media consumption could undoubtedly be reduced.
