Table of Contents
- Fire Assay Fundamentals
- Assay Flux Fundamentals
- Fire Assay Crucible Fusion Theory
- Fire Assay Fusion Procedure
- Fire Assay Refusions
- Traditional Cupellation Procedure
- Silver & Gold Parting Process
- Microwave Fire Assaying Method
I have always been amazed at the amount of knowledge the Alchemists in the Middle Ages possessed regarding chemistry, metallurgy and the precious metals. Yet they did not realise that the fleas of rats were transmitting the plague that killed literally millions of people in Europe during the 1300’s, nor that the earth was round.
I’ll be the first to admit, I certainly do not know how to change base metals into the noble metals of gold and silver. If anyone else does and wants to share, I’d appreciate it.
Now, I do know a method to tell what noble metals are contained in a given sample of ore, by utilizing a microwave oven for the crucible fusion and then, performing the cupellation process, utilizing my simple propane fired furnace that I will share with you. We’re not talking about setting up a complete professional assay facility. However, with practice and by following the procedures, you can be just as good as, or better than, many of them on a small scale.
I’ve spent quite a few dollars on fire assays over the years and decided that I would like to first be able to determine whether the ore samples collected are worth sending to the lab for professional fire assaying or not. I now assay my samples three times utilizing these methods and, if I see decent results, the sample will go to the lab. If not, it goes to the rock garden. Saves me a lot of money and I learn something every time I perform the fire assay.

Microwave Fire Assaying Method

The following chapters present a description of the ‘traditional methods’ of fire assaying, as well as the method for utilizing the microwave oven for the crucible fusion. The principals for the fluxing of the ore are identical for either method, whereas the crucible fusion and cupellation methods are where we part ways from the classical procedures. Yet, end results and principals are identical.
The fire assay has always conjured images of smoking furnaces, molten metal and a certain almost mystical environment associated with the ‘art of the assay’ to me. Now, having learned how to perform the procedures, my understanding of the contained elements and their relationships within the ore has been increased exponentially, while the image of the smoking furnaces, molten metal and almost mystical environment has been affirmed.
The beginnings of fire assaying can be traced to the finds in Troy II (about 2600 B.C.) and in the Cappadocia Tablets (2250-1950 B.C.). These finds prove that very pure silver was made in the 25th Century B.C. From this evidence, we must conclude that the cupellation process and, therefore, fire assaying, was invented in Asia Minor in the first half of the third millennium B.C., shortly after the discovery of the manufacture of lead from galena. The first convincing evidence of the production of silver from lead ores is the cupel buttons found at Mahmatlar in the late third millennium B.C., which reside now in the Hittite Museum in Ankara, Turkey.
Today most methods combine fire assay precious metals collection with the subsequent instrumental determination of values obtained. The advantage of fire assay techniques for the determination of noble metals is the ability to use a relatively large ore sample from which to concentrate these metals, in addition to eliminating virtually all the associated gangue materials by fluxing.
Modern apparatus and a much better scientific understanding of the reactions taking place have improved on the methods of the assay, however, the principals still remain ancient and the actual art of the assay still plays a substantial role in the process.
Whether you choose to apply the procedures described in the following, or simply desire to better understand what occurs during the process of the fire assay, I hope you enjoy what follows. If I happen to learn how to change base metals into noble metals during my practice of the art of fire assaying, I’ll get back to you, however I wouldn’t hold my breath if I were you.
A Description of the Traditional Methods of Fire Assaying
Fire Assay Fundamentals
Fire assaying is an established form of quantitative chemical analysis by which metals are separated and determined in ores and metallurgical products with the aid of heat and dry reagents. Traditionally, the objective is to form a melt of at least two phases – a complex liquid borosilicate slag and a liquid lead precious metal collection phase of a controlled size. The high degree of solubility of the noble metals such as Ag and Au in molten metallic lead, plus the great difference in specific gravity between the lead and slag, permit the separation of the noble metals from the slag as lead alloys.
The subsequent removal of the lead as lead oxide in a porous vessel known as a cupel, by a carefully controlled oxidizing fusion, separates the lead from the noble metals. The remaining metallic bead is then analyzed for the noble metals. By analogy, fire assay may be looked upon as pyrometallurgical solvent extraction, whereby a precious metal is collected and concentrated in a selective solvent. Then, the solvent is stripped from the precious metal by cupelling.
The mixture of chemicals and ore used for the crucible fusion provides a complex system. By correlation with simple systems, such as a metal oxide with borax or silica, one may make reasonable guesses concerning some of the reactions. Thus, the technique of a fire assay collection of the noble metals is largely an experimental process, assisted to a degree by some fundamental principles.
Initially, the ore to be assayed must be in an exceedingly fine state of division and thoroughly mixed with the flux constituents. These conditions are necessary to ensure the intimate contact of each ore particle with the particles of the melting flux. Ideally, this contact must be maintained during the early stage of the fusing process.
This is necessary in order to ensure a sufficiently complete reaction between ore and flux, along with the simultaneous production of the fine globules of lead by the reduction of Litharge (PbO). To bring about this condition, the composition of the flux, the temperature and its rate of increase must be carefully arranged. The optimum viscosity is somewhat dependent upon the proportion of the borax and the character of the borates and silicates that are formed at or near incipient fusion.
In the absence of this concurrence of lead and noble metal, one must depend upon the ability of the high-density noble metal to settle to the bottom of the crucible during the subsequent fusion process. This settling process is facilitated by the increase in fluidity of the mixture at the elevated temperatures and, for the platinum, palladium and gold at least, it is also facilitated by the alloying tendency with the lead finally collected in the bottom of the crucible. Thus, for certain noble metals, a reasonably acceptable assay may be achieved, even under unfavorable conditions.
This opinion is supported by the fact that the classical lead fire assay does not accomplish the direct recovery of iridium through the formation of a homogeneous lead alloy. It is not unlikely that practically all of the iridium and iridosmine, when the latter is present, are recovered by the fall of these high density metals through the low viscosity liquid in the later stages of the fusion. However, there is ample evidence that in general, all six of the platinum metals and silver and gold can be quantitatively recovered by careful use and manipulation of lead collection.
More simply stated, we take our sample of ore and grind the hell out of it until it’s a powder -100 mesh is desirable. Since we’re going to be working with only 15 to 30 grams of ore, it can be done by hand with a mortar and pestle – unless you happen to own a sample pulverizer. We’re not going to go into sample collection, splitting and all the methods used, since that’s not the intent here. What we want to know is if there are any noble metals in the sample that we choose to fire assay.
Once the sample is ground, we are going to mix it with some reagents that make up our assay flux, including PbO, which is lead oxide, also known as Litharge. This mixture is then put into a crucible and placed in the microwave, where we are going to create a controlled ‘reducing environment’ in the crucible and manipulate the final size of the lead button or ‘lead prill’ that will ultimately contain our noble metals, after the fusion is complete. The microwave provides a unique environment for the column of ore and reagents in the crucible, since the contents of the crucible are heated slowly and evenly inside of the crucible by the microwaves, rather than by a radiant heat which heats the contents from the outside of the crucible.
This means that the intimate contact of the ore and flux is optimized during the early stages of the process. A portion of the litharge is reduced to metallic lead during the fusion process and the noble metals are ultimately dissolved into the metallic lead during the fusion. The assay fusion takes place at a temperature lower than the individual noble metals actually melt at. Therefore, the metallic lead acts as a ‘solvent’ which ultimately dissolves and collects the noble metals. Apparently, if the conditions are not ‘perfect’ during the early stages of the fusion process, the noble metals are dissolved by the metallic lead in the bottom of the crucible, after the flux is fluid and the noble metals come into contact with the metallic lead.
One must initially determine whether the ore is neutral, reducing, or oxidizing in character.
Neutral ores have no reducing or oxidizing power and usually are the siliceous, oxide and carbonate ores.
Reducing ores decompose litharge to form metallic lead and usually consist of sulfides and carbonaceous matter.
Oxidizing ores contain ferric oxide and manganese dioxide which, when fused with fluxes, oxidize lead or reducing agents. Ores with considerable oxidizing power are comparatively rare.
The fundamental overall chemical equation for the process of litharge reduction can be expressed as:
2 PbO + C > Pb + CO2
The fundamental overall chemical equation for the process of lead oxidation is expressed as:
2 Pb + O2 2PbO
The fire assay is better facilitated if the chemical and mineralogical composition of the ore is known or can be obtained. For this reason, it is advisable to make a semi-quantitative analysis via a suitable instrumental method, along with a coarse mineralogical examination of the sample, either visually or with x-ray diffraction. From this information, one can usually determine whether an ore is neutral, reducing, or oxidizing.
All of this information is necessary to prepare an optimum charge, so that the maximum recovery of the noble metals may be realized. If the description and an analysis of a sample or ore indicate the presence of sulfides, a preliminary fusion is recommended to establish the ‘reducing power’ of the ore.
The term, reducing power, as used in fire assaying, is defined as the amount of lead that 1 gram of the ore will produce when fused with an excess of litharge.
Conversely, oxidizing power, is the amount of lead that 1 gram of ore will oxidize to lead oxide.
When the need arises to establish the reducing power of an ore, a preliminary fusion is employed, typically using the following charge constituted in a 10-gram fireclay crucible:
3 grams ore, 10 grams Na2CO3, 46 grams PbO, 3 grams SiO2 and 1 gram Na2B4O7.
The fusion is performed at a temperature of 900 to 1000 Celsius for 40 minutes. The lead button produced from this is weighed and the reducing power is then calculated. For example, if 3.00 grams of ore are used and a lead button is obtained weighing 15.00 grams, the reducing power of the ore is 15.00/3.00 = 5.00. In some cases, a small amount of flour is added in the preliminary fusion to ensure that, in the case of neutral or oxidizing ores, a lead button is produced.
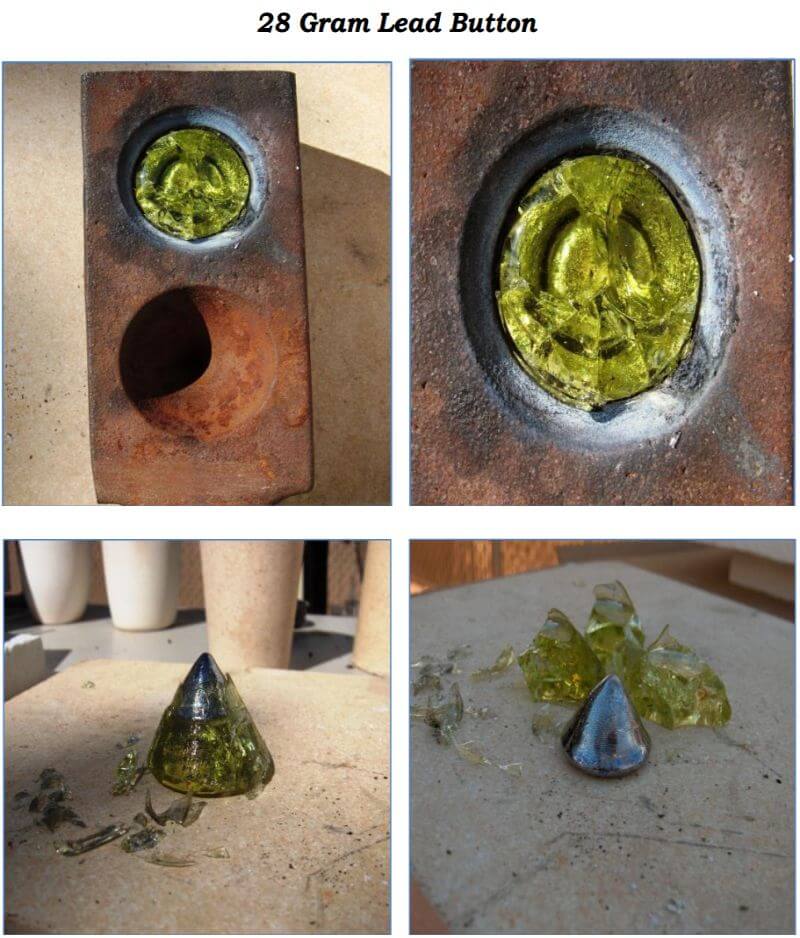
Simply stated, the size of the lead button needs to be controlled after the crucible fusion is completed and poured into the mold. That is accomplished by adding a certain amount of a reducing agent to the flux, as well as knowing what the reducing or oxidizing power of the ore is going to do to the litharge during the fusion, so that you ultimately end up with a button of 28 grams for the cupellation process.
There are lots of opinions on the ‘ultimate’ lead button size. Let’s not get into that debate here, however; it’s best to try for 28 grams when working with a 30 gram ore sample. Personally I’ve had great results with 15 to 20 gram lead buttons when working with 15 gram ore samples, as well. You will ultimately form your own opinions, once you are familiar with the art and science of the fire assay.
A reducing agent needs to be added to the assay flux to produce a metallic lead button of approximately 28 grams, which will contain the noble metals after performing the crucible fusion. If you are working with a neutral or oxidizing ore, you can assume that the lead button will be 28 grams under ideal conditions, when adding the proper amount of reducing agent. The reducing agent most commonly used in the fire assay is flour. Yes, plain old flour.
Flour is a source of carbon and reduces litharge during the crucible fusion, forcing the lead oxide (litharge) to convert to metallic lead, since it cannot remain as an oxide in the ‘reduced environment’ of the crucible. In a perfect world, the reducing power of flour is approximately 10-11, meaning that 1 gram of flour will produce 10 to 11 grams of metallic lead from the litharge during crucible fusion. So, you would need to add approximately 2.5 to 2.8 grams of flour to your flux, to produce the desired 28 gram lead button, when working with the neutral ore. An oxidizing ore will consume a portion of the reducing agent that was added to the flux. A reducing ore will convert litharge to metallic lead without the addition of a reducing agent and you will have to compensate for that phenomenon.
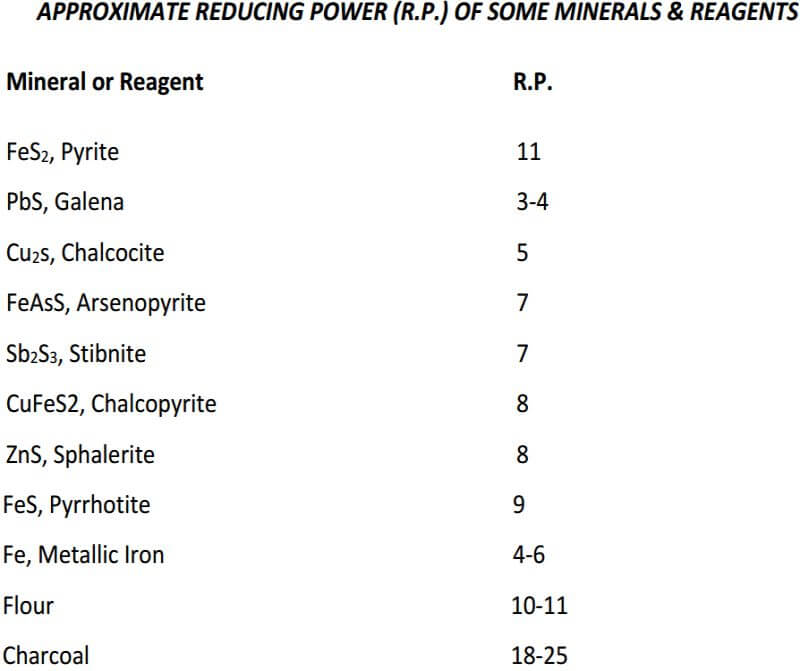
An oxidizing ore is one that will not reduce PbO. Flour, or another reductant must be used to produce a lead button. Oxidizing ores seldom need more than a slight increase in the amount of flour used.
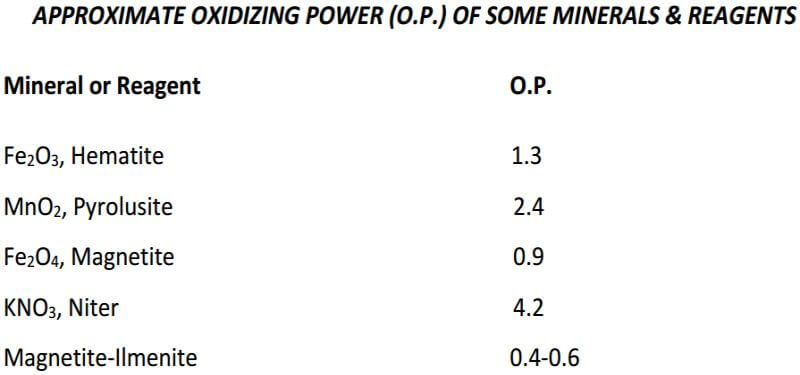
Having established the reducing power of the ore, the following calculations are used to determine the amount of oxidant in the form of niter, required to obtain a desirable-sized button (28-30 grams) when 15 grams of sample is used:
Lead total reducing effect of ore 15 x 5.00……………………….75.0 grams
Lead button desired……………………………………………………..30.0 grams
Difference, ore equivalent that must be oxidized by niter….45.0 grams
1 gram of niter oxidizes (from Table 2)………………………………4.2 grams
Niter required 45/4.2………………………………………………………10.7 grams
Assay Flux Fundamentals
Dry reagents or flux components are added to the pulverized ore in a fireclay crucible to effect a fusion at an easily attained temperature. Each reagent serves a specific purpose in the fusion process, as follows:
Sodium Carbonate (soda) – Na2CO3, is a powerful basic flux and readily forms alkali sulfides during the crucible fusion. Some sulfates are formed in the presence of air and, for this reason, Na2CO3 can be considered a desulfurizing and oxidizing agent. It melts at 852° Celsius; when heated to 950° C, it undergoes a slight dissociation with the evolution of a small amount of CO2 and the liberation of about 0.4% of the free alkali. Both the free alkali and sodium carbonate react to form silicates and aluminates.
Litharge – PbO, is also a basic flux and acts as an oxidizing and desulfurizing agent. It melts at 883° C and, on being reduced, provides the lead necessary for the collection of the noble metals. Litharge has such a strong affinity for silica, that, if the crucible charge does not contain enough silica, the PbO will attack the crucible walls and, if left long enough, will eat a hole through the crucible.
Silica – SiO2, is a strong acidic reagent which combines with the metal oxides to form silicates, the foundation of almost all slags. It is added to the charge when the ore is deficient in silica, to give a more fluid melt and to protect the crucibles from the corrosive action of litharge.
Borax – Na2B4O7, is extremely viscous when melted but at a red heat, it becomes fluid and a strong acid, dissolving and fluxing practically all the metallic oxides, both acidic and basic. In addition, the fact that it fuses at a low temperature facilitates slagging of the ore and lowers the fusing point of all slags. For these reasons, it is used in almost every crucible fusion.
Calcium fluoride – CaF2, is used especially when the aluminum content of the sample is 1% or more. It increases the fluidity of almost any charge.
Flour – Flour is a reducing agent because of the carbon that it contains and is commonly used in the crucible charge.
Potassium Nitrate – KNO3, commonly known as niter, is a strong oxidizing agent. It melts at 339° C but, at a higher temperature, it decomposes, giving off oxygen which oxidizes sulfur and many of the metals. Potassium nitrate is used chiefly to oxidize sulfide-bearing ores. It is advisable to establish the reducing power of the sample because excessive amounts of niter may cause boiling-over of the charge.
The most important factor for a successful crucible fusion is the proper selection and amounts of the flux components. A good flux will produce a slag with the following characteristics:
- It must have a formation temperature within the temperature range of the assay furnace.
- It must remain sufficiently thick at or near its formation temperature to allow any precious metals present to be released from their chemical or mechanical bonds with the gangue, before the flux allows the collector particles of lead to drop down and alloy with the precious metal values.
- It should become sufficiently thin when heated above its formation temperature, to allow the reduced lead globules to settle through it easily.
- It should completely decompose the gangue to a fluid slag and should have a very low affinity for gold and silver.
- Its chemical composition should be such that it does not excessively attack or flux away the crucible.
- Its specific gravity should be low enough to give a good separation between the lead and the slag.
- After the slag has cooled, it should be homogeneous and easily removed from the button.
- It should not retain higher oxides (oxides containing more than 2.0 atoms per molecule) of metal and yet, at the same time, should contain all the impurities present in the gangue.
- It should be free of sulfides.
When the desired flux has been worked up, based on the preliminary fusion to determine the reducing power of the ore and on the examination of the ore, the fusion can proceed. Because the selection of flux components is based primarily upon knowledge of the chemical or mineralogical composition of the sample, it is advisable to perform an analysis of the sample prior to constituting the flux.
Experience has shown that, for basic and ultra-basic rocks, including mineralized basic rocks, a flux high in borax should be used. This flux is also used for silicates, where the Fe and Mg are each 5-10% or more. A convenient flux to use for these types of samples consists of 30 grams Na2CO3, 35 grams PbO, 4 grams SiO2, 35 grams Na2B4O7, 1 gram CaF2 and 3.2 grams of flour, for the 15 gram sample. One component, SiO2, may be varied from 4 to 8 grams, depending upon the silica content of the sample.
CaF2 is another flux component which may vary widely (0-15 grams) depending upon the sample being fluxed. As mentioned previously, it increases the fluidity of most charges. When the elemental aluminum concentration of the ore or sample is less than 1%, CaF2 is not added; if the aluminum concentration is 1-10%, 1 gram of CaF2 is added to the charge; if it is 10-20%, 2 grams is added. For high-grade aluminum bearing samples, as much as 8 grams may be used. Other samples not necessarily containing high aluminum but requiring an excessive amount (4 grams or more) of CaF2 are black sands, magnetite and calcium phosphate (bone ash).
For difficult samples like chromite, a high borax charge, in addition to an auxiliary flux, is used. The main charge contains 30 grams Na2CO3 , 35 grams PbO, 10 grams SiO2, 30 grams Na2B4O7, 1 gram CaF2 and 3.2 grams flour plus 15 grams of sample and an added noble metal (Ag or Au) that serves to collect other noble metals during cupellation. These components are mixed well in a 30 gram fireclay crucible. The auxiliary flux consists of 10 grams Na2CO3, 5 grams SiO2 and 25 grams Na2B4O7 added to and mixed well in a 20 gram fireclay crucible. After fusion of the contents of both crucibles, the melt in the 20 gram crucible is added to the main charge.
When copper, nickel or manganese is present in sulfides in appreciable amounts (2-5%), all components of the flux are increased. This is to increase the volume of the melt, so that the constituents of the sample will dissolve more readily. For example; in the analysis of a sample described as a sulfide-bearing fissure vein, the percentages of the following elements were determined: Fe, 10%; Zn, 10%; Mn, 2%; Pb, 3%; Cu, 1%; Si, 2% and Al, 0.2%. By a preliminary fusion the ‘reducing power’ of this sample was determined to be 5.37.
The first flux, used for a sphalerite (ZnS), was made to contain 20 grams NaCO3 , 60 grams PbO, 8 grams SiO2, 6 grams Na2B4O7 and 12 grams KNO3 for a 15 gram sample. After fusion, this flux produced an undesirable stony slag. A repeat fusion, where all components of the flux were increased with the exception of KNO3, contained 30 grams Na2CO3 , 90 grams PbO, 12 grams SiO2, 10 grams Na2B4O7 and 11 grams KNO3.
This flux produced an acceptable slag and lead button. The preceding example shows that a flux used for a mineral such as sphalerite (ZnS) would not necessarily produce an acceptable fusion when other elements or compounds are present in sufficient amounts.
Siliceous samples or ores containing 60% silica or more and low in the ferromagnesian silicates usually give good fusions using the following flux: 20 grams Na2CO3, 50 grams PbO, 0-3 grams SiO2, 3-5 grams Na2B4O7, 1 gram CaF2 and 2.8 grams flour for 15 grams of sample. From the data given, one can also adjust the charge, if a mixture of minerals is contained in one sample.
The following charges are for calcite, quartz and an adjusted charge if the sample were to contain half calcite and half quartz (all quantities are in grams):
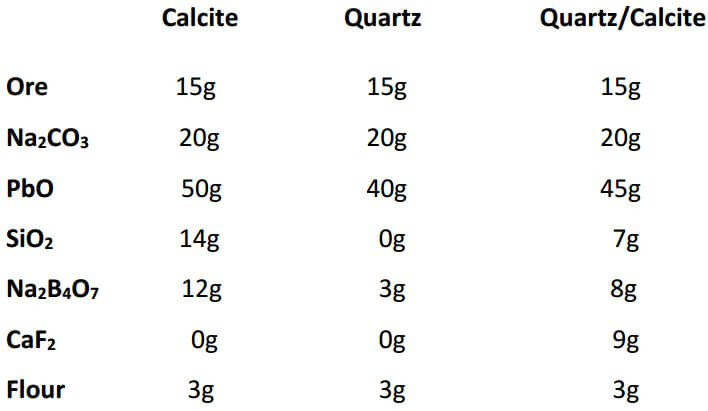
The adjusted charge is obtained by calculating the difference in the amount of each flux component and dividing by two. The result is then added to the smaller figure.
As you can see, fluxing the ore can be as complicated or as easy as you want to make it. As long as we properly identify our samples by their characteristics and put them into one of the three classes of ore, it’s actually not that difficult to choose a proper flux for the assay.
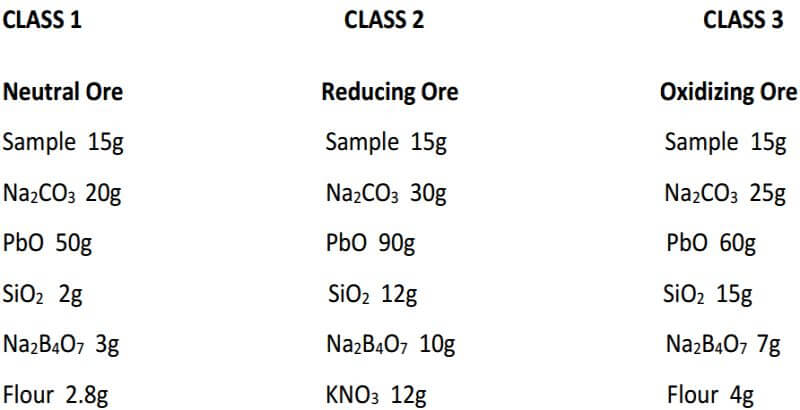
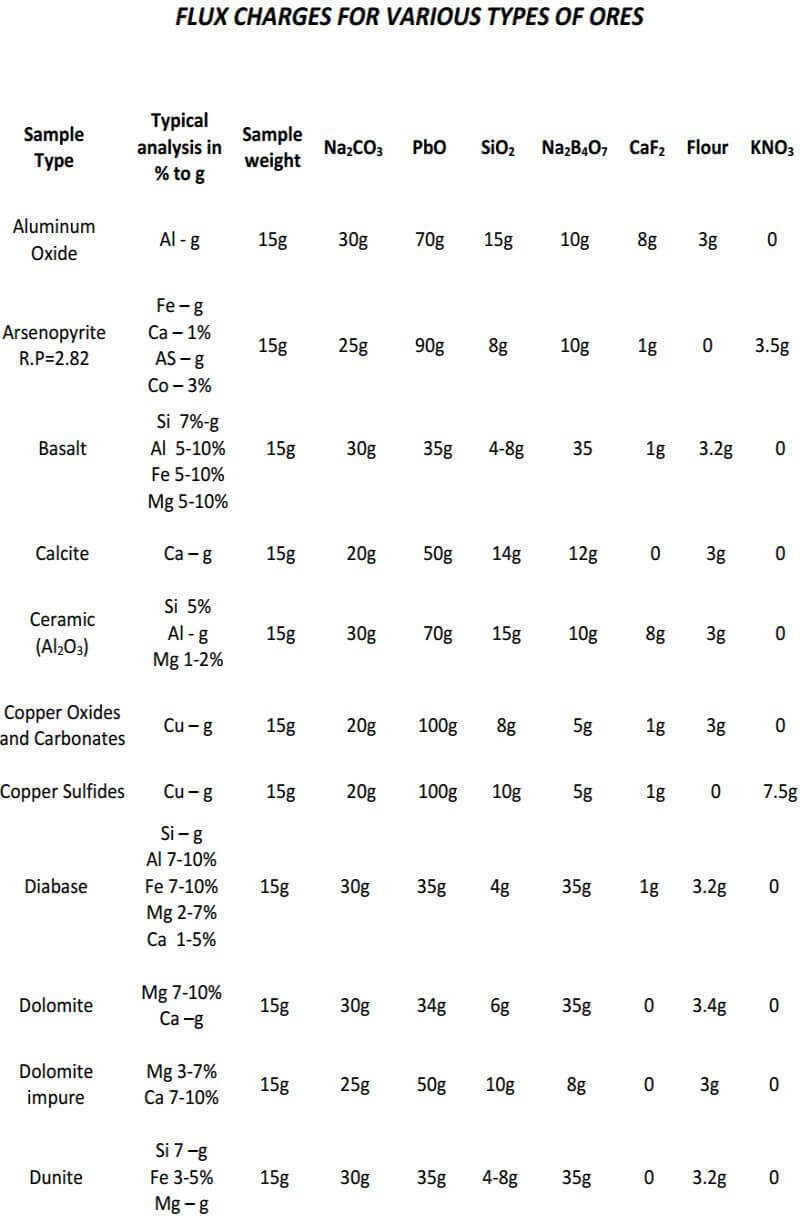
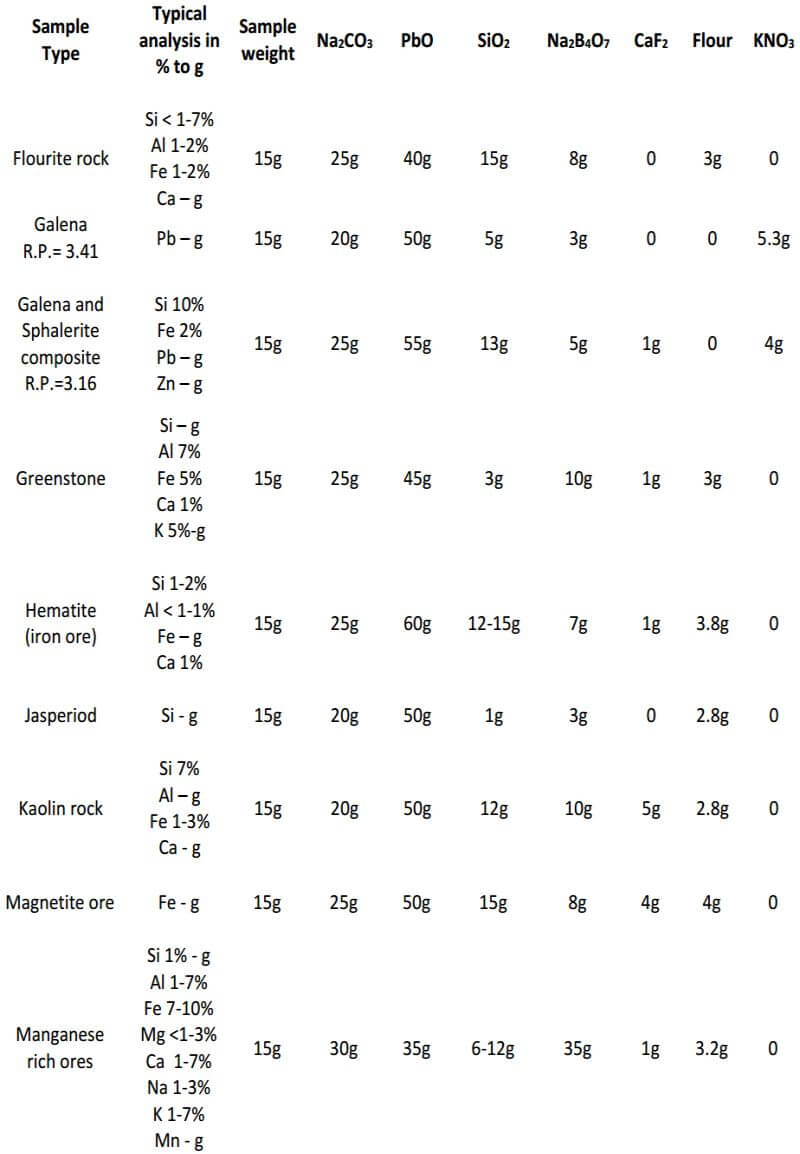
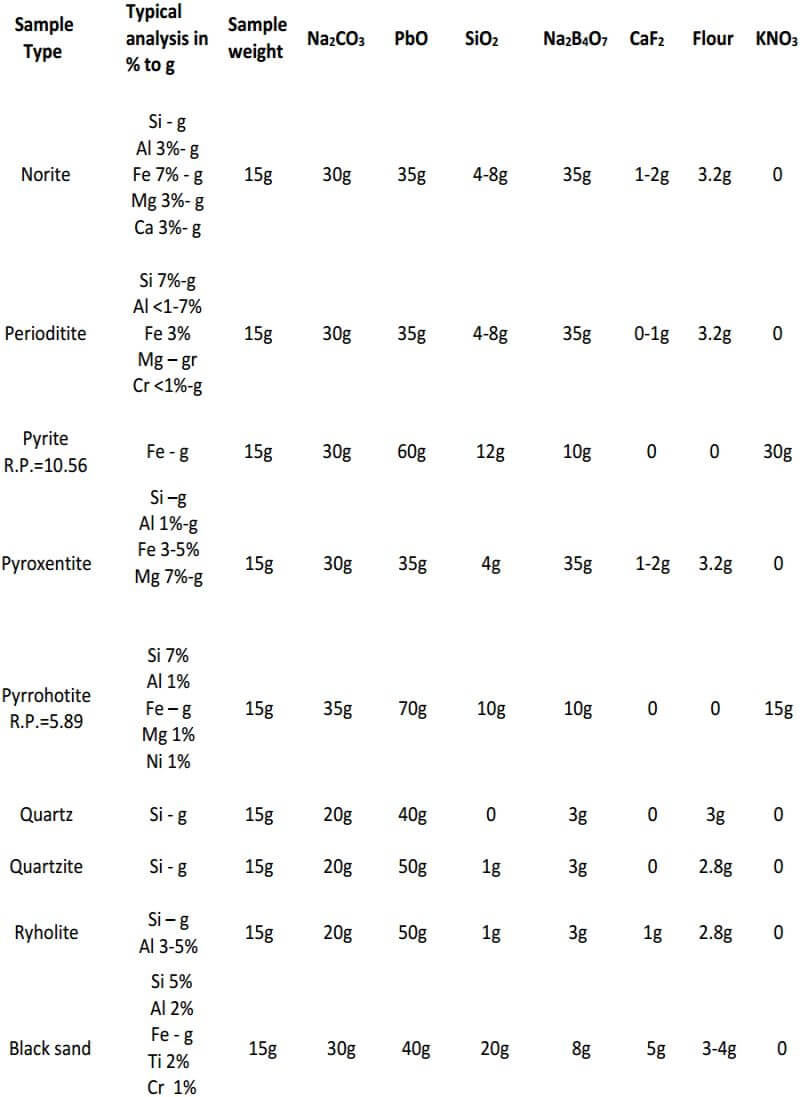
As seen, the fundamental components of the flux remain constant in all three classes of ore. The only variable is the amount of them used in each specific class of ore. In the reduced ore sample, the omission of the flour and the addition of Potassium Nitrate is intended to oxidize the sulfides and obtain a 28-30 gram lead button. Unless I’m working with a concentrated massive sulfide sample, I prefer to carefully roast the sulfides and treat the sample as a class 3 oxidized ore, rather than use KNO3. The table on the next four pages presents general flux charges for various types of ores.
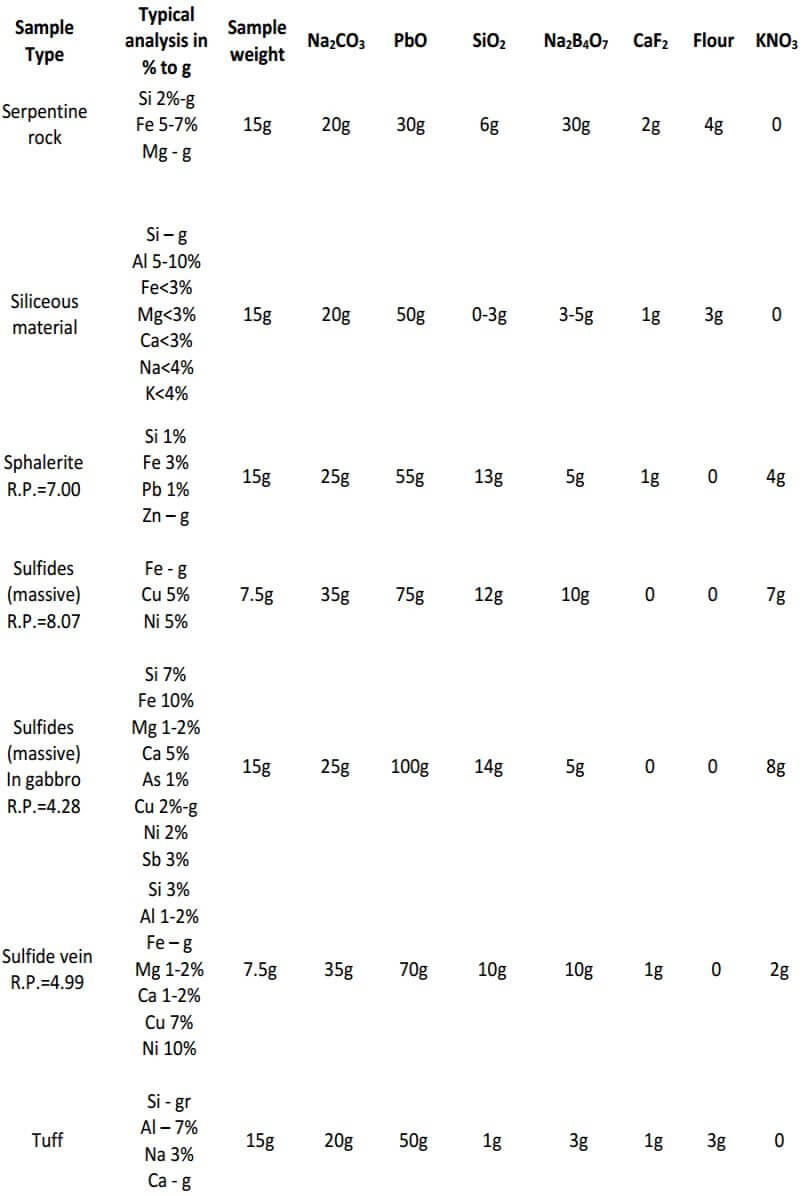
Fire Assay Crucible Fusion Theory
Most ores are by themselves infusible, however; if finely pulverized and mixed in proper proportion with flux components in a fireclay crucible, the mixture will fuse at an easily attained temperature. The ore and flux components are so intimately mixed, that each particle of ore is in contact with particles of the flux components. As the temperature of the mass is gradually raised, part of the litharge (PbO) is reduced to lead, commencing at about 5500 to 6000 Celsius, by the carbon in the flour, or by the sulfides innate to the sample. The mist of lead droplets produced collects or alloys with the noble metals released from the surrounding particles of decomposed sample.
Part of the PbO forms slag compounds, such as the lead silicates, which are absorbed by the slag. The conditions should be such that the slag remains viscous until the ore particles are thoroughly decomposed and every particle of the noble metals has been taken up by the adjacent suspended droplets of lead. After this point has been reached, the temperature is raised to ensure that the slag is thoroughly fluid. This condition allows the lead droplets to coalesce and fall like fine raindrops through the slag to form the lead button in which the noble metals are concentrated.
As previously stated, when we use the microwave oven for the fire assay fusion, we are parting ways with the traditional procedures described in the next chapter. The microwave has a unique capability of heating the crucible charge during the fusion from the inside of the crucible, rather than a radiant heat having to penetrate the crucible from the outside. As a result, the crucible charge heats evenly and slowly, creating the optimal environment for the lead globules to contact the ore during the early stages of the fusion. Generally, the crucible charge is viscous for approximately 20-30 minutes, then, we continue microwaving the crucible charge for another 30 minutes, ensuring a complete decomposition of the ore contained in the charge, as well as allowing time for the fusion to become and ‘quiet or still’ prior to pouring the charge into the mold.
Another unique aspect of the microwave process is that the crucible is microwave transparent, thereby allowing for a physical cover to be placed on the crucible during the fusion process. This creates a truly reduced environment within the crucible and reduces the possibility of ‘dusting’ or losing values by volatizing the ore charge during the fusion process.
An advantage to utilizing a physical cover on the crucible is that litharge is very corrosive to the interior of the furnace. Litharge readily attacks heating elements, fire brick and most everything that comes into contact with it. By placing a physical cover on the top of the crucible we contain the fumes and mists of the litharge produced during the crucible fusion within the crucible. The traditional practice of using a ‘salt cover’ or a ‘borax-soda cover’ is not necessary while using the physical cover as well.
The practice of placing a layer of salt or borax-soda mixture over the top of the crucible charge was often used in the traditional process. If a salt cover was utilized, the salt would ‘float’ on top of the fluid flux, keeping oxygen away from fusion and preventing losses by ebullition. Arguments against the salt cover were founded on the principals that utilizing salt likely contributed to silver and gold losses by volitization. It is well known that gold chloride is volatile at approximately 180° Celsius and that silver chloride is volatile when the chlorides of arsenic, antimony, iron, copper and lead etc. are present. The salt also produces fumes of chloride when pouring the crucible fusion and promotes the volitization of lead compounds as well.
The borax-soda cover fuses before the rest of the crucible charge and remains thick and viscous when melted and theoretically prevents potential losses by dusting or ebullition during the early stages of the fusion. The borax-soda cover eventually enters the fusion and ceases to be a cover as the fusion progresses, thereby challenging the effectiveness of the cover in the first place.
Fire Assay Fusion Procedure
The furnace is brought to a temperature of 1000° Celsius. The crucibles with their contents are now placed in the furnace in rows of four, using a charging fork and starting at the rear of the furnace. A space of about 0.5 cm between crucibles is maintained in the event of boil over. After the furnace door is closed, the temperature is turned down to 900° C for about 20 minutes. In the meantime, the iron molds in which the fusions are to be poured are placed on the steel table with their aluminum covers. After 20 minutes, the temperature is raised to 1000° C for an additional 20 minutes. At the end of this time, the furnace door is opened and the fusion crucibles are removed singly, using the crucible tongs.
The bottom of the fusion crucible is tapped lightly on the steel table and the melt is swirled to ensure that it is liquid and of the right consistency. The melt is then poured into the iron mold, after which the crucible is rapidly rotated vertically so that the liquid does not run down the sides of the crucible.
After the crucibles and melts have cooled, the crucibles are examined for shot and the slag of the cooled melt is broken with a steel rod and hammer. The small amount of slag remaining on the lead button is removed by tapping it with the steel rod. The button is then shaped into a cube with a hammer and anvil. The corners are rounded slightly for convenience of handling. If the button appears somewhat brittle, it should not be hammered more than necessary, or it may flake and crack.
Fire Assay Refusions
Repeat fusions of a sample are conducted (usually with a different flux) when an undesirable fusion was obtained and sufficient sample is available. When the sample is insufficient, the slag from the first fusion can be reprocessed. Indications of an unsuccessful fusion are (a) the slag contains shot or globules of lead; (b) the melt is viscous and gives a muddy pour and a stony appearance. If conditions are too basic, the slag is high in litharge and an insufficient amount of lead was reduced. This is recognized by its higher-than-average specific gravity and even a crystalline character. There are also unsuccessful fusions where the sample has not even decomposed.
Unsuccessful fusions usually fall into one or more of the categories just listed, based on their pour and the nature of their slag. Knowing which flux components to alter and the proper amounts to use to obtain a successful fusion may require considerable thought and experimentation. In some instances, generalities may be stated but in others, the problem is unique.
No specific set of conditions are known for the cause of shot in the slag. Consequently, no generalities can be stated to avoid the production of shot. However, some hypotheses or observations may be, or have been, suggested. For example; if the melt is viscous, it may cause the globules of lead to remain in suspension and prevent them from combining to form the lead button. Or the globules of lead may have become coated and thus prevented from combining. Making the melt more fluid, in the former instance, may aid in the combining and collection of the lead globules. In the latter instance, the causes for coating of the lead globules require more investigation. However, the addition of a considerable amount of Na2B4O7 (30-35 grams), as in fusing chromite ores, seems to prevent coating of the globules, in many cases.
When a viscous pour is evident, steps must be taken to increase its fluidity, by increasing one or more flux components – frequently Na2CO3 or PbO or Na2B4O7 but sometimes, SiO2 or CaF2. If a highly siliceous pour is indicated, the usual treatment is to increase the Na2CO3 by 5-10 grams and, when the pour is too basic, to increase the SiO2 and Na2B4O7. Both pours need additional PbO (about 70 grams).
If, during the pour and after cooling, material similar to the sample appears on the side of the fireclay crucible and in the slag, the sample obviously has not decomposed. This condition suggests that the proper flux may not have been selected. Further study and experimentation to select the proper flux will usually solve this problem. However, in a few instances, such as when fusing chromite concentrates, it may be necessary to decrease the size of the sample from the routine 15 grams to 30 grams, to obtain an acceptable fusion.
At this point, assuming you performed the crucible fusion and everything went well, you now have a 28 gr lead button that contains the noble metals. Ideally, the flux didn’t stick to the lead button after the fusion cooled and the button is clean, soft and malleable. You can then proceed on to the cupellation process. If things didn’t go well and you ended up with a brittle, ugly lead button with matte or speiss stuck to the bottom of, or coating the button, you will need to correct the conditions that likely caused the problem.
Matte is an artificial sulfide of one or more of the metals, formed during the crucible fusion. In assaying, it is most often encountered in the niter fusion of sulfides ores, when the charge is too acidic. It is usually blue-gray colored, approaches galena in composition and is very brittle. It is found lying just above the button. It may form a layer of considerable thickness, or it may appear simply as a granular coating on the upper surface of the lead button.
The matte always carries some silver and gold and, since it is brittle, it is usually broken off and lost in the slag when cleaning the button. Close observation of the lead button when it is first separated from the flux is important. Adjustments to the fusion charge are necessary. If matte is encountered, adjustments may include the addition of Na2CO3 , PbO, or reduce the amount of ore contained in the assay charge.
Speiss is an artificial metallic arsenide and, when obtained in the fire assay, it is usually an arsenide of iron approaching the composition of Fe5AS. Speiss is a hard tin white substance found directly on top of the lead button and adhering tenaciously to it. If a small amount of arsenic is present in the ore, the speiss will appear as a small button lying on top of the lead button. If a considerable amount of arsenic is present in the ore, the speiss may form a layer entirely covering the lead.
The speiss carries some gold and silver, however, if only a gram or so in weight, it may be put into the cupel with the lead button, where it will be oxidized, giving up the precious metals to the lead bath. A large amount of speiss is difficult to deal with, as it is difficult to scorify. When encountered in large amounts, a different method of assaying may be necessary. Roasting the ore containing arsenopyrite prior to the crucible fusion may prevent the formation of the speiss during the fusion process, when treating the roasted ore as a class 3 oxidized ore. Fire assaying is as much an art as science and considerable experimentation may be needed to overcome some of the problems encountered.
Cupellation
Once again we part ways with the conventional methods of cupellation described in the following chapter, in the manner of the furnace that I have designed. The microwave oven is not suitable to use for the cupellation process, for a number of reasons. Therefore; I designed an inexpensive propane fired furnace for the cupellation process. The furnace I use is a ‘bargain basement’ type furnace fired by inexpensive propane torches.
As described earlier, we are not setting up an assay lab. Rather, our goal is to be able to determine whether there are any noble metals contained in any of the samples we collect prior to sending them to the lab for ‘professional services’. However, the actual cupellation principles and results are identical to conventional methods; I simply designed an inexpensive alternative heat source that meets my needs and is easily controlled during cupellation.
The following chapter is a description of the traditional cupellation process:
Traditional Cupellation Procedure
The lead button obtained from the crucible fusion is treated by a process called cupellation to separate the noble metals from the lead. This consists of an oxidizing fusion in a porous vessel called a cupel. The lead oxidizes rapidly to molten litharge, 98.5% of which is absorbed by the cupel and 1.5% of which is volatized. The cupel is a shallow cup typically made of compressed bone ash (calcium phosphate), with or without a binder added. A high-grade bone ash cupel will absorb its weight in litharge. When this process has been carried to completion, the noble metals are left on the cupel in the form of a bead. The cupel itself may be regarded as a membrane permeable to molten litharge and impermeable to lead and the noble metals.
First, the size of the cupel is selected based on the weight of the lead button. For buttons weighing 32 grams or less, 3.8 cm diameter cupels are used. For buttons weighing 32-48 grams, 4.4 cm diameter cupels are used. Due to the intense heat of the furnace and for the convenience of handling, no more than 18-24 buttons should be cupelled at a time. The cupel should weigh approximately 1/3 more than the weight of the lead button being cupelled. There are several substitutes for bone ash – such as cement and magnesia. The end product of cupellation is a small dore bullion bead composed of the less-readily oxidized metals – generally, silver and gold but also any metals of the platinum family that were present in the collection button.
The cupellation procedure is simple and, if followed step by step, good results should result with few problems. However, without care, in excess of 5% of the silver values can be lost during cupellation.
Heat the cupellation furnace to 850° Celsius.
The cupel has to be sufficiently permeable to allow the litharge to be easily absorbed but, at the same time, not be so porous as to allow the bead or lead to sink in. The surface tension of the lead and of the resulting dore bead is such that neither will penetrate into the cupel.
Place the cupels you will be filling inside the furnace with an extra row of empty cupels between them and the door. Heat the cupels for 15 to 20 minutes with the door closed and the temperature at 850° C.
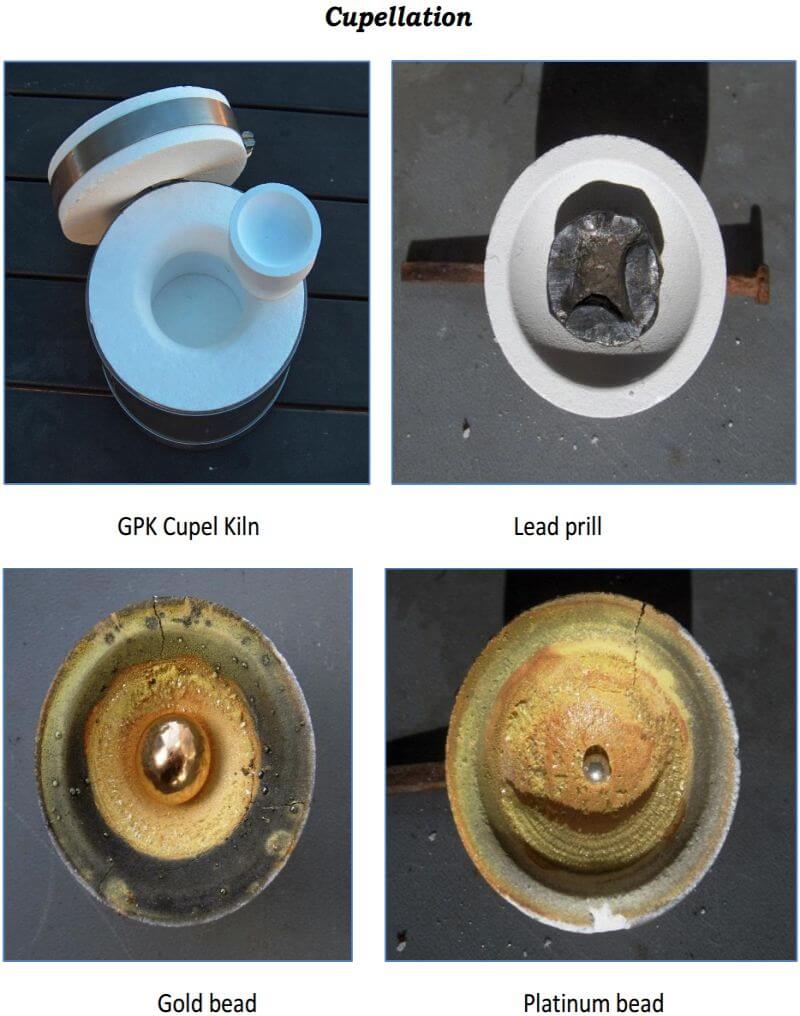
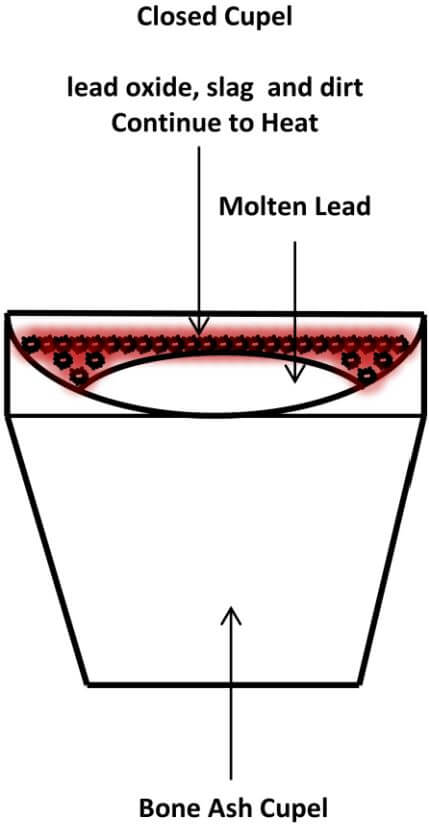
Hammer the lead fusion buttons into rough cubes or ‘prills’. Open the door, quickly place the prills in the hot cupels and reclose the door. Use a peep hole in the furnace door to occasionally observe what is occurring inside. Each lead cube quickly melts and spreads out. The top of the lead pool in the cupel is covered with a black layer of lead oxide, slag, dirt and other solids that have floated to the top. In a minute or two, this covering layer flows to the edge of the cupel and starts to soak into the cupel.
The metallic lead, which had been covered, is then exposed. This is called opening up or uncovering. At the opening-up stage, the remaining solids are swept aside and the exposed bare surface of the lead begins to burn. The lead oxide continues to drain off and soak into the cupel, although a small percentage of the lead vaporizes. A cupel that fails to ‘open’ is called a ‘frozen cupel’ and a frozen cupel usually results from a cupel having too thick a layer of material over the lead to get rid of it all, or from a cupel being too cool. Thus, during the entire operation, the door is kept closed until all cupels have opened.
When the cupels have all opened and the lead is being oxidized and absorbed by the bone ash, the oxidizing reaction of the lead is exothermic and the cupel acts as an insulator. This significantly raises the temperature of the lead being oxidized and, unless the temperature of the furnace is lowered from 850° Celsius, the loss of silver will be promoted. In this case, the lead becomes considerably brighter than the furnace walls. This is called over-driving the cupel and is a poor practice.
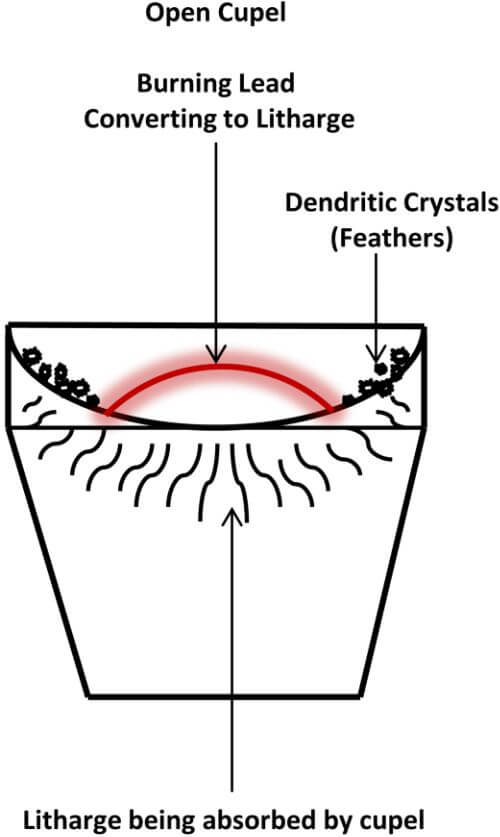
Once the cupels have opened, the furnace temperature must be lowered to a point at which the forming litharge is maintained slightly above its melting temperature. At this point, the burning lead is red, instead of yellow or dazzling yellow-white. As long as the lead and litharge are kept at a temperature at which the lead continues to burn and at which the forming litharge remains molten long enough to soak into the bone ash cupel, satisfactory results will be obtained. If some of the litharge that vaporizes condenses as dendritic crystals on the cupel above the burning lead, it is a very good sign that any silver loss will be extremely minor. These dendritic crystals are called feathers.
Near the end point, when the lead is nearly gone and only a thin coating is left on the dore bead, raise the temperature of the furnace to keep the molten alloy of silver, gold and other values in a liquid state and to drive off the last of the lead. When the end point is close, there is a play of colors in the cupel and the bead appears to spin about the cupel wildly. At the very end, the bead may become very bright for a split second; this action is called the blick or wink.
The cause of this is that the liquid metal super cools at the instant the last of the lead leaves it and, when it goes from a liquid to a solid, the latent heat raises the temperature to produce the wink or blick. If the dore bead is quite large and contains much silver, the cupel should be moved toward the front of the furnace and covered with a hot cupel so that the top surface will remain liquid (not crust over) as the bead solidifies. Silver, when molten, will release any dissolved oxygen released at the moment of solidification – the familiar spit.
In cupellation, if a solid crust forms around a liquid core, as the core then solidifies, the spit of released oxygen remains trapped by the crust and builds up pressure until a miniature explosion occurs. The explosion fragments the crust – an occurrence known as sprouting – resulting in physical loss of some of the value.
Carefully clean and weigh the bead recovered from cupellation.
With the platinum metals, the final stage of cupellation is not usually clearly defined. The platinum metals, if present, will display a variety of effects on the surface of the cold silver bead. It may be emphasized here that the silver bead collection and its subsequent wet treatment, when properly applied, serves as an excellent method for the determination of gold, palladium and platinum, together with traces of rhodium, iridium and ruthenium.
The precious metal beads obtained by the fire assay process can be quite large, or exceedingly small, depending upon the tenor of the ore assayed. Assuming 30 grams of ore was included in the crucible fusion and a bead weighing 1 milligram (1/1000 of a gram) was collected after the cupellation, the ore would theoretically contain approximately one ounce of precious metal to one short-ton of ore (2000 lbs.).
A one milligram gold bead is quite small and an ore with 1 ounce of gold per ton is quite rich. I typically work with 15 grams of ore (½ assay ton), so my bead would be exceedingly small and would weigh only ½ a milligram. Having said that, the point being made here is that many of the beads produced in the fire assay process can only be observed with magnification. I use a good 10 power hand lens for my observations.
If I cannot see a bead with a 10 power hand lens, it’s off to the rock garden with the sample collected, after 3 attempts, unless I have serious doubts about my methods for that sample. I don’t own a scale that will weigh a milligram. My scales are accurate to 1/10 of a gram, so it takes an ore that runs at least 100 ounces to the ton for my scale to be able to weigh the bead collected after cupellation. Once again we are not talking about setting up a professional assay lab here. Rather, we’re talking about determining whether the samples we collect are worth sending to the professional assay lab. However, once you become familiar with the size of the beads produced, based on the professional laboratory results of your samples, you can make an educated guess on the value of the ore, simply by observation of the beads.
I do not attempt to part the beads after cupellation, for reasons previously explained. However, occasionally I will toss one in some 30% Nitric Acid and see if there is a color change after the acid digests some of the bead. For example, if I toss a silver colored bead into the nitric acid and it becomes a gold color, I can assume that it will contain at least 33% gold and possibly more. If I toss a silver colored bead into the nitric acid and it doesn’t dissolve and remains silver colored, I may suspect that it’s platinum.
The old gravimetric methods used for silver and gold determinations based on parting the cupellation beads are uncommon, if not non-existent, in today’s laboratories; most of the final determinations are carried out utilizing ‘Inductively Coupled Plasma-Mass Spectrometry (ICP-MS)’.
The following is a brief description of the Traditional method of parting the cupellation bead.
Silver & Gold Parting Process
Parting is the process of separating silver from gold by dissolution in nitric acid. In the traditional fire assay process for gold and silver, when gold is alloyed with less than 3 times its weight in silver, it is difficult to accomplish a good clean parting because the gold protects the silver from attack by the nitric acid. When faced with such a bead, enough 99.9% pure silver must be added to make the silver in the sample weigh over 3 times as much as the gold. Usually this is done in a process known as inquartation, by adding the pure silver at the initial state of crucible fusion or first cupellation. The word inquartation means one quarter. Of course, the weight of inquarted or added silver must be deducted from the final totals.
For the classical parting process, one part nitric acid mixed with 7 parts distilled water is used. This is placed in a small beaker or porcelain dish and brought to almost boiling. The gold/silver dore bead is then dropped into the acid solution. The acid will immediately start to dissolve or part the silver from the dore head. If the bead fails to start parting, full-strength nitric acid, drop by drop, is added until the bead starts to react with the acid solution. The nitric acid used for parting must be CP reagent grade. If the nitric acid contains any chlorine, it would in reality be a mild aqua regia, putting some of the gold from the dore bead into solution and coating the bead with a precipitate of insoluble silver chloride. If the gold sponge is allowed to disintegrate into small particles, it becomes a problem. Therefore, the acid solution should be hot during the entire parting operation. If the bead to be parted weighs more than a few milligrams, it should be flattened on a polished anvil with a polished hammer and rolled or flattened to about ten-thousandths of an inch thick.
A very large bead might have to be annealed several times to avoid being split or cracked during flattening. This is accomplished by heating the bead (while holding it in platinum tweezers) to a red heat and dropping it into cold water between flattening on the anvil or rolls. The metal is then rolled into a spiral or cornet for parting. The resultant gold sponge should be washed with distilled water. The sponge is then annealed by heating to a red heat, at which point it will assume its gold color.
Microwave Fire Assaying Method
Ok, we finally got here; how to do it and what to expect. The purpose of the previous long introduction is to eventually present to you what we are trying to accomplish with two unconventional heat sources – a microwave oven and the bargain basement propane fired cupelling furnace. The principals remain the same, however the microwave assay is more convenient in my opinion, definitely less expensive and a kick in the pants once you’ve mastered it. One thing about learning to master the Microwave Fire Assay is the knowledge of the ores that you pick up along the way and that knowledge is golden.
Fluxing your ore is an art and a science and I wanted to present as much information as I could so that you are way ahead of the curve when it comes to fluxing your ores without being a chemist or enduring years of trial and error experimentation. The flux mixture is absolutely crucial in the fire assay process and ultimately determines how successful you are with the cupellation of the lead button after the crucible fusion is completed. If your crucible fusion went badly and you’ve got a really ugly button, your cupellation and end results are going to be affected as well. Using the tables as a guideline, correctly identifying your ore, and mixing your flux will become second nature in a short period of time.
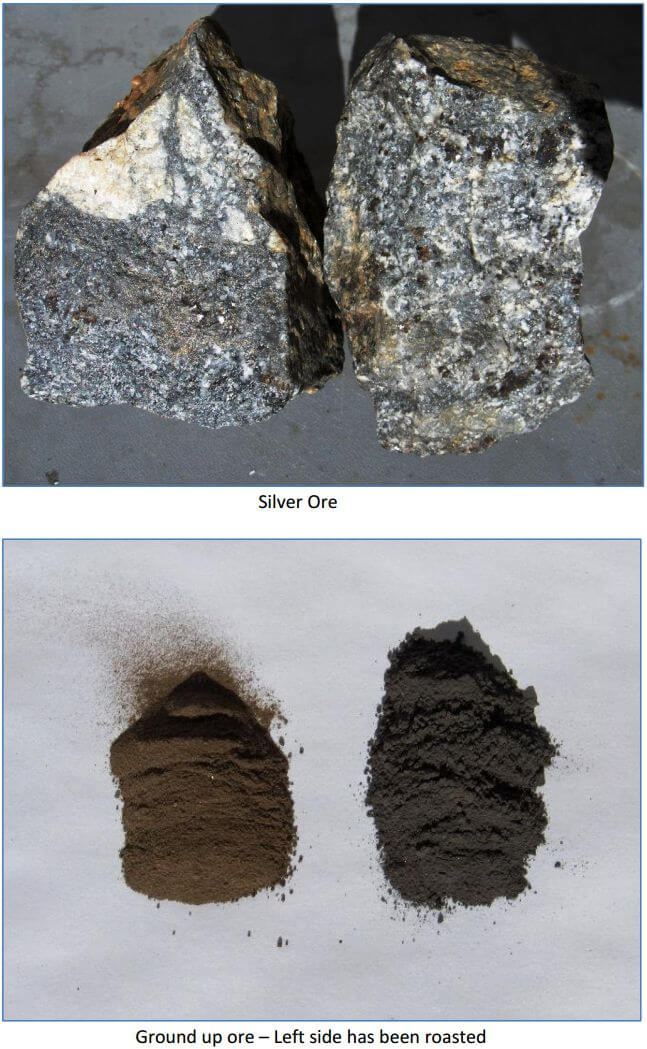
Collect your sample and identify what your sample contains. Is your sample from a quartz vein, a metamorphic greenstone, granite intrusive, a limestone contact, or black sand? Simply; what the heck is it? Does your sample contain native metals, sulfides, oxides, or all three of them? Identifying your sample and putting it into one of the three classes of ore is crucial. Once you’ve chosen a class of ore for your sample, the next step is to grind the hell out it. Minus 100 mesh is desirable, if not absolutely required; the more finely divided your sample is, the better it is for the fusion portion of the assay. I typically work with a sample of 15g (½ assay ton) when performing the assays. I would recommend that initially you start with a 15g sample and work your way up to the 30g sample as you become more familiar with the process.
Choose a flux dependent upon which class of ore your sample falls into; whether it is neutral, reducing, or oxidizing. Neutral and oxidizing ores are actually quite simplistic to assay, however, massive sulfide ores can be difficult. Once again, I personally don’t like to use Potassium Nitrate (KNO3) unless I’m forced to, in the assaying of certain sulfide ores. The KNO3 in my experience is difficult to control when using significant amounts in the fusion and there are arguments claiming that the use of KNO3 oxidizes the silver contained in the sample, which can contribute to low silver recoveries in the assay.
The combination of KNO3 and arsenopyrite, when contained in the sample, can contribute to the formation of matte and/or speiss on the lead button and you also must know the exact reducing power of your ore in order to produce the proper sized lead button after the fusion is complete. Gold ores are theoretically not affected by the use of KNO3 during the fusion and I do occasionally use KNO3, if the ore does not contain a massive amount of sulfides and I suspect the ore contains only insignificant amounts of silver.
The method I prefer is a slow and careful roasting of the sulfides, converting them to an oxide for the assay. Both methods convert sulfides to oxides and both methods theoretically can volatize certain elements contained in the ore and both methods have merit. I simply prefer to accomplish this, separate from the fusion process. The roasting of the ore is an additional step that you have to undertake. As long as you’re going to the trouble of assaying the ore, I find that it is a preferable method in many instances.
Roasting Sulfide Ores
The method used for roasting sulfide ores is as follows:
Utilizing a propane fired burner, place a shallow, flat, thin stainless steel pan on the burner containing 15g of the minus 100 mesh sample, along with 2g of SiO2. The silica helps keep the ore from sticking to the pan while being roasted and is included in the required amount of SiO2 used in the crucible charge. Spread the ore out thinly and cover the ore with a suitable stainless steel cover and heat the ore slowly until the crackling of the ore has stopped (decrepitating) and then, remove the cover.
Continue to heat the ore until fumes start to escape from the ore, check and hold the heat at that temperature for some time, stirring frequently. After all danger of fusing is over, gradually raise the heat, stirring occasionally. Finally, raise the heat to a dull red (approximately 530° Celsius). Check and hold the heat for about a half hour. Practically all of the sulfur will be removed within this time.
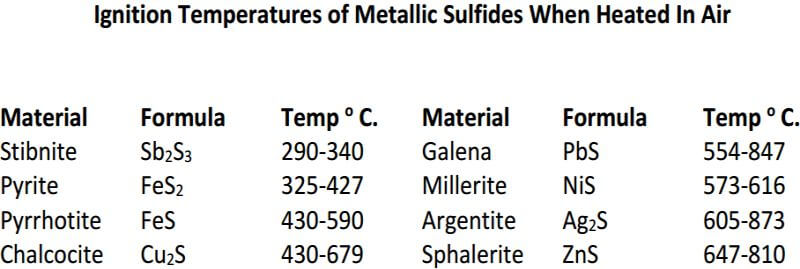
You may want to roast more than 15g at a time while you’re at it. Just remember to add 2g of SiO2 for every 15g of ore. You also have to increase your sample weight to 17g per charge to allow for the SiO2 added during the roasting. I typically roast 45g of ore and add 6g of SiO2 at a time. This gives me the 3 assays that I like to do when eliminating or approving a sample for submittal to the professionals.
Another thing you may find after you roast your ore and collect it from the roasting pan (make sure you weigh it); sometimes you come up short of the original 51g you started with. I take whatever number I get and divide by 3 for my crucible charge. Most of the loss will be moisture content, as well as other factors that I don’t pay much attention to, other than to adjust my crucible ore charge based on my final weight of the roasted sample.
Once you have roasted your sample, treat it as a Class 1 ore in the assay process. Your ore will likely have a slight oxidizing power, if the sulfides were mostly iron before the roasting. Once again, the ores I roast are considered massive sulfide ores and 90% of the time, they retain a reducing effect. Typically, I treat the roasted ore as a Class 3 oxidized ore and add a gram or two of flour as well as SiO2, since they are mostly silica deficient in composition.
Stay out of the fumes in any case; they are toxic and corrosive.
Here’s a tip for you black sands guys. Black sands are mostly composed of iron oxides, either magnetite or hematite, along with several minerals in minor amounts. Fe2O3 and Fe2O4 are reduced by carbon in the fusion and tend to enter the slag as ferrous silicates. An extra amount of flour needs to be added to the charge to provide enough carbon to reduce the iron oxides, as well as reduce enough litharge to produce the lead button. The following is a flux mixture that I prefer for black sands and that has proven very productive for me.

Now you can get the super fine gold trapped in the sands out of them by using this flux and process, when there’s not enough gold contained in the sand to form a button by itself when directly smelting the black sands. The lead acts as the collector metal for the gold, when you process the black sands this way.
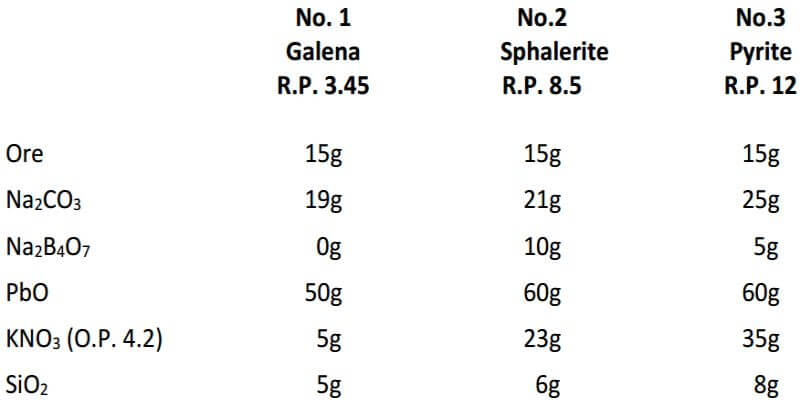
Following is a table is for fluxing pure sulfide ores which includes the required amount of KNO3, based on the reducing power of the ore for a 15g sample. The KNO3 calculated for the pyrite ore is about 10g more than would actually be required for a 15g sample and is an example of how experience and the art of fire assaying plays a large role.
Microwave Fire Assaying
Now that we have collected our sample, prepared it, categorized into one of the three classes of ore and chosen a flux, things get simple. Carefully weigh your individual flux components according to the mixture necessary for your ore and place them into a jar. Add your ore sample charge and place the lid on the jar. Shake the mixture vigorously and then roll the jar in your hands to thoroughly mix the contents; I hold the jar at approximately a 45 degree angle when I’m rolling it. Litharge is heavy and the charge needs to be as homogenous as possible before being placed in the crucible, since we want the lead globules to contact and digest all of the ore particles during the early stages of the fusion process.
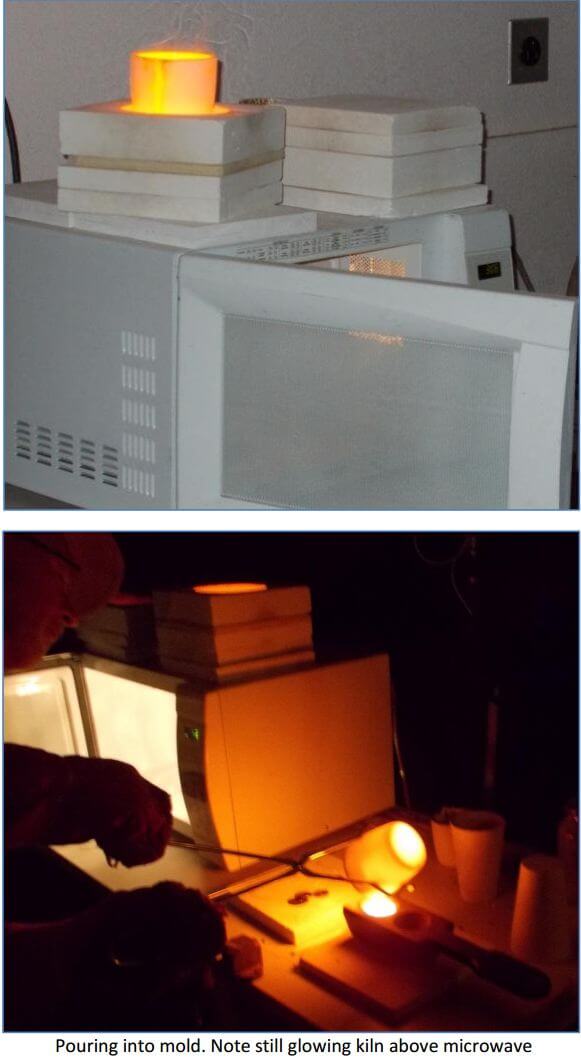
After the ore and flux are thoroughly mixed, pour them into the crucible. Place the crucible into the Microwave Kiln, place the cover on the crucible, place the cover on the kiln and carefully place it in the microwave. Set the timer for 60 minutes. You are now performing the assay. The microwave energy heats the charge slowly and evenly within the crucible and optimizes the contact of the lead and ore particles during the early stages of the fusion. The assay ultimately reaches the desired end temperature by regulating the time the charge is in the microwave. Typical temperatures of the charge at the end of 60 minutes are from 950° C. to 1000° C., which is optimal for the fire assay fusion.
Note: Timing is based upon a 1200 watt microwave. Lesser wattage microwaves will heat slower (not recommended), while greater wattage microwaves will heat faster, the exact timing of which has not been determined.
As I mentioned previously, I prefer to do repeat assays on my samples and will utilize the time the first assay is in the microwave to prepare the second assay. I’ll prepare the flux and the ore sample for the second assay, except for the reducing agent or oxidizing agent. Once I pour the first assay and determine how well the fusion poured, how clean the flux was after it cooled and the size and condition of my lead button, I will make any adjustments necessary on the flux for the second assay. Note: Whether you choose to do repeat assays or not, make sure you preheat your mold if it is cast iron before pouring the fusion into it.
After the 60 minutes are up, remove the kiln from the microwave and set it on a suitable, fireproof surface. Lift the 1” solid lid and top 2” piece of insulation off together and set them on a likewise suitable surface. Observe the color of the crucible, which should be a glowing yellow orange, then remove the cover from the crucible. Grasp the crucible with the tongs and gently tap the bottom of the crucible a couple times on a suitable surface near the mold, to encourage any remaining lead globules to settle to the bottom of the crucible.
Observe the fluid flux in the crucible after tapping and swirl it gently a couple of times to make sure the lead globules contact each other and then, pour the fusion into the mold. When pouring the fluid flux from the crucible into the mold, remember that the lead button is very fluid and, if you pour it too fast, it may splash out of the mold. Pour slowly but purposely until you see the lead button go into the mold, then, pour the rest of the fusion into the mold. Cover the poured fusion with an empty inverted crucible, to contain any spalling of the flux until it cools.
Once the fusion has cooled, separate the lead button from the flux and carefully inspect your lead button and the flux. The flux should not adhere to the button tenaciously. The flux should be homogenous, with no remaining unfused ore particles in it. The flux should not contain any lead globules trapped in it (shotted lead) and should be a uniform color and consistency. The lead button should be bright, soft and not coated with any speiss or matte. There should not be a layer of matte between the bottom of the button and the flux. The button should weigh approximately 28 grams and be easy to clean up. If your flux and lead button meet these conditions, congratulations; you’ve arrived and are ready for the next steps.
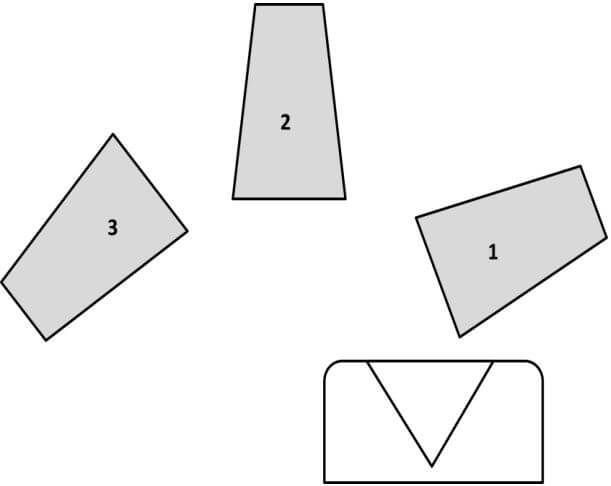
As long as we are here, let me pass on a tip for the method of pouring of the fusion into the mold: In order to keep the flux from running down the outside of the crucible after you pour your fusion, rotate the crucible as shown in the diagram below and hold the crucible in the number 3 position for a short period of time, allowing the flux to solidify.
I perform several fusions in my crucibles and this keeps the flux from running down the outside and getting onto the kiln shelf. Another tip is to sprinkle a coating of Bone Ash (calcium phosphate) on your kiln shelf. This coating will prevent your crucible from sticking to the kiln shelf and will absorb minor spills, making it easier to clean and will extend the life of the kiln shelf. Also; always restack your kiln after you pour your fusion. This will help minimize the insulation cracking from thermal shock and the retained heat will give you a head start, if you’re going to do repeat assays.
Another tip for making your kiln last longer. Litharge has a tremendous affinity for silica, and the insulation that is used for the kiln is made from an aluminum silicate material. So, always perform your fusions with the cover in place on the crucible; this minimizes any dusting and escaping litharge fumes from leaving the crucible. However, if a small amount of litharge does escape, you’ll see where it typically comes into contact with kiln insulation in between the staked layers. This will create a ‘hot spot’ where the litharge is attacking the insulation. Take some of the bone ash and fill up any spots where the erosion is taking place; the bone ash will absorb the litharge and stop any further erosion of the insulation.
Kiln Cupellation Procedure
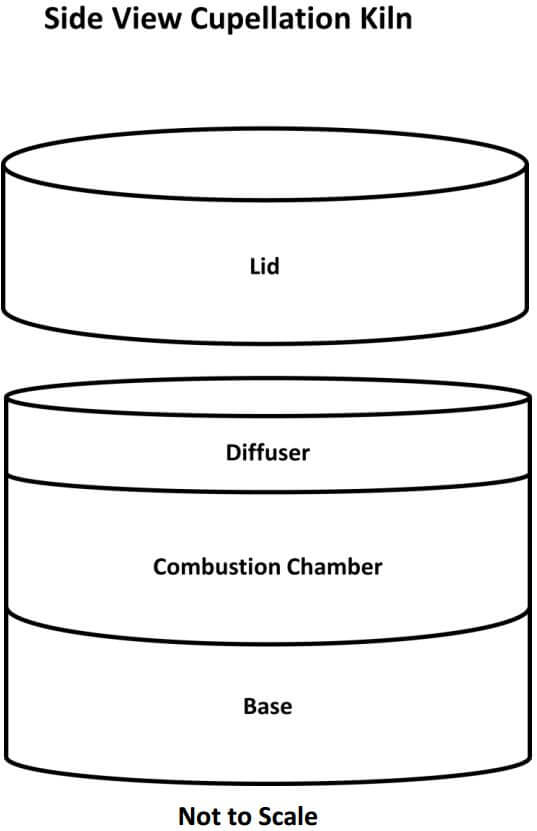
The first thing needed is to understand the workings of the cupellation kiln. The kiln is a single cupel kiln fired by two inexpensive propane torches. The internal components, as seen in the diagram below, are easily replaceable in case of spillage, cracked cupels and/or spitting of the lead prill, all of which are likely to happen sooner or later. My present kiln has had over 40 cupellations performed in it and it’s getting really ugly but it’s still working quite well. The removable lid is used to control the temperature of the kiln and to rapidly raise or lower the temperature of the kiln during the early stages of cupelling, as well as raising the temperature of the kiln at the final stage of the process.
The propane torches have valves on them that regulate the amount of propane fuel fed to the kiln, which also controls the temperature; however, using the lid is faster and much more convenient. Ideally, when cupelling, you want the temperature of the burning lead just above the solidifying point (freezing) of the exposed surface of the lead, so that you do not ‘over drive’ the cupel and promote the loss of precious metals during the process. The ability to carefully control the temperature of the kiln is crucial for the ultimate recovery of the precious metals during the cupellation process.
Cleaning your lead button prior to the cupellation process is also important. Tapping on the button with a suitable device to dislodge the thicker flux and then, brushing it with a stiff brush, should remove most of the flux from the button. The
bottom of the lead button can be difficult to clean sometimes. The next step will help with that. Once you’ve got it cleaned up as best as you can, place the button on a clean, flat surface and shape it into a square with a hammer. I use a clean piece of ½ inch plate steel about 6 inches square.
Remember that the button is soft, so you don’t want to put it on the sidewalk and start pounding on it, or you will get a bunch of dirt and rocks in it. If the bottom of the button has flux stuck to it, lay the button on its side and hit it a couple of times, then rotate it and hit it a couple more times on the opposite side. This will dislodge the flux from the bottom and you can clean it up with the brush. Once your button is as clean as you can get it, shape it into a square shape.
Occasionally, the button is somewhat brittle and will start to crack or break up when you try to form it into a square. Most of the time, something wasn’t quite right during the crucible fusion and your button is probably contaminated with something. Or, there is so much precious metal contained in the button that it’s not all that malleable – we all wish that to be the cause of the problem but unfortunately, that has not been it, in my experience. Since I went to the trouble to produce that lead button, I’ll quit pounding on it and go ahead and cupel it anyway. Once your button is clean and squared up, you’re ready for cupelling and it’s time for the next step.
First, sprinkle a fresh coating of bone ash on the bottom of your kiln. This will protect the bottom of the kiln from spitting lead from the cupel, or from a cracked cupel, etc. Spread out about 1/8” of bone ash and replace it every time you use the cupelling kiln.
Position one of the two propane torches on its side at a port of the kiln chamber and place the burner tip approximately ¼” into the side of the kiln. Light the other propane torch and turn the valve until you have a clean, blue flame approximately 1 to 1½ inches long. Lay that torch on its side also and likewise place the burner tip in line with the second port going into the chamber and ¼” into the side of the kiln. The flame will swirl around inside of the combustion chamber and begin to heat the kiln. Place the lid on the kiln and let it heat up a bit. After approximately 3 to 5 minutes, open the valve of the first torch and it should light without removing it from the kiln.
Once both torches are lit, remove the kiln lid and adjust the valves on the torches so that you have a blue flame penetrating into the combustion chamber approximately ½ to ¾ inches. Replace the lid and, after the kiln warms up – approximately 10 minutes – you should have a flame exiting the center hole in the top of the lid about 2 inches tall. While the kiln is warming up, place a cupel on the lid so that the flame contacts the side of the cupel and move it around with the cupel tongs so that all sides of the cupel are preheated. This helps to prevent the cupel from cracking from the thermal shock when you place it inside the kiln.
Once your kiln is warmed up, remove the lid and place the cupel in the center of the kiln, using the cupel tongs. Then, place the lead cube into the cupel. Replace the lid and observe the lead prill in the cupel through the hole in the lid. In a few minutes the lead will melt the contained contaminate in the lead prill, which will come to the surface of the molten lead to form a crust over the lead. At this point, we have what is called a closed cupel. Continue to heat the cupel, by leaving the lid in place, until you reach the temperature where the crust begins to move around on top of the molten lead. As you continue to heat the cupel, the molten lead will dissolve certain portions of the crust and the remaining crust eventually moves to the edge of the molten lead and is absorbed by the cupel.
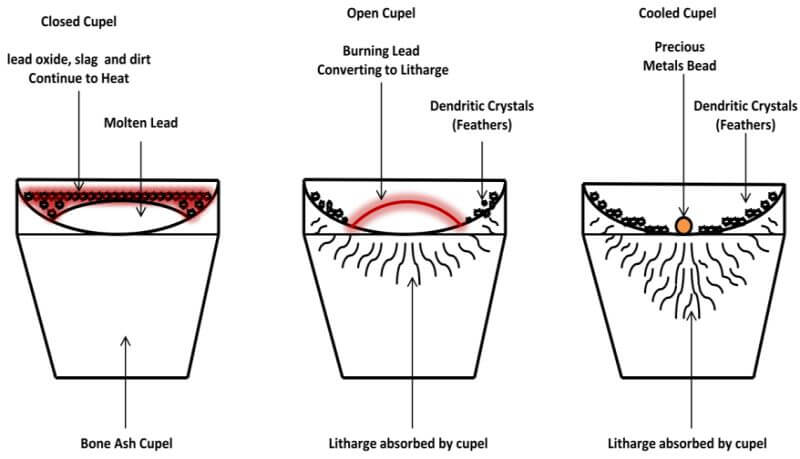
The following diagram depicts a Closed Cupel.
Remember that lead button that wasn’t very malleable? Here’s a tip on minimizing the molten lead from spitting out of the cupel as the crust is dissolved: When the lead first becomes molten after placing it in the kiln, watch the surface of the lead crust closely and, at some point, you will notice that there is a slight bubbling taking place below the surface of the crust. If you carefully watch this process unfold, you can lower the temperature of the cupel and crust by removing the lid for a short period of time and letting the bubbling action slow down and then, raise the temperature again, by replacing the lid until it starts to bubble again. By doing this in incremental steps, you can control the rate at which the contaminates dissolve into the molten lead, giving up their values to the lead bath, without the molten lead spitting out of the cupel.
Once the crust has moved off to the edges of the molten lead and toward the sides of the cupel, the surface of the lead is shiny and the exposed lead assumes a convex shape. This is called an open cupel. Continue to heat for 1 or 2 minutes, then remove the lid from the kiln. When the lid from the kiln is removed, the oxygen will come into contact with the exposed convex surface of the lead, which will begin to oxidize (burn) and convert to litharge.
An oily appearing iridescent play of colors will cover the surface of the molten lead and appear to move about and travel toward the edges of the cupel, which indicates a rich button. Also, a small amount of curling smoke will rise from the cupel. The temperature of the burning lead needs to be maintained at slightly above the melting point of the lead, during the process, for optimal precious metal recovery.
Temperature control is very important for this portion of the cupellation. You should closely observe the cupel and the burning lead at the beginning of the cupellation, as the temperature has not stabilized until the lead that is being rapidly oxidized and the exothermic reaction that takes place raises the temperature of the burning lead. The air contacting the surface of the burning lead cools the surface of the lead and the cupel and, if an excessive amount of air is traveling across the surface of the lead, it may begin to crust over and close the cupel (freezing), thereby stopping the process of converting the burning lead to litharge.
I will closely watch the cupel for approximately 5 minutes, while the temperature is stabilizing and, if I see the cupel trying to freeze, I’ll replace the lid for a short period of time, until the crust has moved off of the lead. I’ll then remove the lid and the conversion of the lead to litharge begins again. Once things finally stabilize and the exothermic reaction has heated the burning lead to its end temperature, I rarely have to do anything else. We’re setting up a ‘cold drive’ for the cupel at this point.
The following diagram depicts an Open Cupel
This is where there is an advantage over the traditional furnace. Since we’re using an open top kiln, rather than an enclosed type of furnace, the exothermic reaction that raises the temperature of the lead does not have a profound impact on the temperature of the kiln. The excess heat mostly escapes up and out of the kiln. The temperature of the cupel itself is controlled by the flames swirling around the cupel and escaping through the top of the kiln.
When the lid is in place on the kiln a reduced environment is achieved, which prevents the formation of a litharge crust on the top of the button permanently freezing the cupel. Once the lid is removed an oxidizing environment is achieved, which allows the conversion of the metallic lead to litharge for absorption by the cupel.
After the temperature has been stabilized, I’ll watch the sides of my cupel for the formation of a ring of litharge crystals (feathers) just above the burning lead. The color of the ring of litharge crystals should be dull red or almost black, where the litharge is being absorbed by the cupel. The color of the burning lead will be much brighter than that of the absorbed litharge, as it is much hotter than the cupel or the air surrounding it.
So long as abundant feathers are forming and the color of the litharge ring is dull red, the temperature is optimal. If the feathers are not forming on at least one side of the cupel, or the absorbed litharge ring is bright red, slowly turn one of the torches down, thus lowering the temperature of the cupel and the kiln until the conditions are optimal. Once you’re familiar with the process, you’ll find it simple to control the temperature and to keep it optimal.
Toward the end of the cupellation process, the temperature must be raised because the alloy becomes more difficult to keep fusible, as the proportions of the precious metals increase and drive off the last of the lead. The temperature should not be raised so high as to melt the litharge crystals or a loss of silver values will be promoted. Most Assayers agree that the best results are obtained with a hot start, a cold drive and a higher finish
As the alloy becomes richer, the bead becomes more and more rounded in shape and shining drops of litharge appear and move about on the surface of the bead. As the last of the lead goes off, these drops disappear and the fused litharge becomes very thin and gives an effect so that the bead appears to spin rapidly and presents a display of rainbow colors. This is called the play of colors. The colors disappear shortly and the bead becomes dull. After a few moments, it becomes bright and silvery. This is called the brightening. After brightening, the cupel should continue to be heated for a few minutes, to ensure the last of the lead is removed. After all of the lead has been removed, the cupel should be cooled slowly. As the bead cools and solidifies, it will emit a flash of light (blick) from the release of the latent heat of fusion.
During the end stages of the cupellation, watch for the appearance of the bead spinning rapidly and the play of colors. Once you see this happening, replace the lid on the kiln and leave the lid in place until the bead ‘brightens’. Once the bead has brightened, continue to heat for a couple of minutes, while paying close attention to the feathers of litharge collected on the sides of the cupel.
The temperature of the kiln should not be allowed to raise enough to melt the litharge feathers. If you see this occurring, immediately remove the lid and finish without the lid in place. After a couple of minutes, turn both valves on the torches off, leaving the lid in place and allow the cupel to cool slowly while watching for the ‘blick’ from the bead. After the bead blicks or flashes and the cupel has cooled, remove it from the kiln and closely observe the surface of your bead. The color of the bead and the appearance of the bead’s surface may indicate the presence of certain metals contained within the bead.
The following diagram depicts a Cooled Cupel
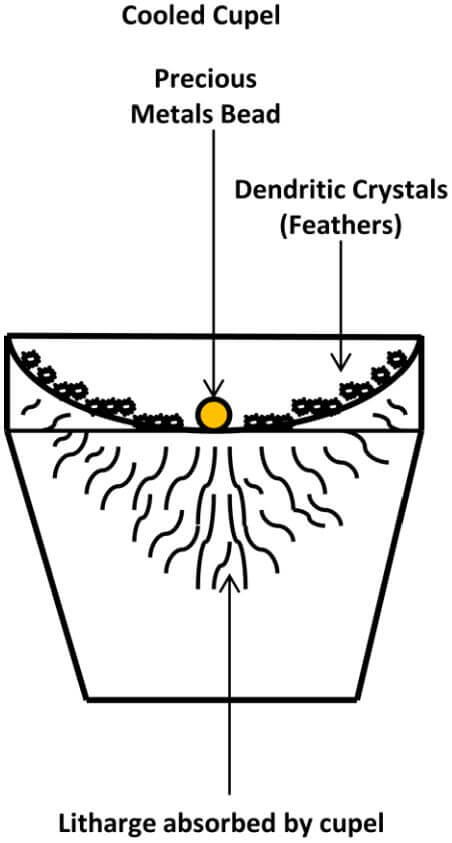
At this point, we need a ‘real world’ check. During the end stages of cupellation, I’ve watched the burning pool of lead get smaller and smaller and smaller, to the point of not being able to see just what the hell is going on in the bottom of the cupel. Remember that some of the beads produced in this process can only be seen with magnification. So, how the heck are we supposed to observe what is going on when the cupel is approximately 800° Celsius and there’s fire shooting out of the top of the kiln? Personally I like my eyebrows just as they are and, if they need trimming, I prefer a pair of scissors.
I have to default back to what exactly my original intentions are, which are to determine if there is anything valuable in my sample, before I send it off to the professionals for their results. So my method, when faced with this situation, is as follows: Once the bead gets so tiny that I can’t tell what’s going on, I’ll replace the lid on the kiln for approximately 1 minute, while watching the feathers of litharge on the sides of the cupel, to make sure they don’t begin to melt. Then, I remove the lid from the kiln. So long as the burning lead is still being converted to litharge and still being absorbed by the cupel, eventually all of the litharge will be removed from the bead.
When the last of the litharge goes off, the bead will still blick, since the temperature of the cupel is ultimately lower that the melting temperature of the precious metals. The blick is still visible even when the actual bead is not, as long the temperature of the cupel and kiln were optimal during the cupellation. Once I see the blick, I’ll turn the valves on the torches off and let the cupel cool. After the cupel has cooled off and I observe the bead under 10 power magnification, the surface of the bead is sometimes smooth and shiny, sometimes rough and sometimes downright ugly. Most of the time, when the beads are really ugly, it is because I am looking for platinum group metals in the sample; ugly beads with the platinum group metals are common.
Beads produced from the cupellation
If your cupel contains a very large Silver bead, it may ‘sprout’ or ‘spit’, if it is cooled without some precautions. The surface of the silver bead will crust over and solidify, while the silver remains molten within the bead. As the interior of the bead solidifies, it will release the oxygen dissolved within the silver and erupt through the crust formed on the surface of the bead, giving a cauliflower type growth on the surface of the bead and losing some of the silver as this occurs.
If you have a large silver bead in your cupel at end stage of the cupellation, place the lid so it completely covers the hole in the kiln, as you turn the torch valves off. This will keep the surface of the bead molten, until the interior of the bead solidifies, preventing the ‘sprouting’ from occurring.
- Beads containing at least 33% Gold will not sprout, even when cooled rapidly.
- When the bead contains primarily Gold, a higher finishing temperature is required.
- When the upper surface of the silver bead appears frosted, this indicates the presence of Tellurium or some member of the Platinum group.
- Beads of silver that contain a large portion of Platinum will not blick but flatten out and have a steel-grey color and a dull surface.
- Beads of silver containing as little as 1.6% of Platinum give the bead a frosted appearance that is visible to the naked eye.
- Beads of silver containing Iridium will have black specks at the bottom of them.
- Beads of silver containing as little as .004% Rhodium have a distinct crystallization visible to the naked eye – the facets of the crystals give the appearance of a cut gem. With .01%, this appearance is more distinct. The presence of .03% and above of Rhodium in the silver bead causes the bead to sprout and spit regardless of all precautions taken in its prevention. With this and larger amounts, the surface of the bead is bluish-gray.
- Beads of silver containing as little as .004% Ruthenium will have a black crystalline structure firmly attached to the bead, usually found on the bottom edge.
- Beads of silver containing Palladium gives the surface of the bead a raised and embossed appearance.
An indicator for the potential of Platinum group metals being present in your assay is the presence of Tellurium. Tellurium will stain the inside of your cupel pink, which mostly fades away as the cupel cools and may leave a faint pink stain surrounding the bead at the bottom of the cupel. Carefully observe the appearance of your bead, if this phenomenon is present after the cupellation of your sample.
Cupellation & Precious Metal Losses
The process of cupellation always produces a loss of precious metals when undertaken. The metal that is most susceptible to the loss is silver, which is readily oxidized, whereas gold and platinum are less susceptible to oxidation and volitization. The single largest factor in the loss of silver appears to be the temperature that the cupellation is carried out at. When the temperature was optimal 700° to 800° C. and abundant feathers of litharge were present on the cupel, after the cupellation was completed, the losses were approximately 1% to 1.30% respectively. When the presence of certain base metals such as copper are alloyed with the silver, this seems to reduce some of the loss. A high gold content can also reduce some of the losses. When the temperature of the cupellation was carried out at 1000° Celsius, the losses approached 5%, when pure silver was contained in the lead button.
With a single cupel in the kiln, we have the ability to control the temperature precisely, so that the cupellation temperature is optimal for precious metal recovery, regardless of what alloys may be present in the lead button. As you become more familiar with the process and how it typically unfolds, you will learn to suspect that unknown elements are present, or the button is exceeding rich, simply by the manner of how the lead button acts, when the cupellation is being performed. Once again, the ‘art’ of fire assaying is fascinating and always a learning process.
![]()
FIRE ASSAY Safety Precautions
We all knew this was coming, so let’s address the safety concerns at this point. Captain Obvious would say that we’re working with several really hot things and we need to protect ourselves and our surroundings from being harmed by them, so let’s get those out of the way first. We’re working with solids and liquids that are nearly 1000° Celsius at times. There is no room for error when handling these things. None.
You need a good pair of gloves. Welding gloves work great. You need safety glasses at the least, a face shield is better. The cooling flux from the crucible fusions can and will ‘spall’, launching shards of razor sharp glass outward, unless you remember to cover the mold with something. Suggestion: Use an empty, inverted crucible. Remember: Even when the flux is cooled and you’re hunting for your lead button, the flux can spall at any given moment. So, protect your eyes, everyone.
Wear a welder’s apron when assaying. It helps to keep your clothes clean, prevents you from burning holes in them and, when you put it on, it simply reminds you that we’re not playing around here. Captain Obvious would say, “Fire assaying is not something you want to do wearing a pair of shorts, a tee shirt and sandals”. Wear the appropriate gear and clothing always. There are no second chances here.
When you put your work area together, you need to think about what you’re working with – super heated liquid metal, flux and hot crucibles. Probably the worst case scenario would be dropping a crucible after it’s removed from the kiln, while moving it to the mold for pouring. Fortunately we are working with a relatively small amount of liquid material. However, let’s keep things in perspective. When the crucible strikes a solid object and breaks – whether it’s the floor, a bench, or whatever – the contents are going to splash out rapidly.
Think about a small glass of milk. Picture everything that the crucible held, coming into contact with anything combustible, immediately bursting into flames, including you. A single drop of the liquid metal or flux the size of a match head will burn approximately ¼ of an inch deep into your flesh before it cools off enough to simply fuse to your flesh. Not good. If your bench top or floor is made out of wood, you’re probably going to have put those fires out before you can worry about how badly you’re burned.
Keep your work space clean and uncluttered with a bunch of non-essential crap. Make sure that your bench top is fire proof. My work space for the microwave consists of a small bench, with a piece of cement board covering the top, the microwave oven, the mold, crucible tongs and an empty crucible to cover the mold with after I pour into it and that’s it. I typically set up outside in the driveway, or in the garage, when I’m performing the fire assay. So, the floor is concrete, the bench top is cement board, cheap and fire proof. In case I drop or spill something, the wife, kids, dog or neighbors are not around either. That way, all I have to worry about is getting the heck away from whatever I dropped or spilled, as fast as I can.
Remember that this process can be as safe as you want to make it, or as dangerous as you allow it to be – it’s your choice.
I haven’t dropped a crucible yet, but I will tell you a story on myself. I set things up to perform an assay as described previously: I removed the kiln from the microwave and set it on the bench, removed the top 2” layer of insulation and the lid together but, for some unknown reason, set it on top of the microwave oven. I removed the crucible from the kiln and went to pour it into the mold and noticed that something was beginning to smell really bad. I poured the fusion into the mold, set the crucible on the bench and covered the pour with the empty crucible.
By now, something smelled really raunchy and, when I finally looked over at the microwave oven, the top of the oven was on fire. When I had carelessly set the 2” ring of insulation and lid on the top of the microwave, the powder coating caught on fire from the heat of the insulation and lid. I picked up the insulation from the top of the microwave, restacked the kiln and put the fire out.
Now, every time I perform and assay, there’s a constant reminder of being careless staring me in the face – the charred top of my microwave. Captain Obvious would say, “Think and pay attention to what you are doing ALL of the time”.
As long as we’re here, remember to preheat your mold, if you’re using a cast iron mold. I can’t stress this enough. You never want to pour a crucible fusion into a cold or wet mold – think volcano literally and the serious consequences of that.
Important Safeguards
Set up your workspace in a well-ventilated area, such as the garage with the door open, or outside. Fumes are created during this process that can be hazardous if not properly ventilated. Do not use the microwave kiln in the house.
A separate dedicated 1200 watt microwave is recommended for assaying. Using a microwave with less than 1200 wattage is not recommended. Allow the microwave to cool at least 10 minutes between firings. Keep microwave door open between multiple firings, for effective cooling. Always remove the kiln from the microwave after firing, to prevent heat from building up in the microwave and damaging it. Do not leave microwave unattended while the fusion process is underway. Keep your workspace free of flammable materials.
Stay out of the fumes produced by the cupelling process and after cupelling, make sure both torches are turned off completely. Always assume that everything that you touch is hot until you are absolutely sure it’s cooled off. The cupel retains heat for quite some time; don’t get in a hurry to see your results.
Use common sense when performing this process and always wear your protective gear.
Fire Assay Ventilation
During the cupellation process, 98.5% of the lead is absorbed by the cupel and 1.5% is vaporized and goes off as smoke and fumes, according to all of accepted opinions I have read. Needless to say, we all know about the consequences of breathing lead fumes, as well as many other elements that may have been present in the sample and/or within lead button.
The cupellation process needs to carried out under a fume hood, in order to be able to safely view the lead button while cupelling and, most importantly, to keep the toxic fumes away from you. The fume hood can be very elaborate, or very simple. The only real requirement is that the fume hood be effective in removing the fumes and keeping them away from the operator.
The fume hood I built is 3 wide by 3 deep by 3 feet tall and has a hinged access panel and a removable access panel on the front. When the hinged panel is closed and the removable panel is in place, it allows for a large enough opening to view the cupel and kiln, as well as allowing access to the kiln, for removing or replacing the lid on the kiln, with the crucible tongs.
The fume hood contains approximately 27 cubic feet of space inside of it and the 8” fan that I use has a flow rating of approximately 400 cubic feet per minute. Utilizing these numbers, the volume of air contained within the interior of the fume hood is exchanged approximately once every 4 seconds, in a perfect world.
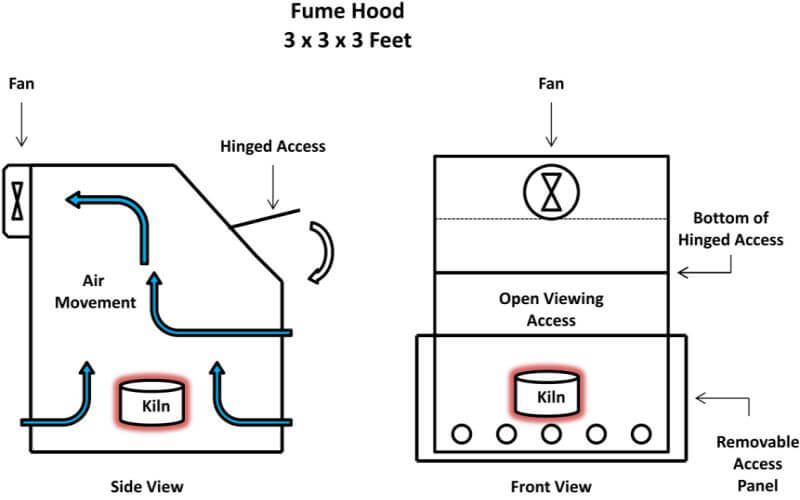
(I know; it’s not a very good diagram.) There is enough air flow through the fume hood that I have to place firebricks around the outside of the kiln to deflect the air flow away from the surface of the burning lead button, or the airflow may freeze the cupel when the temperature is optimal for cupelling.
Remember to stand to the side of the hood, when performing the cupellation, rather than directly in front of the hood. The fume hood is large enough to place the microwave inside, as well. You can leave the removable access panel off when the microwave is inside of the hood.
When I ‘mocked’ up the hood, I used some cardboard for templates, with the idea of taking them to a sheet metal shop for shearing, etc. I changed the design a couple of times during this process and finally ended up with what is depicted in the diagram. I wanted to field test the hood before taking the templates to the sheet metal shop, so I taped it all together with duct tape and placed the cupellation kiln and propane tanks inside and test fired the kiln several times under the hood.
There was enough air flow through the fume hood that the interior didn’t get hot – more like lukewarm inside of the hood. My fan was a ‘thrift store find’ that has the fan mounted inside of a short piece of 8” duct pipe. I wired an extension cord and an on/off switch, where I can easily reach it and plug the fan into an outlet. My fume hood is mounted to the small bench I use that is covered with cement board. The fume hood actually works great. It’s light and portable and it was cheap to construct.
Ultimately it’s up to you to decide what you want to do with fumes that come from the fume hood. Here is a ‘real world comparison’ of the potential level of fume contamination the cupellation process generates when undertaken: Compare the process to the past and present use of leaded gasoline in automobiles, since they both impart fumes into the atmosphere.
Note: Contrary to popular belief, leaded gasoline is still being produced and consumed worldwide today.
Leaded gasoline typically contained from .17g/l to .84g/l of lead from the research I’ve conducted. Therefore, we can use an average number of .50g/l for our purposes. A U.S. gallon contains approximately 3.8 liters. So, one gallon of leaded gasoline contained an average of 1.90 grams of lead per gallon, although I’ve seen numbers as high a 4g/l. The cupellation of the lead button theoretically volatizes 1.5% of the lead during the process, therefore if we take a 28 gram lead button and use the theoretical number of 1.5%, the process would generate approximately .42 grams of lead oxide. Comparatively speaking, the process of cupelling a single 28 gram lead button would produce approximately the same amount of lead oxide that the combustion of a single quart of leaded gasoline would generate.
The previous comparison is in no way or manner intended to influence your decision as to what to do with the fumes ventilated from the fume hood. That decision is wholly up to you. The comparison, as stated, is simply a comparison. Stay away from the fumes. They are toxic. Keep everyone else away from the fumes, as well.
My fume hood has a metal box in line with the ventilation ducting that holds four activated carbon filters that are designed for household stove hoods. The filters are approximately 8” x 10” x ¼” and are inexpensive but effective. They are held in place with metal corner molding, forming L shaped brackets. The filters slip into place inside of the box and are spaced approximately 2” apart. I change the filters often and dispose of them properly, since they are contaminated with lead oxide. I save all of the flux from my fire assays in sealed 5 gallon plastic buckets – might be worth something someday. I also save my spent cupels in a 5 gallon sealed plastic bucket as well. The exception to that rule is, if one of my buddies brings me a sample to fire assay for him, I give him the flux and cupel with the button still attached to it after the cupellation. I forgot to mention that, once your buddies find out that you can fire assay, your circle of mining buddies seems to increase exponentially.
As long as we’re on the subject of ‘buddies’, it seems as though I have a couple of them that like to pan and sluice a little placer gold. They’re always bugging me to melt their fine placer gold into a button for them. Another use for the cupelling kiln is in melting small amounts of gold, silver and copper quickly, if you want. Take a cupel and sprinkle a little Na2CO3 and Na2B4O7 in the cupel. Then, add the clean placer gold to the cupel and fire it with the lid in place on the kiln.
You can actually melt about 2 ounces of gold at a time if you’re careful. Take care not to overfill the cupel depression, so that it overflows when the gold melts, makes a mess and trashes the bottom of your kiln. Once the gold has melted, let the cupel cool off and slag the flux off the button. If you really want the button to be ‘pretty’, put the button and flux in a shot glass full of white vinegar overnight. The vinegar will dissolve the flux and the gold button will be unmarked and lustrous.
Good luck, be safe and most of all, enjoy.
Mineral Classification Tables
|
Element |
Symbol |
Melting Point F. |
Melting Point C. |
Specific Gravity |
|
Aluminum |
Al | 1220 | 660 |
2.70 |
|
Antimony |
Sb | 1167 | 630 | 6.62 |
|
Beryllium |
Be |
2340 |
1280 |
1.82 |
|
Bismuth |
Bi | 520 | 271 |
9.80 |
|
Cadmium |
Cd | 610 | 321 |
8.65 |
| Carbon | C | – | – |
2.22 |
|
Chromium |
Cr | 3430 | 1890 |
7.19 |
|
Cobalt |
Co | 2070 | 1132 |
8.9 |
|
Copper |
Cu | 1981 | 1083 |
8.96 |
|
Gold |
Au | 1945 | 1063 |
19.32 |
|
Iridium |
Ir | 4449 | 2454 |
22.50 |
|
Iron |
Fe | 2802 | 1539 |
7.87 |
|
Lead |
Pb | 621 | 327 |
11.34 |
|
Magnesium |
Mg | 1202 | 650 |
1.75 |
|
Manganese |
Mn | 2273 | 1245 |
7.43 |
|
Molybdenum |
Mo | 4760 | 2625 |
10.20 |
|
Nickel |
Ni | 2651 | 1455 |
8.90 |
|
Osmium |
Os | 4892 | 2700 |
22.50 |
|
Palladium |
Pd | 2831 | 1555 |
12.00 |
|
Phosphorus |
P | 111 | 44 |
1.82 |
|
Platinum |
Pt | 3224 | 1773 |
21.45 |
|
Rhodium |
Rh | 3571 | 1966 |
12.44 |
|
Ruthenium |
Ru | 4500 | 2500 | 12.20 |
|
Silicon |
Si | 2605 | 1430 |
2.33 |
|
Silver |
Ag | 1761 | 961 |
10.49 |
|
Tin |
Sn | 450 | 232 |
7.30 |
|
Zinc |
Zn | 787 | 419 |
7.10 |
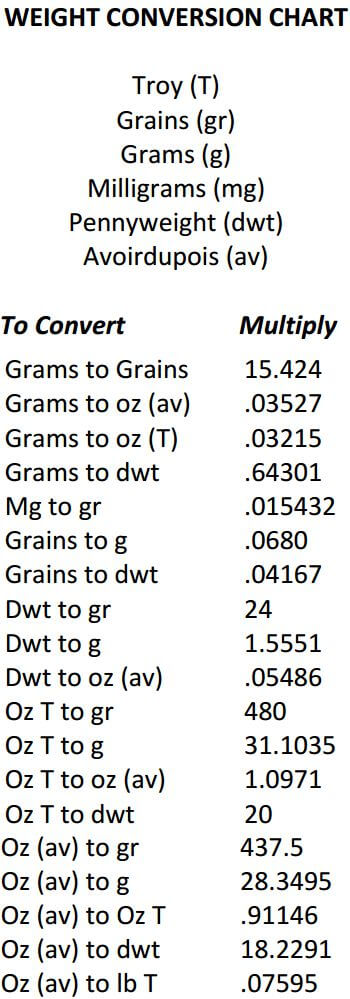
Assay Furnace Temperature & Color
|
Celsius |
Fahrenheit |
Color |
|
550 |
1022 |
Red |
|
700 |
1292 |
Dark Red |
|
850 |
1562 |
Cherry Red |
|
900 |
1652 |
Orange |
|
1100 |
2012 |
Yellow |
|
1300 |
2372 |
White |
|
1500 |
2732 |
Full White |
Temperature Conversion: C <> F
To Convert Celsius to Fahrenheit: C + 40 multiply by 1.8 – 40
To Convert Fahrenheit to Celsius: F + 40 divide by 1.8 – 40
Classification of Minerals and Ores
|
Mineral |
Color |
Luster |
Streak |
Ave. Hard |
Spec Grav |
Characteristics |
|
ALUMINUM (Al) BAUXITE |
Variable gray,
Reddish brown |
Dull | Ocher to reddish | 2.0 | 2.5 |
Clay color, associated with clay, kaolinite, limestone, dolomite. |
|
ANTIMONY (Sb) |
Light copper | Metallic | Grayish-black | 5.8 | 7.5 |
With calcite, smaltite. Tarnishes black, sometimes iridescent; in veins with gold, quartz, galena. |
|
STIBNITE |
Light lead, gray | Metallic | Lead gray, black | 2.3 |
4.7 |
|
|
ARSENIC (As) |
Tin white | Metallic | Grayish-black | 5.8 | 6.0 |
Tarnishes yellow, occurs with chalcopyrite, serpentine. |
|
ARSENOPYRITE |
Metallic |
|||||
|
REALGAR |
Straw yellow to brownish and red-yellow | Greasy, adamantine | Pale yellow | 2.0 | 2.0 |
Independent beds in gypsum, limestone, lava with aragonite, celestite. |
|
ASBESTOS CHRYSOTILE |
White, greenish & yellowish white | Silky
silky-metallic |
White | 1.7 | 1.7 |
Short fibered asbestos, fine parallel, easily separable fibers. |
|
BARIUM (Ba) |
Yellowish | Vitreous | White | 3.3 | 4.5 |
In metalliferous veins; with iron & manganese minerals, galena, chalcopyrite, sphalerite. |
|
BARITE |
Brownish, dark brown |
Pearly |
||||
|
BERYLLIUM (Be) BERYL |
Pale yellow to brownish-yellow | Vitreous | White | 7.8 |
2.7 |
Crystals usually simple; in granite, mica, schist, clay slates. |
| BISMUTH (Bi)
NATIVE
|
Light copper-red | Metallic | Lead gray, shiny | 2.3 | 9.7 |
Associated with nickel & cobalt; brassy tarnish. |
|
BORAX (B) |
White, bluish, grayish, green | Vitreous-resinous | White | 2.3 | 1.7 |
Tastes mildly sweet to alkaline; lake bed deposits. |
|
CADMIUM (Cd) |
Various shades | Adamantine | Orange | 3.3 | 4.9 |
Sometimes a coating on sphalerite, with prebnite. |
|
CARBON (C ) |
Dark gray, iron black | Dull, sub-metallic | Dark-gray, iron | 1.5 | 2.1 |
Feels greasy, marks paper; with spinel, shale, gneiss, mica |
| GRAPHITE | Metallic |
|
DIAMOND |
Colorless, gray, white | Greasy, adamantine | Ash gray | 10 | 3.5 | May have tinges of color; with serpentine, placers, magnetite, in black sands. |
|
CHROMIUM (Cr) CHROMITE |
Iron, black, brownish-black | Pitchy, sub-metallic | Grayish-brown, dark | 5.5 | 4.5 |
Lightly magnetic, pitch-like appearance; with serpentine, talc, in black sands. |
|
COBALT (Co) COBALITE |
Silver white, steel gray | Metallic | Dark, grayish black | 5.5 | 5.2 |
May have red tarnish, often with pink coating; with native silver, smaltite, nicolite. |
|
COPPER (Ca) NATIVE |
Copper red | Metallic red | Copper shining | 2.8 | 8.8 |
Tarnishes readily to red, blue, green, black; cementing material in conglomerate; with cuprite, malachite, azurite. |
|
AZURITE |
Azure blue, dark blue | Vitreous | Blue | 3.8 | 3.7 |
Common alteration product with malachite, cuprite, native copper, chalcocite, chalcopyrite. |
|
CHALCOCITE |
Dark lead gray | Metallic | Dark gray-black, shiny | 2.8 | 5.7 |
Tarnishes dull black, blue, green; often coated with azurite or malachite. |
|
CHALCOPYRITE |
Brass yellow, golden yellow | Metallic | Greenish black | 3.8 | 4.2 | Deeper yellow & softer than pyrite; iridescent tarnish; with pyrite, galena, bornite. |
| CUPRITE | Brick red, dark red | Adamantine, dull | Brownish red, dirty brown | 3.8 |
5.9 |
With copper minerals; malachite, azurite, chalcocite, etc. |
|
MALACHITE |
Emerald, grass & dark green | Silky, adamantine, dull | Light green | 3.8 | 3.9 |
Common alteration product of copper minerals; with azurite, cuprite, native copper, chalcocite. |
|
GARNET |
White, colorless, greenish-white | Vitreous | White | 7.0 | 3.5 |
In crystalline limestones and dolomites. |
|
GOLD (Au) NATIVE |
Gold to light yellow | Metallic | Gold. Characteristic streak | 2.8 | 19.3 |
In quartz veins, placers. Does not tarnish. Non-reactive with most acids or oxidation. |
|
IRON (Fe) HEMATITE |
Brownish red |
Sub-metallic | Reddish-brown | 5.0 | 5.0 |
Impure from clay, sand. |
|
LIMONITE (Yellow ocher, brown ocher, clay ironstone) |
Yellow to brown |
Earthy, dull | Yellowish & dark brown | 2.0 | 3.7 |
Earthy, massive, or impure from clay, sand; ocherous variety may soil fingers. |
|
MAGNETITE |
Iron black | Metallic, sub metallic, dull | Black | 6.0 | 5.1 |
Strongly magnetic, with chlorite, hornblende, pyroxene, chalco- pyrite, etc. |
|
PYRITE (Fools gold) |
Brass yellow, golden yellow | Metallic | Greenish & brownish black | 6.3 | 5.0 |
Variegated tarnish; alters to limonite; found in wide variety of rocks. |
|
LEAD (Pb) |
Tin white | Metallic | 3.0 | 8.2 |
With pyrite, galena. |
|
|
ANGLESITE |
Colorless, white, gray | Adamantine, greasy | White | 3.3 | 6.3 |
Luster & high specific gravity important; with galena, cerusite. |
|
CERUSSITE |
Colorless, white, gray | Adamantine, greasy, silky | White | 3.3 | 6.5 |
Structure, luster & specific gravity important; with galena, cerusite. |
|
GALENA |
Gray | Metallic | Dark, lead gray | 2.5 | 7.5 |
Cubic crystals, high specific gravity; with sphalerite, pyrite, chalcopyrite. |
|
PYROMORPHITE |
Wax yellow, greenish yellow, yellow-brown | Greasy,
adamantine |
White, yellowish white | 3.8 | 6.8 |
Common alteration product of lead minerals; with galena, barite, limonite, etc. |
|
LIMESTONE DOLOMITE |
Variable | Dull | White | 3.0 | 2.7 |
Widely distributed in large, compact deposite. |
|
MAGNESIUM (Mg) DOLOMITE |
Pink to reddish | Vitreous | White to gray | 3.8 | 2.9 |
In ore bodies & cavities; associated with magnesium rocks. |
|
EPSOM SALT (Epsomite) |
White | Vitreous, to earthy | White | 2.3 | 1.7 |
Saline, bitter taste; common in mineral waters. |
|
KIESERITE |
White, grayish- white, yellow | Vitreous | 3.3 | 2.6 |
Often mixed with carnallite & gypsum. |
|
|
MAGNESITE |
White, yellow, grayish-brown | Vitreous, silky | White | 4.0 | 3.1 |
Occurs in serpentine & magnesium rocks. |
|
TALC |
Apple green to white | Pearly on cleavage surface | White | 1.3 | 2.8 |
Greasy feel, common in extensive beds; with serpentine, dolomite, etc. |
|
MANGANESE (Mn) MANGANITE |
Iron black, dark steel gray | Metallic,
sub-metallic |
Reddish or blackish brown | 3.8 | 4.3 |
In veins traversing porphyry. Surface may yield a black streak |
|
PYROLUSITE |
Iron black, dark gray | Metallic, dull | Black, bluish black | 2.0 | 4.7 |
Often soils fingers; with psilomelane, limonite, barite. |
|
RHODOCROSITE |
Rose red, brownish red | Vitreous | White | 4.0 | 4.0 |
With silver, lead minerals, pyrite. May darken on exposure to air. |
|
MARBLE |
Variable | Vitreous to earthy | White or grayish | 3.0 | 2.7 |
Accidental impurities yield several varieties. |
|
MERCURY (Hg) (Free quicksilver) |
Tin white | Metallic, brilliant | 13.59 |
Rarely found in metallic state. |
||
|
CINNABAR |
Scarlet to brownish red | Adamantine, dull | Scarlet, reddish | 2.3 | 8.1 |
Characteristic color & streak in siliceous rocks; with realgar, marcasite. |
|
METACINNA-BARITE |
Grayish black | Metallic | Black | 3.0 | 7.8 |
With cinnabar & marcasite. |
| MICA
BIOTITE |
Greenish black, brownish black, black | Pearly,
sub-metallic |
Clear | 2.8 | 2.9 | Perfect cleavage, elastic flakes. In granite, gneiss; w/ muscovite. |
|
MUSCOVITE (Isinglass) |
Colorless, yellowish white | Vitreous, pearly, elastic | White | 2.5 | 2.9 |
Structure, cleavage and elasticity characteristic; in schist & granite rocks. |
|
VERMICULITE |
Grayish | Talc-like | Clear | 1.5 | 2.7 |
When heated, scales separate & become long, worm-like threads. |
|
MOLYBDENUM MOLYBDENITE |
Bluish gray | Metallic greenish | Dark gray, flexible | 1.3 | 4.8 |
Greasy feel, marks paper, heavier than graphite, lighter in color; with cassiterite and wolframite. |
|
MOLYBDITE |
Straw yellow | Silky to adamantine, pearly | 1.5 | 4.5 |
Found with molybdenite. |
|
|
POWELLITE |
Yellow with green tinge | Resinous | 3.5 | 4.5 |
Associated with argentiferous bornite. |
|
WULFENITE |
Wax yellow to orange, grayish |
Resinous adamantine | White | 2.8 | 6.9 |
Occurs with lead ores. |
|
NICKEL (Ni) |
Light copper | Metallic | Reddish, | 5.5 | 7.5 |
Occurs with calcite, galena, chalcopyrite, fluorite. |
|
GERSDORFFITE |
Silver white to gray | Metallic | Grayish black | 5.5 |
5.9 |
|
|
MILLERITE |
Brass yellow to bronze | Metallic crystals | Greenish black | 3.3 | 5.5 |
Gray iridescent tarnish; with pyrrhotite hematite. |
|
NICCOLITE |
Light copper red | Metallic | Dark brownish black | 5.5 | 7.5 |
Often with nickel bloom, nickel & cobalt minerals, native arsenic, bismuth. |
|
NITRATES (NO3) SODA NITRE |
White, reddish brown | Vitreous | White | 1.8 | 2.2 |
Cool taste, forms incrustations in beds. |
|
PHOSPHATES PHOSPHATE |
Gray | Dull | Gray | 5.0 | 3.2 |
Occurs in massive deposits. |
| POTASSIUM (K) | Pink, reddish | Vitreous | White | 3.8 | 2.7 |
With kaolin, pyrite. |
|
SYLVITE |
Colorless, white, bluish, yellowish red | Pearly | White | 2.0 | 1.9 |
Soluble; saline to bitter taste. |
|
PLATINUM (Pt) |
Dark steel gray, silver white | Metallic | Light steel gray, shiny | 4.5 | 22 |
Does not tarnish; with gold and chromite. |
| PALLADIUM (Pd) | Silver white, steel gray | Metallic | 4.8 | 12 |
Alloyed with platinum and iridium. |
|
|
RHODIUM (Rh) |
Brilliant, silver white | Metallic | 4.0 | 12.4 |
Found with other PGM’s & gold; weakly magnetic if with iron. |
|
|
IRIDIUM (Ir) |
Silver white | Metallic | 6.7 | 22.7 |
With platinum, gold & allied PGM’s and metals. |
|
|
OSMIUM (Os) Iridosmine |
Tin white to light steel gray | Metallic | 6.5 | 20 |
Iridium & osmium in variable proportions; alloyed with platinum metals. |
|
| RUTHENIUM (Ra) | Gray | Metallic | 12.2 | |||
| RADIUM (Ra) | Brown to black | Sub-metallic | Brown, black | 4.2 | 7.2 | With lead, silver, pyrite, uranium. |
| SILICON (Si) | Colorless | White | 7.0 | 2.6 |
Massive, stalactitic, as sand |
|
|
SILVER (Ag) |
Silver white | Metallic | Silver-white | 2.8 | 10.5 |
Tarnishes gray to black with gold, copper, platinum, etc. |
|
ARGENITE (Silver glance) |
Dark lead gray black | Metallic | Dark lead gray | 2.3 | 7.3 |
With cobalt, nickel, silver ores, cleaves like lead. |
|
CERARGYRITE |
Pearl gray | Waxy, greasy | White to gray | 1.8 | 5.6 |
With silver ores, cleaves like wax, changes color when exposed. |
|
PROUSTITE |
Scarlet, vermillion | Dull, adamantine | Scarlet | 2.5 | 5.6 |
With pyrargyrite & other silver ores. Light ruby colored ore. |
|
PYRARGYRITE |
Dark red, disseminated | Metallic | Cherry-adamantine | 2.8 | 5.8 |
In silver ore veins, especially proustite. Dark ruby colored ore. |
|
SULFUR (S) |
Reddish to straw yellow | Greasy-adamantine | Pale-yellow | 2.0 | 2.0 |
With celestite, clay, aragonite, gypsum, limestone beds. |
|
TELLURIUM (Te) CALAVERITE |
Pale bronze yellow | Yellowish gray | 2.5 |
Like sylvanite, krennerite. |
||
|
HESSITE |
Lead gray to steel gray | Metallic | 2.8 | 8.3 |
With chalcopyrite, gyrate, sphalerite. |
|
|
PETZITE |
Iron gray to black | Metallic | Gray | 2.5 | 9.1 |
Tarnishes often. |
|
SYLVANITE |
Steel gray to silver white | Brilliant, metallic | Steel gray, silver white | 1.8 | 8.1 |
Telluride of gold and silver. |
|
THALLIUM (Ti) |
Lead gray | Metallic | 2.8 | 6.9 |
A selenide of copper and thallium with a little silver. |
|
|
THORIUM (Th) MONAZITE |
Yellowish to brownish red | Resinous, vitreous | White | 5.3 | 5.1 |
Rounded grains in sand; with gold, magnetite, chromite, etc. |
|
TIN (Sn) CASITERITE |
Black, brownish | Sub-metallic, dull | Pale brown, pale yellow | 6.5 | 6.9 |
Alluvial deposits as stream tin; veins cutting granite; with wolframite, scheelite, molybdenite. |
| TITANIUM (Ti) | Iron black | Metallic | Black | 6.0 | 5.1 |
Strongly magnetic; in sand with pyrite, chlorite, feld-spars, bematite, quartz, ilmenite. |
| RUTILE | Iron black to reddish black | Metallic, adamantine | Pale yellowish | 6.5 |
4.3 |
|
| TUNGSTEN (W) | Dark green to pistachio | Highly vitreous | Greenish-gray | 4.8 | May be alteration product of scheelite. |
|
SCHEELITE |
Pale yellow to grayish brown | Greasy, adamantine | White | 4.5 | 6.0 |
With wolframite, fluorite, cassiterite, molybdenite. |
|
WOLFRAMITE |
Dark gray, brownish black | Sub-metallic | Dark reddish brown | 5.3 | 7.3 |
With apatite, huebernite, cassiterite. |
|
URANIUM (U) |
||||||
|
URANINITE |
Brown, blackish brown | Submetallic, dull | Brownish, grayish-black | 4.2 | 7.2 |
With ores of silver & lead; fresh material is hard and heavy. |
|
AUTONITE |
Lemon to sulfur yellow | Pearly to subadamantine | Yellowish | 2.3 | 3.1 |
A phosphate of uranium and calcium. |
|
CARNOTITE |
Canary to greenish yellow |
Resinous, dull, vitreous |
Yellow |
1.5 |
Power of loosely cohering masses; with azurite, magnetite etc. Mixed with sands. |
|
|
ZINC (Za) |
||||||
|
SMITHSONITE |
Green to gray to blue | Vitreous, dull | White, grayish | 5.0 | 4.3 |
With sphalerite & calamine. |
|
SPHALERITE |
Brown, yellowish & reddish | Submetallic, resinous | Light brown, yellow | 3.8 | 4.1 |
With galena, chalcopyrite, rhodocrosite; in limestones. |
|
ZINCITE |
Deep red, orange yellow | Subdamatine | Orange-yellow | 4.3 | 5.5 |
With franklinite, willemite, etc. |
Disclaimer
No guarantee is given regarding the amount of gold, silver, or other precious metals obtained from this process, as it depends upon the quality of your materials to begin with and your own skills. Always submit your samples to a ‘professional laboratory’ for final determinations, if you intend to represent your findings to third parties; they are ISO certified.
The kiln and kit materials are not toys and are not to be used by children. These are kilns that ultimately generate temperatures in excess of 2200F degrees. Do not allow children or other people or animals in the immediate area when you are firing. Use at your own risk and follow all recommended and common-sense safety precautions. Sellers are not responsible for accidents or injuries caused by hot kilns or the contents thereof. Using one purchased from this seller acknowledges that you use it at your own risk.
Please remember that traditional smelting, assaying and cupelling furnaces are composed of fireproof materials. A microwave oven is made of materials that can burn under certain conditions, so use the kiln only as directed in the instructions. Other uses void all expressed or implied warranties.
GPK Company, LLC’s and Caren Seabeneck’s and Patrick Moulton’s permissions to publish The Art of the Microwave Assay book.
Get the hard copy at https://goldkilns.us/product/book-a-practical-guide-to-modern-alchemy-the-art-of-the-microwave-fire-assay/
