Table of Contents
Before starting to work at Practical Chemistry it is necessary that the student should have some knowledge of how to cut, bend, draw down, and round off the ends of glass tubing, make closed and bulbed tubes, mend test- tubes, top and bottom, and fit up a decent wash-bottle. In this chapter is included also the graduating of test-tubes and beakers, so that the student from the beginning can work economically with regard to the use of reagents.
Cutting Glass Tubes
To cut a glass tube the simplest method is to make a sharp scratch on one side of it with a three-edged file where it is desired to cut, then take the tube in both hands, keep the scratched side from you, and placing the thumbs on either side opposite the scratch, press gently towards you.
If large tubing is to be cut, it is necessary to make a deeper scratch, and sometimes to file to some depth all round the tube.
Where delicate apparatus, such as a test-tube, etc., has to be dealt with, the above method must not be used, but the following:
Make a scratch with a file and touch it with the end of a very small piece of glass, drawn out and heated at the tip to its melting point. If the heated point is not fine, the fracture is likely to be uneven. To start the crack, it is found best to use glass similar to that being cut. If the crack does not pass quite round the tube, bring the heated piece of glass with which the crack was started to one end of the crack, and slowly move it (nearly touching the glass) in the required direction. The crack will be found to follow the movements of the hot glass.
Bending Glass Tubes
To bend small tubes and tubes of a moderate size of soft glass, use a fish-tail burner, similar to one used for the purpose of illumination. The flame should be from 1½ to 2½ inches in breadth, so that a fair surface of the tube can he heated and a good bend may result. If a narrower flame is used, less surface of the glass can be heated, and the result is generally a buckling on the concave side.

The tube to be bent should be held in the position shown in fig. 1, supported by both hands, one on either side of the flame, and should be constantly rotated, so that it may be equally heated on all sides.

When the tube has softened, remove it from the flame and allow it to bend to the angle required
by its own weight, slightly relieving the pressure by placing the thumb under the bending end, as shown in fig. 2.
A tube well bent should show no compression or sign of buckling at the bend, and the bore should be of uniform size all through.
When hard glass tubing is required to be bent, the foot blowpipe or a bunsen burner fitted with a fish-tail jet must be used for heating the tubing.
Drawing down Glass Tubes
For the purpose of making a jet for the wash-bottle, a piece of glass tubing the same thickness as is used for the mouthpiece can be drawn down. Take a piece of tubing from 3 to 4 inches in length, hold it in both hands between the thumb and first finger, keeping the thumbs at least 2½ inches apart, and rotate it over a pointed flame. When the glass is sufficiently soft remove it from the flame, still rotating it, and then pull it out suddenly. If the operation is performed successfully, the drawn down tube will have the appearance shown in fig. 3.

A small surface of the glass only is required to be heated, hence a pointed flame is used; and according to the hardness of the glass, so either a small bunsen or a fine blowpipe flame can be used.
Rounding and Bordering the ends of Tubes
The sharp edges left after cutting glass tubing can be rounded off by holding them in a flame for a few minutes until the glass begins to molt. When the
end of the tube is required to be closed by a cork or stopper, its mouth should be expanded a little or
bordered. To do this, heat the end of the tube uniformly all round by rotating it in the flame till it
softens, then remove it from the flame, at once introduce the charcoal cone, as shown in fig. 4, and rotate it with gentle pressure against the softened glass till the desired effect is produced.

Making Closed Tubes
To make closed tubes it is best to take a piece of hard glass tubing about 7 inches long and 3/8 inch in diameter, as this will make two closed tubes such as are used in the dry tests in chemistry, without much waste of tubing. Adjust a blowpipe flame so that it will heat a zone of glass about as broad as the diameter of the tube. Hold the tube on each side of the point where it is to be closed, in the same manner as described in fig. 1. Bring the tube gradually into the flame, and heat it with constant rotation till the glass softens. When the glass begins to thicken, gently pull asunder the two ends, taking care not to pull out the softened glass too much, but to allow the sides to fall together, as shown in fig. 5. When this is done, heat the glass at the narrow part till it melts, and pull asunder the two ends. The closed ends should present the appearance shown in fig. 6.

If a considerable mass of glass be left at the closed end, it may be removed by heating it to redness, touching it with the pointed end of a cold glass tube, to which it will adhere, and by which it may be pulled away.

Making Bulb Tubes
To make a bulb tube, make a closed tube first, heat up the closed end in the flame, keeping the tube rotated all the time until the mass of glass becomes thoroughly softened, then remove from the flame, and holding the closed end downwards, blow gently down the tube. Repeat this until the mass of glass at the closed end is worked out to the same thickness as the tube and a bulb is formed similar to the one shown in fig. 7.
Mending Test-tubes
To mend the tops of test-tubes, proceed exactly as in “ Rounding and Bordering the Ends of Tubes,” only first cut the tubes off evenly with a piece of hot glass as mentioned in “ Cutting Glass Tubing.”
To mend the bottoms of test-tubes, cut off evenly as above, and close them with another piece of glass tubing; then gently heat up the closed ends, and proceed as in making bulb tubes, only, instead of blowing, breathe gently into the tubes, as they are made of very thin glass.
Fitting up a Wash bottle
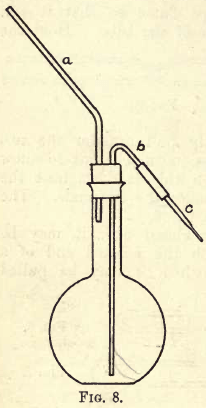
Choose a flat-bottomed flask capable of holding from 750 c.c. to 1 litre, also a good cork to fit this flask; in the cork bore two holes parallel to one another, but before boring the holes be sure and soften the cork by wrapping it in a piece of paper and rolling it under the foot. Then take a piece of glass tubing about 3/16- inch bore and about 9 inches long, and 3½ inches from the end bend it through an angle of from 40° to 45°. Take another piece of tubing of the same bore sufficiently long enough to reach to the bottom of the flask, and pass through the cork 3½, inches, and about 2 inches from one end bend it through an angle of from 135° to 140°. Round the ends of both pieces of tubing and fit them into the cork as shown in fig. 8. Draw down a piece of tubing for a jet and attach it to b by a piece of caoutchouc tubing. Fit the cork and tubing into the flask, and a wash-bottle similar in appearance to that shown in fig. 8 will be the result. b and c together should be equal in length to a, and should fall in the same plane.
The glass tubing should fit tightly into the cork, so that when you blow through a no air can escape except through c.

Graduating Test tubes and Beakers
Take test-tube of about 30 c.c. capacity, clean it thoroughly and dry it; then rake a jar of 100 c.c. capacity, graduated in c.c.’s and provided with a spout. Fill the graduated jar up to the 100 c.c. mark with distilled water, keeping the temperature of the water as near as possible to 15° C. Pour out 5 c.c. into the test-tube carefully, and, holding the test-tube in a vertical position, make a small scratch on it with a file at the bottom of the meniscus of the water, then add another 5 c.c. of water and mark the same as before, and so on until 25 c.c. has been measured out. Take a beaker of about 200 c.c. capacity and graduate this in a similar way to the test-tube, only marking it at
every 50 c.c. instead of 5 c.c. (fig. 9).

The above method is only a very rough way of graduating vessels, but these measurements will be found very useful when different quantities of reagents are required, and quite near enough to prevent students at the beginning of their course using too large quantities, thus avoiding waste.
Blowpipe Flame test and Borax bead
A luminous flame is used with the blowpipe, and this can be produced by inserting a piece of brass tubing into an ordinary bunsen burner as shown in fig. 10.

The jet of the blowpipe is placed in the flame (see fig. 11), and a steady blast can be maintained by breathing through the nose and keeping the cheeks inflated. The stream of air is not expelled directly from the lungs, but from the mouth by the action of the muscles of the cheeks.
In structure, the blowpipe flame is similar to the ordinary flame, and consists of three distinct cones: the innermost, A, is a cool mixture of air and combustible gas; the middle, R, termed the reducing flame, because there is not sufficient oxygen to cause complete combustion of the gas, and the outermost ; O, termed the oxidising flame, where there is a free supply of oxygen from the air, and in which any substance which combines with oxygen at a high temperature is oxidised.
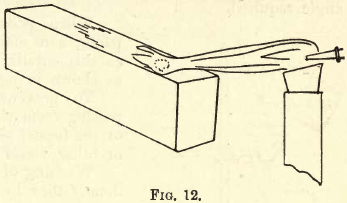
A simple experiment will prove the action of the blowpipe flame at R and O. In a shallow cavity cut in the surface of a charcoal block (see fig. 12) place a little PbO and allow the point R of the flame to act upon it; in a short time metallic Pb will appear in the cavity, and further along on the charcoal, where the cone O has reached, you will see an incrustation of PbO. Now allow the point O to act upon the reduced Pb and you will notice a film of oxide soon forms on its surface.

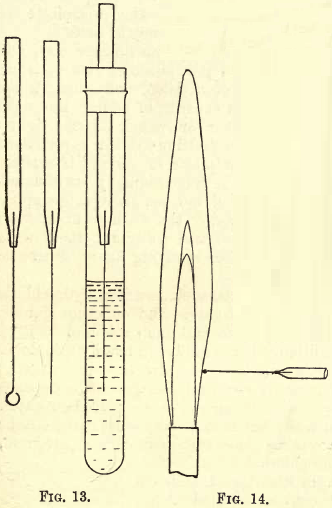
In flame reactions the substance to be tested, held either in a loop of Pt wire or on a straight piece of Pt wire, is brought into the lower outer edge of a bunsen flame, when the whole of the outer cone is coloured or rendered luminous by the substance (see fig. 14).

The borax bead is made by fusing borax in a loop of Pt wire until the borax when cool is quite clear and transparent. In testing for colour reactions before the blowpipe, very small particles of the substance should be fused into the bead, and care should be taken to form the flame properly before placing the bead in it.
Filtration is the separation, by a porous medium, of solids from liquids, whereby the solids are collected on this medium and the liquids pass through. Porous paper, known as filter paper, and cut in circular pieces of different sizes, is mostly used for this purpose.
These papers are folded as shown in fig. 15 to fit into the glass filter funnels.
The cone of the filter funnel used should always be a little deeper than the filter paper, so that the glass projects slightly above the paper when fitted in.
The filter paper when placed in the funnel should be moistened with distilled water and made to fit closely to the funnel.

If the filter paper, when folded at right angles to the first fold, is too small to fit closely into the funnel, a second fold should be made at the angle required.

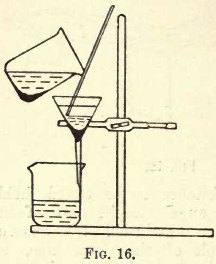
When pouring the liquid on to the filter paper, care should be taken to prevent splashing, as this entails loss. Use a glass rod, and pour as shown in fig. 16.
To prevent splashing when the solution is passing from the funnel to the receiver, the stem of the funnel should touch the side of the beaker or other vessel employed as a receiver.
Washing of Precipitates and Residues can be done either by decantation or filtration; in both cases the solution used for this purpose should have no solvent action upon the precipitate or residue. Distilled water is much used.
Decantation is generally the quicker way, and can be used when the precipitate or residue is not in a very fine state of division, and when its sp. gr. is much greater than the wash solution. It consists of adding the wash solution to the precipitate or residue in a beaker or vessel, stirring it up well, allowing the solid matter to settle, and then pouring off the supernatant liquor, and repeating this operation until the precipitate or residue is entirely freed from any trace of the solution with which it was originally surrounded. When the precipitate or residue is very fine or of low sp. gr. it is generally washed on to the filter paper in a funnel by spraying the wash solution from a wash-bottle over it until it is free from the original solution. Each wash solution should be allowed to filter right off before spraying again, otherwise the washing will not be found complete.
Solution is the result of the action of solvents, such as water, hydrochloric acid, etc., on solids, such as metals, salts, etc.; on gases; and on other liquids. What is meant by putting a salt into solution is to add such solvents to it as will convert it totally into a liquid condition. Some solids are readily soluble in their solvents, while others are difficulty soluble and require the application of heat. Solution is accompanied sometimes by chemical changes; this depends upon the nature of the substances employed. If some nitre be placed in water, the result is a solution of potassium nitrate; but if some potassium carbonate be put into hydrochloric acid, effervescence takes place, carbon dioxide is given off, and the result is a solution of potassium chloride.
Evaporation is the conversion from the liquid state to the gaseous or vaporous state, and can be effected either by the application of external heat or without; the latter is termed spontaneous evaporation.

The separation of solids from liquids, the concentration of liquids, crystallisation of salts from solution, etc., can be effected by means of evaporation. Where it is necessary to exercise care and high temperatures are not required, a water-bath is generally used for evaporating solutions. If there is not a water-bath handy, one can be improvised as shown in fig. 17.
Where rapid evaporation is required, a porcelain dish set on wire gauze on a tripod over a bunsen (with rose burner) is used, as shown in fig. 18. As the process approaches completion, the flame must be lowered to prevent ‘ spurting,’ which entails loss.
Fusion is the conversion of a substance from the solid to the liquid state by the application of heat. This must not be confounded with putting a substance into solution. In the case of fusion, after the removal of heat the liquid assumes the solid state again.
Chemical action takes place on fusion sometimes where it does not on solution. When barium sulphate is fused with about five times its weight of sodium potassium carbonates in a porcelain crucible and the fused mass is treated with water, the solution will be found upon examining to contain sodium and potassium sulphates; and upon treating the residue with hydrochloric acid, it will go into solution with effervescence, and will be found to contain barium carbonate. Barium sulphate is insoluble in hydrochloric acid, so during the fusion chemical action has gone on between the carbonates and the sulphate. (See fig. 19.)

Precipitation is the throwing down from solution, by the addition of another substance (usually in solution), of a substance insoluble in the remaining solution. The substance thrown down is called the precipitate. Precipitation is the result of chemical action. If you dissolve a little mercurous nitrate in water and add hydrochloric acid to this solution, you get a precipitate of mercurous chloride thrown down, insoluble in the solution which remains. The hydrochloric acid is called the precipitant. Precipitation may be complete or incomplete. Some precipitates are soluble in excess of the precipitant, hence care must be taken in the addition of the precipitant; on the other hand, if the addition of the precipitant is not sufficient, the result will be incomplete precipitation. Students should always exercise due care with regard to precipitation, and, after filtering, test their solutions to see if it is complete by adding to the filtrate a little more of the precipitant.
Ignition is a term used rather freely in chemistry; it really means the raising of the temperature to that point at which a substance inflames, or in other words, the combustion of a substance; very often in chemistry it is applied to the process of driving off foreign matter from a precipitate by strongly heating. When the student is directed to wash, dry, and ignite a precipitate, the last term is not always used in the sense of decomposing or altering the composition of the precipitate, but simply means ridding it of foreign matter. Heat gently or strongly are terms preferable for use in most cases.
